Floor Water Damage. Tips From Professionals
Wood floors look great and add sophistication and style to any room in a home. While wood floors are relatively durable, water can damage them. If your wood floors have water damage, this information can help you address the problem.
Floor Water Damage:
If you notice water damage on your floor, the first step is to find the source and stop additional water from flowing to the floor. The next step is to remove the water as soon as possible, followed by removing furniture and extra weight. Give the floor time to dry. If parts of your floor are severely damaged, it may be necessary to replace those areas.

In this article, I will further explain how to spot water damage on your floor. Sometimes it is clearly visible, but in some situations, it is harder to spot. If the water has been removed, I will show how to prevent damaged floorboards and swelling. And in the case of watermarks, I will show how to hide the water damage.
Contents
- 1 What Does Water Damage on Wood Floors Look Like?
- 2 Can Water Damaged Wood Floors Be Refinished?
- 3 How To Prevent Water Damaged Floorboards
- 4 How To Prevent Wood Floor Swelling from Water
- 5 What Happens If Water Stays on Wood Floor?
- 6 How to Hide Water Damage on Wood Floors?
- 7 What Happens If Water Gets Under Linoleum?
- 8 The Reaction of Different Flooring Materials to Water Exposure
- 8.1 ● Limitations of Laminate Flooring with Water
- 8.2 • Timely Action & Preventive Measures
- 8.3 • Linoleum: Resisting Moisture, But Not Waterproof
- 8.4 • The Trouble with Trapped Moisture
- 8.5 • The Role of Leaky Pipes
- 8.6 • Impact of Poor Ventilation
- 8.7 • Adverse Effects of Water Damage
- 8.8 • Immediate Moisture Wiping
- 8.9 • Damage Control for Linoleum Water Damage
- 8.10 • Preventive Measures for Water Damage
- 8.11 • Identifying and Fixing the Source of Water Damage
- 8.12 • Spotting Hidden Water Damage on Wood Floors
- 8.13 • Preventing Future Damage After Water Removal
- 8.14 • Hiding Water Damage on Wood Floors
- 8.15 • What Happens to Linoleum Flooring
- 8.16 • Water Damage in Vinyl Flooring: Understanding, Prevention, and Solution
- 8.17 • Vulnerability of Vinyl Flooring
- 8.18 • What Causes water damage in Vinyl Flooring?
- 8.19 • Detecting Water Damage in Vinyl Flooring
- 8.20 • Importance of Compliance to Manufacturers Installation Standards
- 8.21 • Techniques to Test Moisture in Concrete Slabs
- 8.22 • Seeking Professional Help
- 8.23 • Personal Recommendations for Water Damage Prevention
- 8.24 • Signs of Water Damage: Discoloration and Other Issues
- 8.25 • Curling and Lifting Seams: A Sign of Trouble
- 9 The Damaging Effect: Bubbles on the Linoleum Surface
- 10 Spotting Water Damage on Wood Floors
- 10.1 • Refinishing Water Damaged Wood Floors
- 10.2 • Preventing Water-Damaged Floorboards
- 10.3 • Preventing Wood Floor Swelling From Water
- 10.4 • The Consequence of Water on Wood Floors
- 10.5 • Concealing Water Damage on Wood Floors
- 10.6 • The Impact of Water on Linoleum Flooring
- 10.7 • Effects of Excess Moisture on Hardwood Floors
- 10.8 • Importance of Proper Hardwood Floor Installation
- 10.9 • Possible Home Remedy for Minor Water Damage
- 10.10 • Intervention for Severe Buckling and Water Damage
- 10.11 • Preventive Measures Against Buckling for Hardwood Flooring
- 10.12 • Where to Look? Express Flooring
- 10.13 • Recognizing Different Types of Water Damage on Wood Floors
- 10.14 • Rehabilitating Water-Damaged Wood Floors
- 10.15 • Prevention Measures Against Water-Damaged Floorboards
- 10.16 • Steps to Avoid Wood Floor Swelling
- 10.17 • Consequences of Water Staying on Wood Floors
- 10.18 • Tips on How to Hide Water Damage
- 10.19 • Understanding Water Damage Underneath Linoleum
- 11 Identifying the Source of Water Damage
- 11.1 • Removing Furniture and Excess Weight
- 11.2 • Use of Ventilation and Commercial Drying Equipment
- 11.3 • Damage Types to Wood Floors
- 11.4 • Effects of Ignoring Water Damage
- 11.5 • Refinishing the Entire Floor
- 11.6 • Preventing Water Damage
- 11.7 • Water Damage to Linoleum Flooring
- 11.8 • Hiding Water Damage is Not a Solution
- 11.9 • Allow Evaporation Before Repairs
- 12 Essential Tools for Addressing Water Damage on Wood Floors
- 12.1 • Tracing and Addressing Water Infiltration Points
- 12.2 • Using a Shop Vacuum for Water Extraction
- 12.3 • Importance of Cleanup: Mixing Detergent and Disinfectant
- 12.4 • Dealing with Mold: Using Trisodium Phosphate (TSP)
- 12.5 • Drying the Floor: A Slow and Natural Process
- 12.6 • Dealing with Flooring Deformities: Sanding High Areas
- 12.7 • Addressing Mold Under Painted Floors
- 12.8 • The Issue with Laminate Flooring and Water
- 12.9 • The Consequences of Wood Floor Water Damage
- 12.10 • Recognizing the Indicators of Water-Damaged Hardwood Floors
- 12.11 • Effective Remedies for Swollen Wood Floors
- 12.12 • Applying the Five-Step Drying Process
- 12.13 • Utilizing a Water Vacuum for Cleanup
- 12.14 • Proactive Measures: Mats, Rugs, and Regular Inspections
- 12.15 • The Protective Value of Sealing Hardwood Floors
- 12.16 • Dealing with Water Damage to Engineered Wood Floors
- 12.17 • Professional Help for Water-Damaged Floors
- 12.18 • Common Queries About Water-Damaged Wood Floors
- 12.18.1 – Identifying Your Flooring Type After Water Damage
- 12.18.2 – Evaluating Mold and Mildew Presence
- 12.18.3 – Checking for Underlying Water Damage Signs
- 12.18.4 – Comparing DIY Repairs vs. Professional Assistance
- 12.18.5 – Accommodating Specific Room Needs
- 12.18.6 – The Importance of Prompt Restoration
- 12.18.7 – Opting for 50 Floor for Replacement Flooring
What Does Water Damage on Wood Floors Look Like?
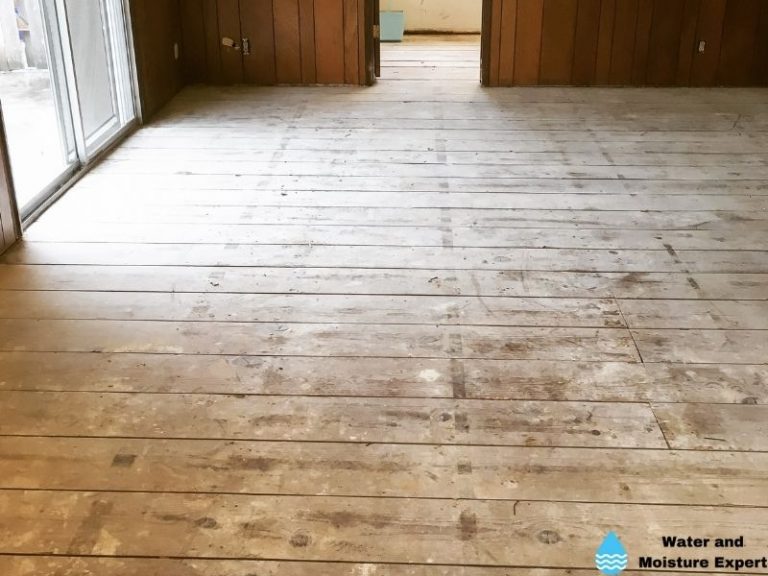
Water can cause different types of damage to wood floors. The longer water sits on a floor, the worse the damage will be. If you think your wood floors may have water damage, look for some of these signs.
● Water Damaged Wood Floor Cupping
Cupping occurs when the outside edges of the wood flooring rise higher than the centers. This can happen even if you don’t see standing water on the floor. If there is too much moisture in a room, it can cause the wood to swell and push the boards together. The pressure between the boards causes the sides to warp and become damaged.
● Water Damaged Wood Floor Crowning
Crowing happens when the center of the wooden boards lifts up, and the edges pull down. The wood floors may appear as arches or humps throughout the room. This occurs when there is too much moisture on the surface of the wood and not as much on the bottom. Wood absorbs excess moisture and swells. Crowning occurs more often in the summer when there is more humidity.
● Water Damaged Wood Floor Staining
When water sits on a wooden floor too long, it can start to stain the boards. Staining can appear as a white or dark color and is a sign that the floor’s finish is damaged. White stains are easier to remove and are usually a sign that the damage is only on the surface of the wood. Black stains are a sign that the water has penetrated deeper into the wood and that the damage is more severe.
● Water Damaged Wood Floor Buckling
Floors that buckle can have wooden boards sticking up from the floor or pulled up in the corners. Buckling usually occurs after a flood and is considered a sign of severe water damage. It may affect a small area or the entire floor. If your wood floors are buckling, there is a good chance the subfloor is damaged as well.
Can Water Damaged Wood Floors Be Refinished?
Water-damaged wood floors can and should be refinished. I recommend repairing or replacing the damaged part of the floor and then refinishing the entire floor. This will ensure that the subflooring and bottom of the floor are structurally sound and the surface is well-blended and has the same finish. Even if you don’t have to replace or repair the entire floor, you should still consider refinishing it all.
How To Prevent Water Damaged Floorboards
While most water damage occurs due to accidents or unexpected flooding, there are things you can do to prevent your floorboards from being damaged by water.
● Clean Up Spills Immediately
Never leave water standing on a floor. Even small spills such as a tipped-over drink can damage the floor. The water can run down into the floorboards and cause the wood or the subfloor to swell. Cleaning up the spills immediately will remove the liquid before it has a chance to seep deeper into the floor.
● Check For Leaks Often
Even small drips and leaks that go unnoticed or unrepaired can lead to severe water damage. A continuous drip can spread to large areas of the floor and cause damage. By checking your sinks, faucet, toilets, and appliances often, you can identify leaks before they become severe and have a chance to damage your flooring.
● Seal Windows and Doors
Water can easily get inside your home if your windows and doors are not correctly sealed. You may not always notice water leaking in, but it could be running behind the walls and into your floor. Check your windows and doors to make sure they are sealed, and no water can get inside and ruin your flooring.
● Check the Roof for Leaks
When your roof is leaking, water may find its way to your floor. If the leak is larger, you probably will see spots on the wall, closer to the roof. But when the leak is smaller, the water can also find a way through the wall and will only be visible when it can’t go further at floor level.
How To Prevent Wood Floor Swelling from Water
If your floors do get wet, you may be able to clean up the water before the wood starts to swell. The amount of water and the length of time it has been standing on the wood will determine if you can save your floors and what you should do.
● Clean Up The Water Quickly
The faster you remove the water from the floor, the less likely it will be to swell. Depending on the amount of water on the floor, you may be able to clean it up with a mop, towels, or a sump pump.
● Remove Furniture and Extra Weight
The more weight on the floor, the more the water will soak into it and flow towards specific areas. If you notice there is water on your floor, remove any furniture in the room immediately. This will also make it easier to remove the moisture and dry the floors.
● Dry The Floors
It’s not enough to remove the water from the floor. You also have to dry the floors before they swell. The water will likely have soaked into the floor before you can get it cleaned up thoroughly. Drying the floor will pull the water out of it before it causes the wood to swell. You should ventilate the room, bring in fans or even commercial drying equipment to try to dry the floors as quickly as possible.
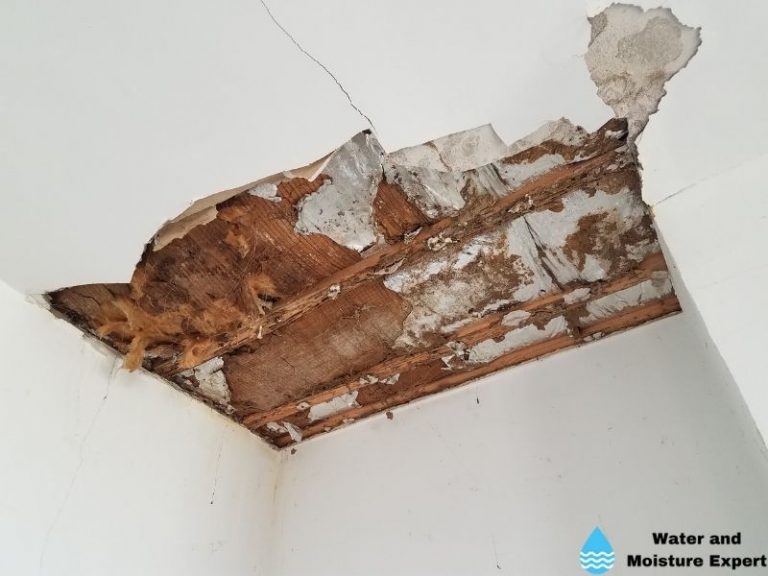
What Happens If Water Stays on Wood Floor?
It’s never a good idea to allow water to stay on your floor. Removing it as soon as you notice it will help you avoid severe water damage. Many different things can happen if water is allowed to stay on the floor.
● Surface Damage
The most common type of water damage I see on floors is surface damage. This damage reaches the top layers of the floor and may not be deep into the wood. It can include staining, swelling, and even lifting or cupping boards.
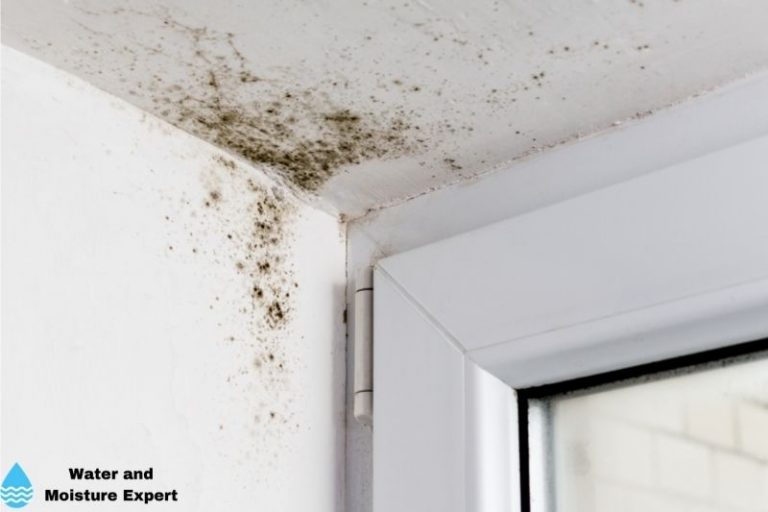
● Mold Growth
Some people may not consider mold growth a type of damage, but if it occurs, it will need to be removed and could result in flooring and even subflooring replacement. Mold can grow due to too much moisture in a home. This could be due to water standing on a floor or just excess moisture due to humidity. If the mold growth is too severe, you may need to hire a professional mold remediation crew to remove the mold before you can repair the flooring safely.
● Subfloor Damage
If the water has been on the floor for an extended period of time, it can cause damage to the subfloor. This is a more severe type of damage and requires total replacements. If there is subfloor damage, there is likely noticeable surface damage as well, but this is not always the case. I have seen many situations where the water started beneath the subfloor and worked its way up to the surface.
● Structural Damage
The worst-case scenario of water damage is structural damage. This often occurs with significant flooding or severe leaks where the water has been left standing for a long time. Structural damage means the water has affected the foundation of the home and the frame of the floor and walls. Damage to the structure of your home could be costly and difficult to repair.
How to Hide Water Damage on Wood Floors?
While you may be tempted to hide your water-damaged wood floors, it’s not a good idea from a professional standpoint. I’ve always found that it’s best to repair any water damage as soon as you find it. This will prevent the possibility of more severe damage and could reduce the amount of time and money spent on the repairs.
I suggest only hiding the cosmetic aspects of damaged floors. Make sure any structural damage has been repaired to avoid safety issues and further damage. If you want to hide your water-damaged floors until you can replace or repair them, there are a few simple ways you can do so.
● Hide water damage with Rugs
You can use large or small area rugs to cover up the damaged areas of the flooring.
● Hide water damage with Furniture
You may be able to move your furniture around to hide the parts of the flooring that are damaged.
● Hide water damage with Artificial Plants
Use tall or wide artificial plants to hide the damaged flooring areas. You can also use live plants, but it may not be a good idea to risk more water damage since they need water to grow.
What Happens If Water Gets Under Linoleum?
Wood floors are not the only type of flooring that suffer from water damage. Linoleum may have a water-repellent surface, but that doesn’t mean standing water can’t damage it. Water may find its way underneath linoleum floors, where it can soften and damage the subfloor and break down the adhesive that holds it in place. This can cause the edges of the linoleum to lift and peel back or bubble up.
Similar to most other floor types, you should find the source of the water and stop. If the water flow is stopped, dry the linoleum. If it is loose on the floor, you can try to lift parts to make drying easier. Ensure that the moisture under the linoleum can evaporate. This can take much longer than you think.
The Reaction of Different Flooring Materials to Water Exposure
Flooring materials respond differently to water exposure. Their reaction depends largely on their composition and their level of porosity.
The implications could range from simple cleaning and drying to complete replacement. It is essential to understand the behavior of different flooring materials when exposed to water.
● Limitations of Laminate Flooring with Water
Laminate flooring is notorious for quickly absorbing water, leading to delamination. The absorption occurs almost instantaneously, leading to bloat and deformity. When soaked, the acrylic resin fibers in the laminate separate, making it difficult to fix the damage.
This flooring is an economical option that imitates the look of real hardwood or stone. However, its ability to absorb water quickly can seriously hamper its longevity in areas prone to dampness or flooding.
According to the University of Minnesota, it is best to replace this type of flooring immediately when water damage is evident.
● Challenges with Vinyl Flooring
Vinyl flooring including linoleum, acts like a water barrier but has its own set of challenges when subjected to water damage.
When water gets underneath it, it needs to be removed to allow the subfloor beneath to dry. The good news is once the water is evaporated, the flooring can be reinstalled if it is not damaged.
However, if left submerged for too long, the vinyl layers may separate, causing irreparable delamination. Thus, early detection and quick response are essential when water leaks occur on vinyl flooring.
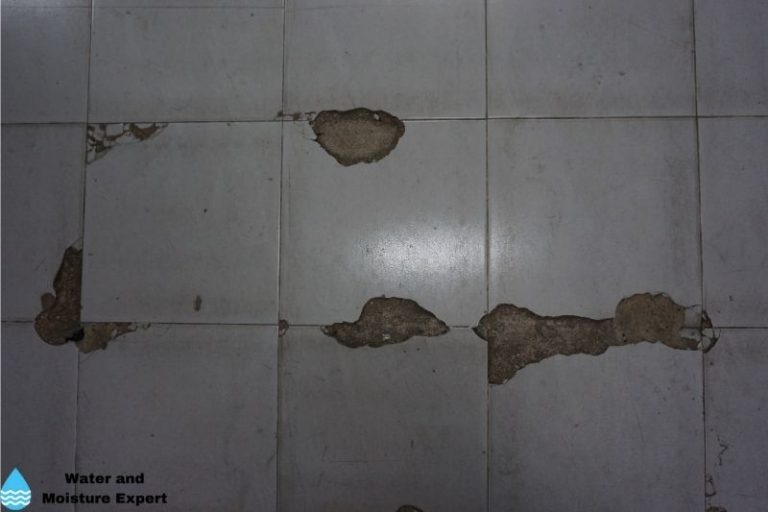
● Ceramic Tile Floors and Water
Ceramic tile is one of the best materials for handling water damage. It is non-porous, so water does not seep through and reach the subfloor.
However, if water gets under the tile through loose grout or broken tiles, it may not dry easily and can cause problems down the line. It’s vital to inspect for loose tiles or degraded grout and manage repairs promptly to prevent issues.
● Wood Flooring and Water: A Vulnerable Match
Wood flooring is semi-porous and can absorb water through its joints. While its rich aesthetic appeal draws homeowners, its susceptibility to warping and staining is a worrying factor.
Early detection can allow for restoration using drying mats and heaters. Failing to do so may result in permanent damage to the wood.
Given the heft of natural wood floorings, quick response to any water spillage is crucial. Wood generally darkens with water exposure.
Timely drying and sanding can offer moderate salvage in early-stage water exposure. However, if left unattended, the staining could seep even deeper and ruin the flooring entirely.
● Importance of Prompt Water Clean-up
Whether it’s wood, vinyl, laminate, or ceramic, it’s essential to clean water off the flooring promptly. Each type of material has unique characteristics that respond differently to water, causing respective damages.
The key to preventing damage and restoring these floors to their pre-loss condition is rapid response and adequate clean-up.
● Professional Water Damage Restoration
When it comes to repairing and restoring flooring materials after water damage, seeking professional help is advisable.
Professional services like ServiceMaster of Greater Pittsburgh can locate the source of water, extract it, and restore materials to their pre-loss condition using the right drying equipment.
Professionals are equipped with moisture-sensing equipment. They can detect and extract invisible water in carpets and walls that homeowners might miss. They use commercial-grade fans, dehumidifiers, and other equipment to speed up the drying process rapidly.
• Timely Action & Preventive Measures
To conclude, water does not play well with most flooring materials. Delays in cleaning and drying can result in costly and sometimes irreparable damage.
Regular maintenance, immediate clean-up of spillages, and hiring professional water restoration services, when needed, can go a long way in prolonging the life of your flooring.
• Linoleum: Resisting Moisture, But Not Waterproof
One common misconception is that linoleum is waterproof. However, this is not the case. Linoleum is actually water-resistant. While it can repel water to some extent, issues can arise if water remains on the linoleum floor for longer periods.
Over time, moisture can seep through the seams of the linoleum floor coverings, penetrating underneath the surface and causing problems with the floor beneath.
• The Trouble with Trapped Moisture
Where does the collected water go if not absorbed by linoleum? Unknowing to many, linoleum acts as a vapor barrier.
This means it traps moisture under the floor, which can lead to an assortment of problems. The trapped moisture can cause distortion and warping of the floor, making it uneven and visually unappealing.
• The Role of Leaky Pipes
Another common culprit for water damage under the linoleum floor is leaky water pipes. If pipes under or near your floor are leaking, water can slowly accumulate under the linoleum tiles.
Over time, this accumulated water can lead to warping and gradual damage to the floor. For valuable information about the detection and management of leaking pipes, visit EPA’s website.
• Impact of Poor Ventilation
Just like leaky pipes, poor ventilation can also lead to water damage on linoleum floors. Poor ventilation creates a humid environment, causing moisture to condense in cooler areas like the floor. This moisture can then seep beneath the surface, accumulating under the linoleum and leading to water damage.
• Adverse Effects of Water Damage
What happens when water finds its way beneath the linoleum? Excess water can cause distortion and discoloration of the linoleum, making it appear worn and unsightly.
Besides this, mold can take hold and proliferate, posing a health risk. Also, water damage to the subfloor is another critical issue that could necessitate a complete overhaul of your flooring.
• Immediate Moisture Wiping
In case of water spills, it is essential to clean up the water immediately to prevent further damage. Immediate wiping away of the moisture can effectively stop seepage through the floor, hence preventing damage to the subfloor.
• Damage Control for Linoleum Water Damage
Once you detect water damage under the linoleum floor, the best course of action is to remove the linoleum tiles, dry the subfloor, and then reapply an adhesive to repair the damage. However, this may not be feasible in severe cases. In such instances, you may need to replace the entire floor.
• Preventive Measures for Water Damage
Prevention is better than cure. To prevent water damage on linoleum flooring, several steps can be taken. Firstly, keeping the floor dry is a basic but essential step.
Also, ensuring proper ventilation can substantially reduce moisture accumulation. The application of a sealant is another effective strategy to prevent moisture from seeping through the floor.
The use of a waterproof subfloor is another strategic, long-term solution. Regular maintenance checks are vital to identify any budding issues while still manageable, hence avoiding expensive repair or replacement costs.
In conclusion, while linoleum floors have several benefits, it’s important to be aware of their vulnerability to water damage. With proper care and preventive measures, you can significantly enhance the durability of your linoleum floors.
• Identifying and Fixing the Source of Water Damage
The first step towards dealing with water damage on your wooden floors is to identify the source of water. There could be numerous reasons for water damage, from leaky pipes to heavy rain seepage.
Before you embark on fixing the damaged floor, it’s pertinent to identify and fix the source of water damage.
Fixing the Source
Based on the water damage’s root, different actions must be taken. If a leaky pipe is causing water damage, then you should get it fixed immediately. If rainwater accumulates due to poor drainage, consider altering your house’s drainage system.
Always remember that addressing the cause first will prevent further damage to your floors and save you time and money in the long run.
• Spotting Hidden Water Damage on Wood Floors
When exposed to water, wood tends to darken. However, the untrained eye may not identify the signs of water damage promptly. Here are steps you can take to spot water damage on your wood floors:
Visual Inspection: Look for dark stains, discolored patches, or spots with a whitish hue, indicating water damage.
Physical Inspection: The feel of the wooden floor may also change, becoming cupped, warped, or buckled. If it feels different underneath your feet, you likely have water damage.
For more information on how water damage may appear on your wood floors, visit this page on the University of Minnesota’s web (Link).
• Preventing Future Damage After Water Removal
If you’ve successfully located and fixed the water damage source, you may be wondering how to prevent future damage. Always remember that prevention is better than cure.
Proper Ventilation: After water removal, ensure that your room is properly ventilated to prevent moisture from accumulating on the floorboards. This may lead to swelling or further damage.
Regular Maintenance: Regularly check your floorboards for any signs of water damage. A quick response can significantly reduce the potential damage caused by water leakage.
• Hiding Water Damage on Wood Floors
In some cases, the water damage on your wooden floors may not be severe enough to warrant a total replacement. You might want to consider these tips on hiding water damage on your wood floors:
Using Wood Filler: If your wooden floors have holes or cracks due to water damage, a wood filler can make them look like new again. This is a more cost-effective method compared to complete floor replacement.
Refinishing Your Floor: Refinishing involves sanding down the top layer of affected wood and applying a fresh coat of finish. A well-executed refinishing job can hide the most glaring signs of water damage.
• What Happens to Linoleum Flooring
When water seeps under linoleum flooring, the ensuing damage can be significant. Unlike wooden floors, linoleum floors cannot absorb water, leading to immediate swelling and buckling.
Addressing the Issue:
Identify the Affected Area: It’s essential to spot the affected areas timely. Look out for signs like bubbling, warping, or cracking.
Immediate Clean-Up: Use a vacuum cleaner to suck up as much water as possible. The quicker the water is removed, the lesser the damage.
Consider Replacement: Deeply soaked linoleum flooring is susceptible to bacteria growth and uncomfortable odors. In such cases, consider replacing it to avoid health risks.
For more information on how to handle water-damaged linoleum flooring, visit this site from Massachusetts Housing Consumer Education Centers (Link).
In conclusion, keenly identifying and addressing water damage on your floor, irrespective of the flooring type, can mitigate further damage and save you a significant amount of money and time in the long run.
• Water Damage in Vinyl Flooring: Understanding, Prevention, and Solution
Vinyl flooring has amassed widespread popularity owing to its affordability and durability. But like any other type of flooring, water damage in vinyl flooring can occur.
It is predominantly witnessed in areas with high water presence, such as kitchens or bathrooms. Understanding how water damage can occur and its prevention is essential to ensure the longevity of vinyl flooring.
• Vulnerability of Vinyl Flooring
Although vinyl flooring, particularly in the form of sheets, is water-resistant, damage can still transpire. This issue intensifies when sheet vinyl flooring is installed over concrete.
The ambiguous nature of water damage makes it more challenging to handle. Stains indicative of damage may not be visible immediately and may surface months or even years later.
• What Causes water damage in Vinyl Flooring?
The causes of water damage in vinyl flooring are multifaceted. It could be due to water leaks or from a wet underlayment.
Also, concrete slabs or moisture penetrating from below a slab or crawl space can contribute to the predicament. Once the water finds its way under the flooring, it can cause significant damage.
• Detecting Water Damage in Vinyl Flooring
Being mindful of the signs of water damage is paramount to prevent further damage to the vinyl flooring. These signs can include discoloration, opening seams, bumps, or bubbles.
Other telling signs might involve the occurrence of ridges, growth of mold and mildew, and curling up of the tiles. Additional indications might include efflorescence, adhesive deterioration, and popping of underlayment nails.
Surface moisture resulting from mopping or spills usually does not culminate in damage. However, if the seams are unsealed or improperly sealed, it can allow for water entrance into the substrate.
• Importance of Compliance to Manufacturers Installation Standards
When installing vinyl flooring, following the manufacturers’ installation standards is not an option but a prerequisite. This involves conducting moisture testing on concrete substrates prior to installation. Following these steps diligently helps better arm your flooring against water damage.
Flooring manufacturers usually have installation standards to thwart the incidence of water damage. It is worth mentioning that their warranties often withhold coverage for discoloration caused by excessive moisture.
• Techniques to Test Moisture in Concrete Slabs
If you suspect your vinyl flooring is affected by moisture, specialized tests can be conducted. Simple tests such as putting rubber mats on the floor for 24-48 hours can reveal if there is moisture emergence.
Alternatively, more scientific and reliable tests include the ASTM F 1869 test and the ASTM F 2170 test, which can provide a comprehensive moisture assessment.
ASTM F 1869 test measures the moisture vapor emission rate and the ASTM F 2170 measures the humidity in concrete slabs. Learn more about these tests from the .gov library.
• Seeking Professional Help
If you encounter water damage in your vinyl flooring and require professional inspection, contact The Weinheimer Group. They are experienced in dealing with these issues and can provide a thorough inspection to find the root cause of the problem.
Remember that quick action can prevent a minor issue from transforming into a significant problem. It is always advantageous to consult a professional if you notice any signs of water damage in your vinyl flooring.
• Personal Recommendations for Water Damage Prevention
From personal experience, I recommend a regular check-up of your vinyl flooring. It helps in early detection and prevention of potential water damage. Further, ensure proper installation practices like sealing the seams properly and conducting moisture tests.
Prompt attention to any water leaks and maintaining an adequate balance of humidity in the house can also contribute significantly to averting any water damage to your vinyl flooring.
By being vigilant and adhering to preventive measures, water damage in vinyl flooring can effectively be mitigated. This will ensure that your vinyl flooring continues to serve you well and enhance the aesthetics of your home for years to come.
• Signs of Water Damage: Discoloration and Other Issues
As a flooring professional, I deal with a variety of surface materials, but linoleum stands out for its specific set of challenges.
From experience, discoloration is often a sign of water damage on linoleum floors. It typically occurs due to friction and exposure to moisture, leading to a faded or blotchy appearance. It’s a common problem, particularly in areas frequently subjected to wet conditions.
• Curling and Lifting Seams: A Sign of Trouble
Another clear signal of water damage is curling and lifting seams. When linoleum is exposed to water for extended periods, the edges may begin to curl or lift. If you notice this sign, it’s likely that your linoleum floor has endured prolonged water exposure and may need replacement.
Additional consideration should be given if the damaged area is extensive, as it may be more cost-effective to replace the floor entirely instead of individual repairs.
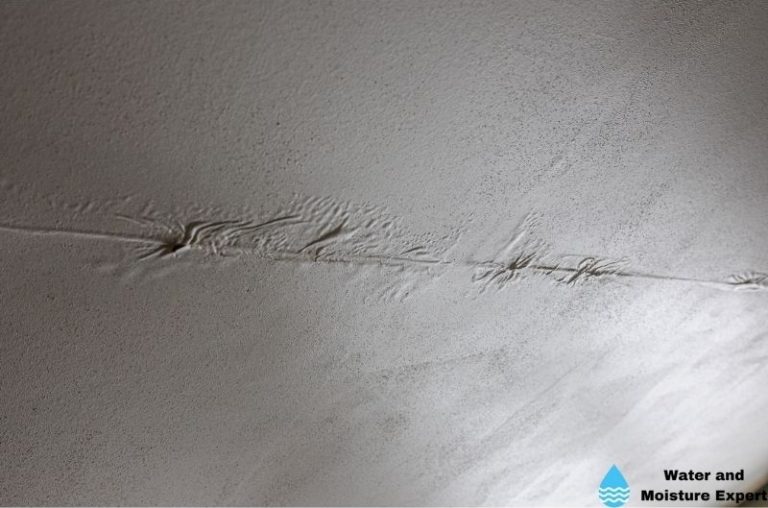
The Damaging Effect: Bubbles on the Linoleum Surface
A particularly telling sign of water damage is bubbles forming on the surface of your linoleum floor. Such blisters can develop due to excessive water coupled with friction, often caused by consistent walking or dragging of furniture.
Assessing how widespread the bubbling is will determine the best course of action whether to repair or replace the linoleum.
• Fixing Water Damage: Replacement and Repair Options
When repairing water-damaged linoleum floors, there are a few methods that can be employed. One practical strategy is to replace the damaged tiles entirely.
However, in situations where the damage is not widespread, repairing cuts or holes using wood glue and spare linoleum tile dust is a viable alternative. Personally, I recommend the latter for minor isolated damages to limit costs and avoid having mismatched tiles.
• The Underlying Concern: Checking For Subfloor Damage
Before you embark on repairing or replacing water-damaged linoleum floors, it’s vital to check for underlying subfloor damage. This is because water can sneak past your linoleum and affect the layer beneath it.
When this happens, that damage needs to be addressed before you tackle the surface linoleum. Cleaning and drying the area thoroughly before installing new tiles is also key. You can consult HomeAdvisor’s guide on subfloor repairs to get more detailed instructions on the process.
• Avoiding Further Damage: Cleaning Up Standing Water
Standing water and puddles are the enemy of any floor type, but linoleum is particularly susceptible to sustained damage.
As a professional, I cannot stress enough the importance of swiftly cleaning up spills to prevent further water damage. This small action can save you a significant amount of time, hassle, and repair costs in the future.
• Wise Installation: Minimize Water Exposure
While linoleum boasts many benefits, it also has its vulnerabilities, particularly when it comes to water. I recommend installing linoleum in areas with minimal water and moisture exposure, such as living rooms and bedrooms.
Wet areas like bathrooms and laundry rooms are more conducive to frequent repairs due to the heightened potential for water damage.
By adhering to these practices, you can get the most out of your linoleum floors, prevent unnecessary damage, and save on repair costs.
Spotting Water Damage on Wood Floors
Recognizing water damage on wooden floors at an early stage is crucial to preventing extensive damage. Prolonged contact with water often causes wood floors to discolor, developing dark or white stains.
Additionally, they can warp or cup, as water absorption makes the boards swell at the edges and shrink at the center. Keep an eye out also for mold, an indicator of long-standing water exposure. Visit EPA’s website for more information on mold detection.
• Refinishing Water Damaged Wood Floors
Yes, water-damaged wood floors can often be refinished, depending on the severity of the damage. However, if the wood has been saturated in water and the damage reaches beneath the surface layers, refinishing may not be possible.
Refinishing only addresses surface damage; deep-seated water problems might require floorboard replacement. I recommend consulting a professional to assess the damage before deciding on the course of action.
• Preventing Water-Damaged Floorboards
Prevention is the best solution when dealing with water damage on wood floors. Immediately cleaning up spills helps to avoid water seeping into the wood. Complete the cleanup by thoroughly drying the area.
Regularly checking for leaks, particularly in at-risk areas like bathrooms and kitchens, is also a preventive measure. A small leak may go unnoticed until it has caused significant damage.
• Preventing Wood Floor Swelling From Water
If left unattended, water can cause wood floors to swell, making them uneven and unattractive. Prevent this swelling by immediately removing furniture and extra weight from the wet area, reducing the pressure on the swollen wood.
Dry the floors properly with towels or a wet vacuum, facilitating faster evaporation. Dehumidifiers can further help by reducing humidity levels, promoting quicker drying.
• The Consequence of Water on Wood Floors
Leaving water on your wood floors can wreak havoc over time. Not only will it cause surface damage, such as discoloration and warping, but it can also lead to mold growth, which can pose health hazards.
The water seeping into the subfloor can cause extensive damage to the subfloor and even the supporting structure underneath. Regular inspection and maintenance can minimize these risks.
• Concealing Water Damage on Wood Floors
While hiding water damage on wood floors doesn’t fix the issue, it can be a temporary solution until a professional can address it.
Use rugs, furniture, or artificial plants to cover the damaged areas strategically. However, it’s critical to address the root cause of the water damage to prevent it from worsening.
• The Impact of Water on Linoleum Flooring
Just like wood, water can also seep under linoleum flooring, causing damage. If water gets trapped, it can lead to mold growth and rot, compromising the integrity of the substructure. To address this, remove the linoleum to expose the affected area, then dry and sanitize it.
If the damage is extensive, replacing the linoleum and the underlying substructure may be necessary. Do consider hiring a professional for such tasks, as they have the necessary expertise to handle such damages adequately.
• Effects of Excess Moisture on Hardwood Floors
Hardwood floors represent a significant financial investment and add natural beauty and charm to your home. However, these floors are not immune to damages that can degrade their visual appeal and structural integrity.
One such damage is buckling, caused primarily by excess moisture, which makes the floors lift at the edges or create a hump in the center.
Hardwood flooring that has buckled due to excess moisture can lose its aesthetic appeal and even become a safety hazard in severe cases.
This damage may disturb the perfect symmetry and smoothness that hardwood flooring is loved for, instead presenting a distorted and uneven surface. It is, therefore, necessary to prevent or manage this issue to maintain the integrity of your flooring.
• Importance of Proper Hardwood Floor Installation
Warding off such buckling starts with the installation process. Proper installation plays a pivotal role in preventing buckling in hardwood floors. Hiring professional experts for the job is strongly recommended, even though it might seem costlier upfront.
An expert can evaluate the condition and shape of your floor to implement the right installation process, which can prevent future buckling. You can potentially save a lot in the long term by avoiding damages that can necessitate costly repairs or even replacements.
• Possible Home Remedy for Minor Water Damage
Minor buckling that arises due to excess moisture can be salvaged with a simple home remedy. The first step entails the removal of the excess moisture, which can be achieved by soaking it up.
Following this, it is essential to clean the buckled area with a good disinfectant cleaner to limit any potential growth of bacteria or fungus.
Once the area is clean, an electric fan and a dehumidifier can be used to accelerate the process of drying. The electric fan helps by circulating air over the damp areas while the dehumidifier directly pulls out the moisture from the air and floor.
Bear in mind that this is a temporary fix, and you might need to consult with a professional for long-term prevention and rectification.
• Intervention for Severe Buckling and Water Damage
Severe buckling demands a more rigorous intervention than minor damages. In cases of intense water damage, the damaged floorboards might need replacement. Additionally, in cases of tongue-and-groove hardwood flooring, the state of the damage might require professional attention for repair.
Repairing tongue-and-groove flooring demands specialized skills to make sure the groove fits perfectly into the tongue of the adjacent plank. An internet resource for finding professional help can be beneficial in such cases.
• Preventive Measures Against Buckling for Hardwood Flooring
Prevention is always better than cure. Similarly, preventing buckling in hardwood flooring can help avoid the hassle of repairs and replacements.
Immediate clean-up of spills is the first step in this preventive measure. Failing to wipe up spills could accelerate water absorption, resulting in buckling. Also, checking for leaks in your home, especially in areas around your hardwood floor, is essential.
Additionally, putting on shoe types that are less likely to scrape or damage the floor will also help prolong the lifespan of your hardwood floor. Using water sparingly when mopping your hardwood floors is also a good rule of thumb.
Lastly, the choice of cleaning products for your hardwood floors is crucial. Some cleaning products have harsh chemicals that can damage the floor and boost the likelihood of buckling. It’s imperative to use products that are appropriate for hardwood floors to prevent any undue damage.
• Where to Look? Express Flooring
For fresh flooring installation or replacement services, Express Flooring is an excellent option. They boast a comprehensive catalog of flooring solutions, including hardwood, stone, carpet, tile, vinyl, and laminate.
Alongside this variety, they offer professional installation services, in-home estimates, design consultations, and even a lifetime installation warranty.
The longevity, richness, and beauty of your flooring depend largely on appropriate choices and informed care. Remember, a well-maintained hardwood floor can grant your home a rich and timeless appeal.
– Environmental Factors and Wood Floors: Understanding Buckling
Buckled wood floors, while an unfortunate and quite cumbersome predicament, can occur due to a range of environmental factors.
Chief among these factors are water damage and high humidity. Both can significantly undermine the structural stability of your flooring, causing it to warp or lift from the subfloor beneath it essentially.
Water damage can occur from a host of situations – from a simple liquid spill that goes unnoticed to a leaking pipe or even heavy rainfall. On the other hand, high humidity, often overlooked, is a pervasive problem for wood floors.
The presence of excess moisture in the air can inadvertently lead to the absorption of this moisture by your wooden floors, causing them to expand and eventually buckle.
– The Importance of Proper Acclimation and Installation
Just as environmental elements can cause a wood floor to buckle, improper acclimation prior to installation is another culprit. Wood, being a natural material, will expand and contract based on changes in temperature and humidity.
To help mitigate this, the wood needs time to acclimate to the specific conditions of your home before it is installed. This process typically involves letting the wood sit in the room where it will be installed for a few days to allow it to adjust to the temperature and humidity level.
Failing this crucial step can lead to swift expansion or contraction of your wood floors after being installed, culminating in the dreadful buckling.
I recommend seeking professional help, such as companies like Vintage and Specialty Woods, who specialize in hardwood flooring installation, to ensure the right acclimation and installation procedures are followed.
– Buckled Wood Floor: Potential Quick Fixes
Although buckled wood flooring might seem disheartening, a few DIY measures can sometimes do the trick.
The first step is drying the affected area. Use fans, dehumidifiers, or heaters to dry out the area as quickly as possible. This step counters the moisture that leads to the expansion and buckling.
Next, try applying pressure or placing a heavy object on top of the distorted area. This can help press the buckled wood back into place. However, for this method to work, it’s essential to dry out the area fully first to prevent further moisture-induced damage.
– When To Seek Professional Help
Despite your best efforts, it’s possible that DIY fixes won’t completely remedy the buckling wood floor problem. When this happens, I recommend you should call in the professionals. Remember, replacing and fixing a buckled wood floor is a complex process that ideally needs expert hands.
Furthermore, dealing with buckled flooring without adequate knowledge might lead to more damage than relief. Cornell University’s Resource Library offers solid advice on maintaining and repairing home structures, including wood floors, that homeowners could find useful in making the right decisions.
In conclusion, understanding the cause of buckled wood floors and knowing when to seek professional help is crucial. A wood floor is as good as its installation and subsequent care.
Therefore, effectively managing factors like humidity and getting experts to install your wood floors will prevent a significant pain point for homeowners.
Through proper acclimation before installation and responding swiftly when buckling occurs, homeowners can enjoy the beauty and elegance of wooden floors without significant hiccups.
• Recognizing Different Types of Water Damage on Wood Floors
In dealing with water damage on your wood floors, recognizing the problem is essential. Four common types of water damage include cupping, crowning, staining, and buckling.
Cupping refers to the edges of the floorboards curling up while crowning is the opposite, where the center of the board rises higher than the edges. Staining visibly discolors the wood, and buckling shows severely warped boards that rise from the subfloor.
• Rehabilitating Water-Damaged Wood Floors
A frequently asked question is whether water-damaged wood floors can be refinished or need to be replaced. The answer largely depends on the severity of the damage.
Light stains or minor cupping and crowning can often be treated with refinishing, while serious buckling generally requires replacement. For more information, visit a reputable source like Wood Floor Business.
• Prevention Measures Against Water-Damaged Floorboards
Preventing water damage should be a top priority for anyone with wooden floors. A couple of critical steps can significantly prevent damage.
Immediately cleaning up spills allows no chance for the water to soak into the wood. Regularly checking for leaks – under appliances, near plumbing, and around windows – can catch potential problems early.
• Steps to Avoid Wood Floor Swelling
Another viable concern is wood floor swelling caused by water. In this situation, it’s essential to act fast to reduce as much damage as possible.
Remove any furniture, rugs, or extra weight from the affected area to allow the swollen part to ‘breathe’ and dry naturally. Portable fans or professional drying services can expedite the drying time.
• Consequences of Water Staying on Wood Floors
When water stays on wood floors, it causes more than just cosmetic damage. Possible consequences can range from surface to structural damage.
If left untreated, prolonged exposure to water can lead to mold growth, posing health risks for the inhabitants. It can also result in subfloor damage, requiring extensive and costly repairs.
• Tips on How to Hide Water Damage
In some instances, water damage might be minor enough that you prefer to hide it rather than fix it. A few simple solutions can camouflage the damage effectively.
Strategic placement of rugs, furniture, or artificial plants can cover the damaged areas seamlessly. Just make sure this doesn’t contribute to a moisture-trapping problem.
• Understanding Water Damage Underneath Linoleum
Water damage isn’t just confined to wood floors; it can happen under linoleum as well. When water seeps under the linoleum, it can damage the subfloor and cause the linoleum to lift or peel.
For more resources on this, visit the National Institutes of Health for an in-depth study on how to handle these situations properly.
Prevention, fast action, and strategic solutions can protect your floor from extensive damage. In the worst case, don’t hesitate to seek professional assistance if the damage is beyond manageable conditions.
Identifying the Source of Water Damage
Primarily, you need to pinpoint the origin of the water damage. It can stem from flooding incidents, leaks, or any other water source. Identifying the exact cause is vital to preventing further damage.
For example, if it’s a leak that’s causing the damage, then fixing it will prevent any more damage from occurring.
• Removing Furniture and Excess Weight
In certain instances, removing furniture or any extra weight from the affected area is necessary for proper drying. By doing so, you ensure ample space for efficient drying and moisture removal. This way, the possibility of secondary water damage can be avoided to a greater extent.
• Use of Ventilation and Commercial Drying Equipment
To hasten the drying process, install ventilation wherever possible. Use fans to improve the airflow. For best results, consider using commercial-grade drying equipment.
It can help to prevent wood-floor swelling, which is a common side-effect of water damage. A helpful resource for understanding the benefits of commercial drying is the Official Journal of the American Industrial Hygiene Association.
• Damage Types to Wood Floors
Water damage can inflict various kinds of harm on wood floors. Cupping, crowning, staining, and buckling are some of the typical outcomes. If water damage is left unaddressed, staining can become irreversible and buckling can become severe, making the floors unsalvageable.
• Effects of Ignoring Water Damage
Ignoring water damage can result in surface damage, mold growth, subfloor damage, and even structural damage. It is crucial to understand that water damage isn’t always localized.
It may spread throughout your property extensively before becoming noticeable, which emphasizes the importance of addressing it promptly.
• Refinishing the Entire Floor
Even if the damage is limited to a specific area, I recommend refinishing the entire floor. This is to maintain a consistent finish and to preserve the structural integrity of the entire floor. This also ensures the longevity of your floor and helps avoid future issues.
• Preventing Water Damage
Take preventative measures such as cleaning up spills immediately, checking for leaks regularly, and ensuring windows, doors, and your roof are properly sealed. Attending to any water-related issues promptly will significantly reduce the chances of water damage.
• Water Damage to Linoleum Flooring
Linoleum flooring is not immune to water damage. If water seeps underneath this type of flooring, it can potentially damage the subfloor, causing the linoleum to lift and peel back. This is why any water leaks or spills should be dealt with immediately.
• Hiding Water Damage is Not a Solution
Although hiding water-damaged areas with rugs, furniture, or artificial plants may hide the issue temporarily, it is not a feasible long-term solution. The best course of action is to address and repair the damage as soon as possible to prevent further deterioration.
• Allow Evaporation Before Repairs
Whether dealing with wood or linoleum flooring, it is crucial to allow the moisture trapped underneath to evaporate completely before moving on to repairs or replacements. This drying process is necessary to prevent future damage to newly repaired or replaced surfaces.
Essential Tools for Addressing Water Damage on Wood Floors
The first step in addressing water damage on wooden flooring is to gather all the necessary equipment. This might include a shop vacuum, a squeegee, a stiff brush, a bucket, rubber gloves, and an absorbent cloth.
Each tool serves a crucial part in the restoration process, ensuring you can quickly and effectively deal with the problem at hand.
• Tracing and Addressing Water Infiltration Points
Damage can occur when water permeates wood floors through various infiltration points such as seams, breaks in the coating, baseboards, and heating registers. Identifying these vulnerable spots can help prevent further damage from occurring.
• Using a Shop Vacuum for Water Extraction
To remove surface water after a leak or flood, I highly recommend the use of a shop vacuum. Use the vacuum in wet mode, making sure to remove the bag for maximum effectiveness. This is an efficient way to get rid of as much water as possible.
• Importance of Cleanup: Mixing Detergent and Disinfectant
Dirt, mud, silt, and organic material can promote mold growth. To prevent this, combine a mild detergent and a compatible disinfectant with clean water in a bucket.
Scrub the whole floor and any related woodwork using a stiff brush. This cleaning process helps eliminate the potential breeding grounds for molds.
• Dealing with Mold: Using Trisodium Phosphate (TSP)
If you notice signs of mold, clean affected areas using Trisodium Phosphate (TSP) or a TSP substitute mixed with water. Scrub until the mold and discoloration are gone.
Once done, rinse the area with clean water and dry it using an absorbent cloth. For more information about mold removal, visit the United States Environmental Protection Agency’s website.
• Drying the Floor: A Slow and Natural Process
After cleaning, dry the floor naturally and gradually. This can be done using fans to improve airflow through the area. Avoid speeding up the drying process with heat, as it can cause the wood to crack.
• Dealing with Flooring Deformities: Sanding High Areas
Correct minor high areas or concave/convex floorboards, known as cupping, by sanding. Use a drum or orbital sander to even out the surface. This helps restore the beauty of your wooden floor.
• Addressing Mold Under Painted Floors
If there’s mold growth under the paint on a painted floor, remove the finish. Scrub the wood with an abrasive cleaner or a TSP-water solution with some added laundry bleach. This ensures all molds are removed, even those hiding under the paint.
• The Issue with Laminate Flooring and Water
Sadly, laminate flooring does not do well when exposed to water. Water can cause significant, irreparable damage to this type of floor. Therefore, any water-damaged laminate flooring usually needs complete replacement.
– Evaluating Water-Damaged Wood Floors: Repair or Replace?
Deciding between repairing or replacing water-damaged wood floors can be challenging. Several factors need to be considered, including the extent of the damage, the type of water causing the damage, and the visible signs of damage.
– Signs of Severe Damage
When determining the need for replacement, some signs to watch out for include stains, discoloration, buckling or cupping of the boards, and the growth of mold.
These are all signs of severe water damage, which might necessitate replacement. Wood is an organic material that can host mold and fungi, which can continue to spread if not entirely removed.
Homeowners should be aware of these signs and act promptly to prevent further damage. For more information on mold and its effects on wood, visit the US Environmental Protection Agency’s website.
– Water Type Matters
The type of water causing the damage is a crucial factor in determining whether repairs are possible. Clean water is the best-case scenario as it often leaves little to no residue after drying, making a successful repair more likely.
Conversely, dirty water or blackwater, which are often from floods or sewage backups, complicate the restoration process and decrease the likelihood of successful repairs due to the harmful substances and contaminated residue they leave behind.
Even more important is the type of water when you live by the sea. Saltwater can extensively damage the finish of wood floors, often necessitating a complete replacement.
– Visible Damage Indicates Severity
Visible signs such as crowning, buckling, staining, and cupping are strong indications of severe water damage that may require replacement.
Crowning and cupping are descriptive terms for the way wooden plank warps due to moisture imbalance. Buckling is a sign of severe warping where planks start to lift from the subfloor.
– Time and Context
The timeline of the situation plays a crucial role in whether the floors can be repaired or need to be replaced. The longer the wood is exposed to water, the deeper the damage can penetrate, making it harder to restore.
In some instances, homeowners may consider replacing the floors rather than repairing them. This is often viewed as a fresh start and a way to protect against future accidents, especially in areas prone to flooding or large spills.
– Cost Considerations
Financial implications cannot be overlooked. The average cost of repairs for water-damaged wood floors hovers around $1,000. This, however, can vary greatly depending on the extent of the damage and the area in which you live.
A complete replacement, though more costly initially, with some new installations costing as low as $2,400, could prove to be a more economical choice in the long run if the damage is severe or expected to recur.
– Consult a Professional
I highly recommend assessing the extent of the water damage and consulting a professional to determine the best course of action.
Professionals have the necessary experience and knowledge to accurately evaluate the damage and provide guidance on repair possibilities or the need for replacement. Not only will this save time, but it could also potentially save money in the long run.
Remember, each situation is unique. Therefore, it is essential to carefully assess all aspects before deciding to repair or replace your water-damaged floors. As a homeowner, understanding all these factors will guide you to make the best decision for your home and your wallet.
• The Consequences of Wood Floor Water Damage
When the beauty of your hardwood floor is marred by water damage, the problems go beyond aesthetic issues. The impacts can range from structural damage, such as warping, to health hazards, like the growth of mold, which can permeate your living spaces.
Additionally, there’s the unfortunate aspect wherein your property value could decrease as a result – an undesirable situation for homeowners.
• Recognizing the Indicators of Water-Damaged Hardwood Floors
It is crucial to always be on the lookout for signs of water damage. If you notice an unusual odor around your wood floor, chances are, there could be some moisture trapped underneath.
Other signs to watch out for include buckling or crowning of the floorboards, lifting nails, as well as staining on the wood – evidence of unwelcome moisture. Mold growth is also a common symptom of water damage to wood floors, and if left unchecked, it can pose significant health risks.
• Effective Remedies for Swollen Wood Floors
Swollen wood floors are the aftermath of water damage that you can manage effectively with just a few steps. Laying thick towels over the affected area can soak up a significant amount of the remaining moisture.
In conjunction with this, use a dehumidifier to get rid of excess humidity, ensuring your hardwood floor returns to a moisture level that ensures its long-term stability.
• Applying the Five-Step Drying Process
After you have immediately soaked up the water, there is a systematic five-step drying process you can follow for effective repair and minimal damage to your hardwood floors.
The crucial objective of this process is to dry, reduce, aerate, stabilize, and refinish the floor to ensure optimal restoration (for more information, visit the National Wood Floor Association .org site).
• Utilizing a Water Vacuum for Cleanup
To streamline the cleanup process even further, you can resort to using a water vacuum. This tool is highly efficient in soaking up water from wood floors while being relatively gentle, ensuring you don’t accelerate the damage.
• Proactive Measures: Mats, Rugs, and Regular Inspections
In my experience as an expert in this field, the use of mats and rugs at entrances and under sinks or pet bowls can significantly improve wood floor protection against water damage. It is also crucial to conduct regular inspections to identify and fix leaks that could cause flooding.
• The Protective Value of Sealing Hardwood Floors
Frequently sealing your hardwood floors every few years with a quality water sealant can provide an effective defense against moisture. The sealant offers a protective layer that resists water penetration, thereby mitigating the risk of water damage.
• Dealing with Water Damage to Engineered Wood Floors
Specific measures must be taken when dealing with water damage on engineered wood floors, as unlike hardwood, they cannot be simply sanded and refinished. Best practice calls for the replacement of affected boards and refinishing the entire floor to ensure uniformity and restore the floor’s beauty.
• Professional Help for Water-Damaged Floors
When dealing with water damage, action needs to be swift. I highly recommend consulting with professionals to get expert assistance and ensure that your floor is adequately repaired.
• Common Queries About Water-Damaged Wood Floors
As I navigate through this field, some of the frequent questions I encounter include: How to treat water-damaged wood floors effectively? How to remove old water stains from hardwood floors?
And does a wet subfloor need to be replaced? Understanding the answers to these questions can significantly assist when dealing with wood floor water damage. It’s your home; knowledge is the power to preserve its beauty and value.
– Identifying Your Flooring Type After Water Damage
The first step in addressing water damage on your floors is to identify the type of flooring you have. Different types of flooring, ranging from solid hardwood, laminated wood, tile, or carpet, may necessitate distinct approaches for repair or replacement.
For example, solid hardwood flooring might need sanding and refinishing after being water-damaged, whereas a wet carpet might need to be entirely replaced. For accurate information on the repair or replacement process, consult resources from reliable non-commercial websites like This Old House.
– Evaluating Mold and Mildew Presence
Take the time to consider whether mold or mildew has intruded on your water-damaged floors. The presence of these microorganisms can significantly affect your decision on whether to repair or replace the damaged section.
Mold and mildew can topically infect carpets and penetrate into the fabric. In case of such deep penetration, it is advisable to replace the entire carpet to prevent health hazards due to airborne spores.
– Checking for Underlying Water Damage Signs
There could be hidden signs of water damage beneath your flooring, which are vital to address to prevent further damage. Increased water bills or running water in hidden areas can be indicators of an underlying leak or water damage.
You may also spot areas of the floor that are unusually soft, which is a common sign of wood rot due to prolonged water exposure.
– Comparing DIY Repairs vs. Professional Assistance
Take into account the complexity of the damage, as well as your repair skills and the tools you have on hand. Consider the time it would take to complete this task on your own versus hiring professional help.
While DIY repairs might seem cost-effective initially, mismanaged repairs can lead to further damage and increased cost in the long run. Consider hiring a professional if the damage is extensive or if the repair process is beyond your expertise.
– Accommodating Specific Room Needs
Different rooms may have unique demands, and these needs should be taken into account when selecting the appropriate approach toward water-damaged floors.
Bathrooms and kitchens, for instance, require water-resistant flooring owing to their frequent exposure to moisture. Living areas and bedrooms, on the other hand, can benefit aesthetically from hardwood or carpet flooring.
– The Importance of Prompt Restoration
One of the key pieces of advice I’d offer from my experience is the necessity of quick restoration. Addressing water damage swiftly can prevent further damage and restrict the growth of mold.
By acting promptly and removing the water as soon as possible, you can help mitigate any potential larger issues down the line.
– Opting for 50 Floor for Replacement Flooring
When replacing water-damaged floors, consider services like 50 Floor, which offer home consultation and a wide variety of flooring options tailored to your needs. They provide superior quality products at competitive prices, making the entire floor replacement process convenient and hassle-free.
To summarize, identifying your flooring type, assessing the water damage severity, considering potential mold and mildew formation, and deciding between DIY and professional repairs are necessary troubleshooting steps after encountering water damage.
Factor in the specific requirements of different rooms in your house before making any swift decision. Lastly, consider trustworthy flooring solutions like 50 Floor to replace your damaged floors.