Fix Wood Flooring That Is Starting To Rot. What The Pro’s Say.
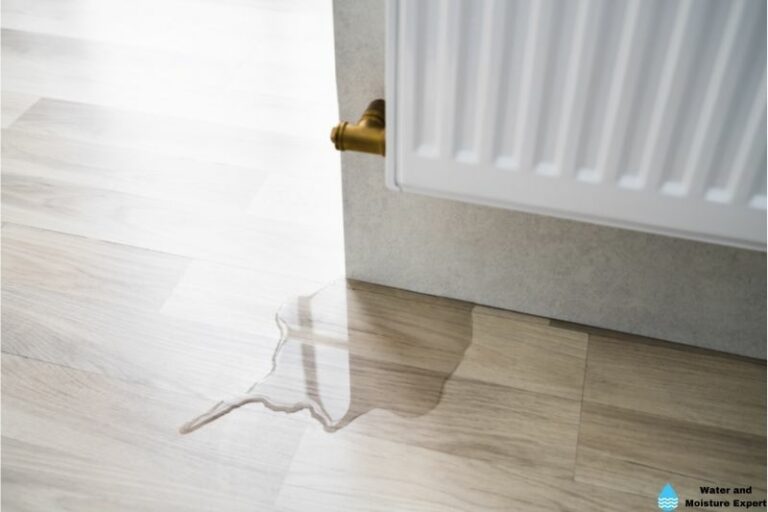
As beautiful as your wooden floor might seem, water and moisture can lead to permanent damage. If water was present for an extended time, the floor could start rotting. This could be dangerous to the safety of everyone living under your roof.
Fix Wood Flooring That Is Starting To Rot
Start with checking the type of wood rot, dry rot of wet rot. Continue with removing all the rotted wood. Always remove an area greater than the damaged part you can see. Clean the whole surface and treat it with a suitable fungicide. You can purchase some or make it yourself. Add new wood to the parts you have removed. Ensure that the beams under the floor are not damaged.
In this blog post, I will show the types of rot, and how to spot it. How to fix the floor that is starting to rot will be explained in more detail, and some additional frequently asked questions I get will be answered.
Contents
- 1 Dry Rot And Wet Rot
- 2 How To Check If Your Floor Is Starting To Rot?
- 3 Fix Wood Flooring That Is Starting To Rot
- 4 How Long Does It Take For Wood To Rot?
- 5 How Far Can Dry Rot Spread?
- 6 How Quickly Can Dry Rot Spread?
- 7 Does Rotted Wood Continue Rotting?
- 8 Does Dry Rot Continue To Spread?
- 9 How Long Does It Take For Dry Rot To Appear?
- 10 Can Dry Rot Spread From House To House?
- 11 Can Dry Rot Spread Without Moisture?
- 12 Identification and Locations of Wood Rot
- 13 Understanding Dry Rot and Wet Rot in Wood Flooring
- 13.1 • The Prevalence of Dry Rot
- 13.2 • Wet Rot – a Common Flooring Foe
- 13.3 • Identifying Signs of Rot in Your Flooring
- 13.4 • Killing Fungus the Homemade Way
- 13.5 • Leveraging Natural Light in the Fight Against Fungus
- 13.6 • Effective Moisture Management and Care of Affected Areas
- 13.7 • Choosing Treated Wood Flooring and Regular Cleaning
- 13.8 • Types of Rot Affecting Wood Flooring
- 13.9 • Checking if Your Wood Floor is Starting to Rot
- 13.10 • Repairing Wood Flooring Experiencing Rot
- 13.11 • Understanding the Duration and Spread of Wood Rot
- 13.12 • Continuing Spread of Rotted Wood and Dry Rot
- 13.13 • Appearance of Dry Rot
- 13.14 • Dry Rot Spread across Locations
- 13.15 • Spread of Dry Rot without Moisture
- 13.16 • Choosing the Right Material for Filling Rotted Wood
- 13.17 • Procedure for Repairing Rotted Wood
- 13.18 • When to Seek Professional Help
- 14 Identifying the Type of Wood Rot
- 14.1 • Inspecting the Underneath Beams
- 14.2 • Using Fungicides
- 14.3 • Making Repair or Replacement Decisions
- 14.4 • The Role of Epoxy Consolidant
- 14.5 • Repairing Small Damage Areas with Wood Patching Products
- 14.6 • Removing the Rotted Wood
- 14.7 • Surface Cleaning
- 14.8 • Fungicide Application
- 14.9 • Replacing Removed Parts with New Wood
- 14.10 • Finishing the Repaired Wood
- 14.11 • Understanding Wood’s Susceptibility to Rot
- 14.12 • The Quick Spread of Dry Rot
- 14.13 • Dry Rot’s Survival Mechanism
- 14.14 • Dry Rot Spread Across Houses
- 14.15 • Initial Moisture Requirement for Dry Rot
- 14.16 • Regular Maintenance of Wood Floors
- 14.17 • Dealing with the Expansion and Contraction of Wood Floors
- 14.18 • Sanding the Floors
- 15 Understanding Dry and Wet Rot
- 16 Checking the Depth of the Rotted Wood
- 16.1 • Importance of Removing the Rotten Part
- 16.2 • Different Types of Fillings
- 16.3 • Epoxy: The Hardening Liquid Plastic
- 16.4 • Wood Putty: The Stiff Filler
- 16.5 • Sanding, Priming, and Painting for a Seamless Finish
- 16.6 • Seeking Professional Help
- 16.7 • Identifying the Cause of Wood Rot Matters
- 16.8 • Risks Placed on Structural Soundness
- 16.9 • Treating Rotted Wood with a Fungicide
- 16.10 • Utilizing Epoxy Consolidant to Reinforce Wood Fibers
- 16.11 • Importance of Proper Wood Cleaning
- 16.12 • Using Epoxy Wood Filler for Restoration
- 16.13 • Understanding Wood Rot Timeline
- 16.14 • Possibility of Dry Rot Spreading
- 16.15 • Treating Adjacent Wood to Prevent the Evolution of Dry Rot
- 16.16 • Dry Rot’s Ability to Transfer from House to House
- 16.17 • The Connection Between Dry Rot, Moisture, and Its Spread
- 17 Recognizing the Signs of Wood Rot
- 17.1 • The Causes Behind Wood Rot: Moisture and More
- 17.2 • Effective Methods for Repairing Wood Rot
- 17.3 • Addressing the Root Problem: Moisture
- 17.4 • The Importance of Professional Assistance
- 17.5 • Addressing Rotted Joists in the Basement
- 17.6 • Risks Associated with DIY Repairs
- 17.7 • The Menace of Wood Rot in Buildings
- 17.8 • The Root Cause of Wood Rot: Excessive Moisture
- 17.9 • Wet Rot: A Fungal Love of High-Moisture
- 17.10 • Dry Rot: The Independent Fungus
- 17.11 • The Art of Repairing Wood Rot
- 17.12 • A Plea for Professional Help
- 18 Understanding Dry Rot: The Ideal Conditions for It
- 19 Identifying Types of Wood Rot: Dry and Wet Rot
- 19.1 • How to Ascertain Wood Rot in Your Floor
- 19.2 • Remediation Steps for Rotting Wood Flooring
- 19.3 • Duration Required for Wood Decay
- 19.4 • Understanding Dry Rot Spread
- 19.5 • Speed of Dry Rot Spread
- 19.6 • Continual Decay in Rotted Wood
- 19.7 • Persistence of Dry Rot
- 19.8 • Emergence of Dry Rot Symptoms
- 19.9 • The Possibility of Dry Rot Spreading from House to House
- 19.10 • Dry Rot Spread without Moisture
- 19.11 • Resources
- 19.12 • Checking the Depth of Rotted Wood
- 19.13 • Use Epoxy for Rotted Wood
- 19.14 • Using Wood Putty as a Substitute
- 19.15 • Post-Repair: Sanding and Painting
- 19.16 • Dealing with Damaged Trim
- 19.17 • When to Seek Professional Help
- 20 The Causes of Wood Rot
- 20.1 • The Importance of Spotting Wood Rot Early
- 20.2 • Preventing Wood Rot with Crawl Space Encapsulation
- 20.3 • Extending Support with Sistering Floor Joists
- 20.4 • When Full Wood Floor Replacement is Necessary
- 20.5 • Preventative Measures for Wood Rot
- 20.6 • Responding to Wood rot: Critical Strategies
- 21 Recognizing Signs of Wood Floor Problems
- 21.0.1 – Gap Filling In Wooden Floors
- 21.0.2 – Squeaky Floorboards
- 21.0.3 – Detecting Excessive Moisture
- 21.0.4 – Dealing with Water Damage
- 21.0.5 – Coping with Floor Cupping
- 21.0.6 – Avoiding Buckling and Crowning
- 21.0.7 – Accepting Color Inconsistencies
- 21.0.8 – Rectifying Unevenness
- 21.0.9 – Dealing with Pet Stains
- 21.0.10 – Addressing Rough Surfaces
- 21.0.11 – Fixing Dents
- 21.0.12 – Managing Pest Infestations
- 21.1 • Importance of Regular Inspection
Dry Rot And Wet Rot
Understanding the cause of wood rot is the first step to dealing with the menace. The environment we all live in is laden with millions, if not billions, of fungi. Under the right conditions, the fungi cause fungal decay in the timber used in various parts of your house. If left untreated, over time it can even pose a risk to the structural soundness of the house.
The two types of fungal decay are wet rot and dry rot, which must be identified early enough if mitigation is effective:
● Wet Rot
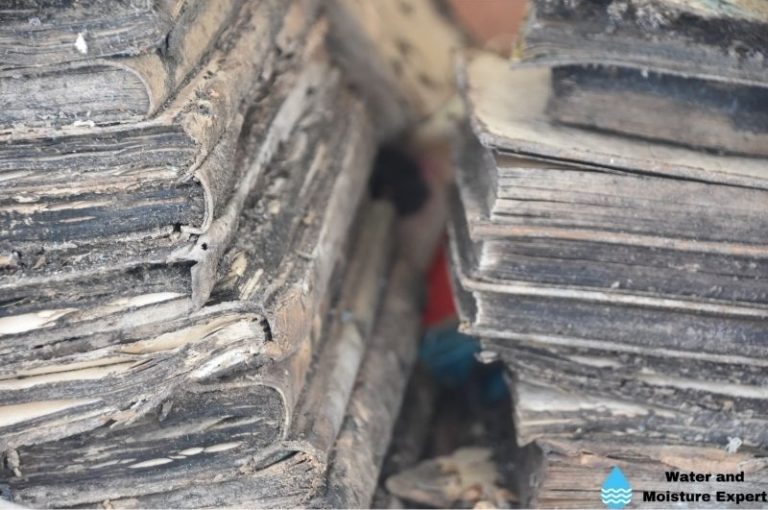
Wet rot thrives by the fungi feeding on the moisture and wood nutrients, producing spores in the process. On the other hand, it requires moisture to spread. Its presence is characterized by darkened timber that may also be soft and spongy and breaks upon touch, damp, musty odor, localized fungus growth, and wood shrinkage.
● Dry Rot
On the other hand, dry rot is lethal compared to its wet counterpart and spreads faster. Spreading for dry rot is not water or moisture-reliant, as such. The fungi involved digest part of the wood, mostly the area that gives the wood its strength. It can thrive in poorly ventilated areas.
How To Check If Your Floor Is Starting To Rot?
To check whether you may have dry rot your wooded floor, poke the wood, preferably using something like a screwdriver. How does it feel? Is the wood spongy? Does the screwdriver go all the way in? That’s how you know that the wood is affected.
Visible signs would include green algae on wood, white or gray growth, mushroom-like body, cracked or peeling paint, and a darker shade of wood compared to the surrounding wood.
Fix Wood Flooring That Is Starting To Rot
Fixing the problem of dry rot will involve either repairing the affected wood or replacing it altogether. The extent of the damage involved dictates this. If the affected area is relatively small, and the parts are not load-bearing. you could treat the area. If the area is bigger, or involves a load, replacing it is recommended.
Using home remedies is also an option you may consider. This usually involves mixing up household ingredients to come up with makeshift fungicides. The idea is to spray this fungicide on the affected wood to make it hostile to the growth of the rot-causing fungal.
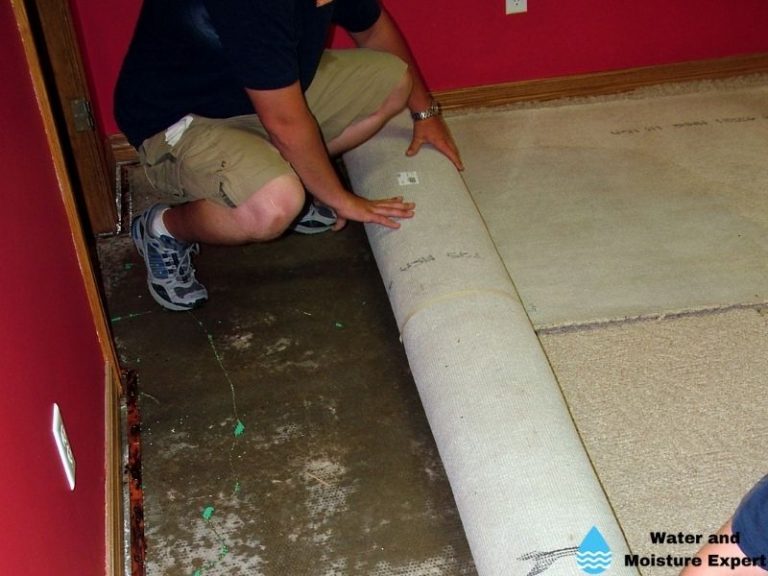
If you opt to repair the damaged part, you may remove it with the help of a hammer or chisel and a wire brush. In doing so, you’d want to remove as much of the afflicted area as possible.
Injecting an epoxy consolidant also helps a great deal. This can be done via drilled holes, which go a long way in reinforcing the wood fibers.
You may also use a wood patching product and apply it to the affected wood, which is later shaped by an appropriate tool.
To fix wood flooring that is starting to rot, use the following steps:
● Step 1: Remove all rotted wood
Ensuring all the rotted and potentially rotted wood is removed. While removing the wood, don’t just remove the affected wood. It is advisable to extend to at least three feet beyond the affected area to encompass all the potential areas the rot would spread to.
If a plank has a lot of damage, I recommend replacing it entirely. Always check the construction under the floor planks. You want to ensure that this part is not damaged. If possible, try to check under the house and check the different beams.
● Step 2: Clean the wood surface
Cleaning the surface of the wood is really important. This helps to ensure that no fungus remains on the wood. Any fungi remaining on the surface have the capability of affecting the wood later again.
● Step 3: Treat the surface
Treating the surface- This is done by applying a fungicide, either industrial or homemade. You can find multiple options in your local hardware store, or online. Try to treat both the top and the bottom of the floor. The bottom in case you can reach it.
● Step 4: Add new wood
If you have removed part of the wood, replace them with new parts. As said before, if the damaged parts are more significant, I recommend replacing the whole plank or planks.
In case you have removed only small parts, or even only the surface, you can replace it with epoxy wood filler, or other wood restoration material.
● Step 5: Finishing
Finish off by applying paint or other finish you are used to using onto the replaced parts. Do not forget the underside of the wood.
How Long Does It Take For Wood To Rot?
Wood can start to rot in after one week under ideal conditions. But it will take up to 6 months to see real signs of rot. It greatly depends on moisture, temperature, and exposure. The environment is always laden with wood-rotting accelerators such as fungi that create the perfect wood rot once combined with moisture humidity and exposed wood.
Depending on whether you’re dealing with wet rot or dry rot, the amount of time taken by the wood to rot will vary. The proper temperatures must obtain for wet rot, i.e., 65-90 degrees F, oxygen, dampness/moisture, and the actual wood. Once these conditions are favorable, it takes approximately one week to ten days for the rot to develop. Noticing the actual rot, however, takes much longer.
Wet rot spreads quicker to the dampest regions of the wood and as such should be removed immediately, one notices its presence. Dry rot will spread quicker in poorly ventilated areas.
How Far Can Dry Rot Spread?
Discovering wood rot at its initial stages is not easy. Mostly, we come to realize the presence of wood rot upon seeing its impact. Once dry rot takes hold of your timber, the ramifications can be far-reaching if not properly kept in check. What makes it even more dangerous is that spreading doesn’t need much moisture. In contrast to wet rot that needs moisture or dampness. Dry rot spreads to all areas on the wood floor where conditions are suitable. It doesn’t stop with the floor. Dry rot can spread to and damage your house’s support beams, ceiling joists, roof decking et Cetra.
How Quickly Can Dry Rot Spread?
Once the right conditions prevail, the dry rot can spread really quickly. Dry rot thrives at 66 to 70 degrees Fahrenheit and likes poorly ventilated areas. It needs no abundance of moisture for it to spread on your wooden floor. 30 to 40 percent moisture is just as sufficient. Wood experts agree that dry rot has the capability of spreading up to 3 inches per day, under perfect conditions.
Does Rotted Wood Continue Rotting?
Rotted wood will continue rotting, and can spread across your floor if not stopped correctly. Wet rot will continue as long as there is a wet or damp environment. Dry rot can spread in a dry environment and likes poorly ventilated areas.
Depending on the scale of the damage, treat the damaged areas. Or replace the wood if the damage is more severe. Ensure that you treat the other wood close to it with an effective fungicide. If you are unsure what to do, ask a professional for help.
Does Dry Rot Continue To Spread?
Dry rot will continue to spread when it is not treated correctly. It does not need a wet or damp environment. Particularly when the area is poorly ventilated, it is prone to spread further. I recommend replacing the infected wood and treating other areas with an effective fungicide.
It is slightly different compared to wet rot, which does not spread. However, this doesn’t mean that wet rot is less dangerous. Nothing could be further from the truth. However, dry rot is by far much worse in terms of spreading.
How Long Does It Take For Dry Rot To Appear?
Two things should not be confused here, the first one being the time taken for the dry rot to infect your wood and the time such infection manifests itself. Ordinarily, dry rot will be discovered through its effects on the wood.
This does not mean that it needs time to develop and grow. As captured in this article, the dry rot, all suitable conditions prevailing, takes approximately a week to ten days for the rot to develop. It takes much longer for the effects to appear. Once spotted, you’re best advised to fix the problem without delay. The longer you wait, the bigger the problem will be.
Can Dry Rot Spread From House To House?
Dry rot is caused by a fungus that can spread rapidly if untreated. It can spread all over your house and cause extensive structural damage if the situation remains uncontrolled. Spreading from house to house is a different issue altogether and is uncommon. However, if the houses or some of their parts are joined or connected with wood, then the dry rot may spread from one house to another.
If wood is moved from one house to another one, it is possible that the dry rot is moved as well. I always recommend being extremely careful to move wood or timber from one house to another one when rot or harmful insects (like the long worm or woodworm) are involved.
Can Dry Rot Spread Without Moisture?
Dry rot is capable of spreading without moisture. However, it is essential to know that moisture is an important element for its growth at the initial stages. It occurs much more often in poorly ventilated areas. However, as for spreading, dry rot can spread with minimal moisture requirements.
Identification and Locations of Wood Rot
Wood rot is often associated with the floor, but it can affect various parts of your home. Wood rot can occur in areas such as support beams, ceiling joists, and roof decking. The ability to identify wood rot early can significantly reduce the risk of substantial structural damage.
There are two types of rot that can affect your home: dry rot and wet rot. Each manifests with distinct signs.
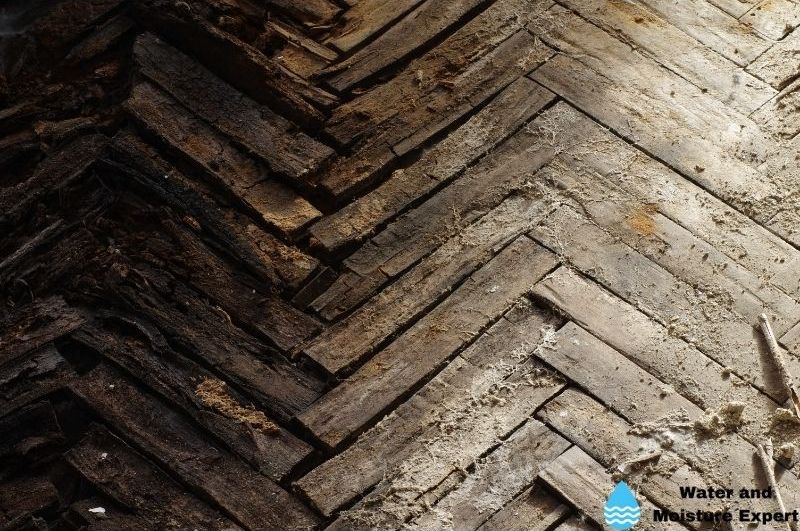
- Dry rot typically leads to wood shrinkage and can cause a breadcrumb-like texture. It often displays deep cracks within the wood.
- Wet rot, on the other hand, exhibits in the form of soft, spongy wood. This type of rot often leaves black fungus around the rotting wood.
• Strategy to Curb Wood Rot
One of the effective methods to prevent the spread of wood rot is the use of fungicide. Treating the surrounding and infected wood with a fungicide can avoid the extensive spread of rot.
However, it’s essential to know the proper use of these chemicals to ensure they’re effective. They should be applied following the manufacturer’s instructions.
• Causes of Wood Rot
Excess moisture and poor ventilation are major culprits for wood rot. When moisture infiltrates your home, it creates an ideal environment for fungi to grow, leading to wood rot.
Many factors can contribute to excessive moisture, from leaky pipes and roofs to damp basements. On the other hand, poor ventilation can also trap moisture, providing the fungi a conducive breeding ground.
• Risks Associated with Wood Rot
Structural damage is the most common risk associated with wood rot. However, it can exceed that. Mold and fungus associated with wood rot may lead to health issues, like allergies and respiratory problems.
It is, therefore, crucial to address wood rot as soon as it’s detected. If you suspect an extensive infestation, you might want to consider professional services.
• Seeking Expert Assistance
For excessive wood rot, it may be wise to seek help from professionals. Contractors that specialize in wood rot repair can efficiently deal with this issue and may help prevent future occurrences.
Before hiring a company, ensure they have proper certification and positive reviews. You can use Better Business Bureau to verify the credibility of professionals.
• Regular Maintenance and Inspection
Prevention is always better than cure. Regular maintenance and inspection of your home can help you detect wood rot early, which can prevent further damage. Scheduled inspections around your home can save you costly repairs in the future.
• DIY Wood Rot Treatment
In less severe cases, DIY methods can be an effective solution to treat wood rot. Applying borax and vinegar solution or a mixture of bleach and water can be a home remedy for wood rot.
Remember, consistency is key. Apply your DIY fungicide repeatedly to ensure all the fungus is eliminated.
• Personal Protective Equipment
Safety is paramount when dealing with wood rot. Mold and wood dust particles might harm your body in various ways. Therefore, always use personal protective equipment, like gloves and a mask, while handling wood rot. This way, you can avoid exposure to fungi and other potential hazards.
• To Sum Up
In conclusion, dealing with wood rot can be a challenging task for homeowners. However, knowing how to identify, treat, and prevent it can save you from potential risks and expenses.
Whether you choose to do it yourself or hire a professional, your actions towards wood rot will ensure your home’s longevity and safety.
Understanding Dry Rot and Wet Rot in Wood Flooring
• The Prevalence of Dry Rot
Dry rot represents a specific kind of wood destruction. This form of rot is typically perpetrated by a certain species of fungus known as Serpula lacrymans. This particularly damaging organism thrives on wood containing a moisture content of 20% or higher.
For accredited information about the specific nature of the Serpula lacrymans fungus and how it interacts with wood, consult resources provided by governmental educational sites such as The US Department of Agriculture Forest Service.
Given the potential severity of dry rot issues, prompt and professional intervention is crucial. Even minimal delays can result in the complete degradation of your timber, leading to costly repairs and replacements.
• Wet Rot – a Common Flooring Foe
Contrary to dry rot, wet rot is a term used to refer to a more common form of wood degradation. This type of rot is typically caused by the Coniophora puteana fungus, which thrives in excessively moisture-saturated wood.
The damp conditions bolster the growth of this destructive organism, which can compromise the structural integrity of your flooring.
• Identifying Signs of Rot in Your Flooring
Recognizing a rot problem early can make a significant difference in saving your wood flooring. You’re likely facing a rot problem if you notice matted, whitish growth that may have yellow or lilac patches on your wood. More serious symptoms can include dark, spongy flooring and a persistent musty odor.
In some instances, the wood might also show signs of shrinking or splitting. If not sure about these signs, it would be ideal to engage a professional flooring expert to confirm your observations.
• Killing Fungus the Homemade Way
Regular cleaning and disinfecting can make a big difference when trying to fight wood flooring rot. One versatile remedy is using household vinegar.
When used correctly, vinegar can effectively destroy the fungus responsible for rot. Simply combine a cup of vinegar with warm water and use this solution to clean the affected area.
Another handy substance for combating fungus is Borax. Easily available and simple to use, you can sprinkle Borax on the dry, affected flooring, let it sit for about 30 minutes, and then vacuum it up. This simple process can help kill mildew, fungi, and mold, helping to protect your floor from further damage.
• Leveraging Natural Light in the Fight Against Fungus
A little-known fact is that increasing the amount of light in a room can significantly prevent the growth of rot-causing fungi. This means that opening your curtains or blinds during the day can do a lot more than brighten your space.
Also, a useful tactic for managing a stubborn, musty odor in your wood flooring involves the use of lemon juice. A mixture of water and lemon juice can effectively neutralize even the most persistent smells.
• Effective Moisture Management and Care of Affected Areas
More often than not, moisture is the primary culprit initiating wood rot. Thus, reducing moisture in the affected areas is an effective way to prevent the spread of rot-causing fungi. This could involve fixing leaking pipes or improving the room’s ventilation.
Where rot has already taken root, it’s critical to treat or remove the affected parts without delay. As always, professional help is recommended to effectively ensure the complete eradication of the problem.
• Choosing Treated Wood Flooring and Regular Cleaning
When it comes to wood flooring, prevention is always better than cure. Therefore, investing in wood flooring that has undergone adequate treatment to prevent rot is crucial.
Moreover, maintaining a strict regimen of regular cleaning and disinfecting goes a long way in combating wood flooring rot. This is especially effective when you engage professional help, which involves thorough cleaning and disinfection processes.
With these tips, you can enjoy resilient wood flooring for years to come, creating a warm, welcoming space for your family and guests. Consider these steps as essential preventive maintenance in prolonging the lifespan of your wood flooring.
• Types of Rot Affecting Wood Flooring
Wood flooring is susceptible to various types of rot, including white rot, brown rot, and, most commonly, dry rot.
- White rot: Typically affects hardwoods and possesses a whitish appearance due to the fungus consuming hemicellulose and cellulose, leaving lignin behind.
- Brown rot: This type attacks both hardwoods and softwoods, decaying the cellulose and hemicellulose, leaving behind the brown-colored lignin.
- Dry rot: Contrary to its name, dry rot requires moisture to develop. It forms a cobweb-like fungus that gradually decays the wood.
In a webinar from the University of Tennessee, they explain the biology and different types of wood rot, which is beneficial for better setting preventative measures.
• Checking if Your Wood Floor is Starting to Rot
Early detection of wood rot can save flooring and, importantly, save costs. Be on the lookout for the following signs:
- Discoloration: A clear indicator that rot may have set in. Colors variate depending on the type of rot.
- Texture change: Rotten wood is often softer and may feel spongy to the touch.
- Fungal growth: This could be spore dust or larger, visible fruiting bodies of the fungus.
• Repairing Wood Flooring Experiencing Rot
Once you’ve confirmed wood rot’s presence, it is essential to undertake repair and remediation measures. Here’s a simple guide on how to repair rotting wood floors:
- Identify the extent of the damage: Understand how far the rot has spread before starting any repair work.
- Safety precautions: Wear an appropriate mask and gloves before cleaning or removing the rotten wood.
- Remove the affected parts: Using a wood chisel, remove all rot-affected parts of the wood.
- Treat the remaining wood: Apply a wood hardener to fortify the remaining wood and prevent further rot.
- Fill in the gaps: Use a wood filler or epoxy to fill in the removed sections, ensuring a seamless repair.
• Understanding the Duration and Spread of Wood Rot
Wood rot is not an overnight event. It hinges on multiple factors, such as the type of wood, the moisture level, and the environmental conditions. While there’s no universal time frame, wood rot can begin to manifest in a few months if conditions are conducive.
Once established, dry rot can spread quickly, even on surfaces that aren’t directly in contact with the initial source. It can travel through masonry, plaster, and other building materials, making it capable of affecting vast areas if left unchecked.
• Continuing Spread of Rotted Wood and Dry Rot
Once a portion of the wood is rotten, it can continue to rot if the conditions that led to its rotting persist. Similarly, dry rot continues to spread if the environment stays damp and warm. Therefore, remediation must also address the root cause to prevent future recurrences.
• Appearance of Dry Rot
The time for dry rot to appear varies. Conditions including but not limited to the moisture content, temperature, ventilation, type of wood, and presence of previous rot allow dry rot to appear anywhere from a few weeks to several months.
• Dry Rot Spread across Locations
Dry rot can indeed spread from one location to another under certain conditions. While it requires a source of moisture to thrive, it can travel through other materials and could feasibly reach another house.
Spores can also be carried in the air or on clothing and tools and start a new colony if they land in a suitable environment.
• Spread of Dry Rot without Moisture
While dry rot needs moisture to grow and decay wood, the fungus can survive without it. Spores can remain dormant for a long time and may become active once exposed to water again. However, the actual decay process itself can’t occur without the presence of moisture.
• Choosing the Right Material for Filling Rotted Wood
In dealing with rotted wood, the first crucial step is choosing the right material to use as filler. In my experience as a seasoned carpenter, I highly recommend the use of epoxy or wood putty. They are both excellent choices for filling rotted wood due to their reliable adherence and long-lasting properties.
Epoxy is an adhesive used primarily in structural applications. It is resistant to high heat and can bond to a variety of surfaces. Available in various formulations, epoxy possesses a higher ability for gap filling.
On the other hand, wood putty, also known as wood filler, is typically used in finishing wood surfaces. It is handy for patching small cracks, dents, or holes. However, for extensive rotted areas, epoxy might serve better due to its superior strength and more durable finish.
• Procedure for Repairing Rotted Wood
Once you have chosen your preferred filler, be it epoxy or wood putty, the process of repairing the rotted wood follows. The actual repair tasks involve several steps that ensure not only aesthetic coherence but also the durability of the repair.
The first step is to liberally apply the filler on the rotted section of the wood. Ensure the epoxy or putty completely fills the rotted part to provide a solid base when set. When the filling material has dried and set, you then move on to the next step: sanding.
Sanding is essential to achieving a smooth surface that matches the rest of the wood. This can be achieved by using a variety of sandpaper grit sizes to ensure an even finish. However, always remember to protect your eyes and lungs with appropriate personal protective equipment (PPE).
A site published by the Center for Construction Research and Training Health Hazards in Construction provides a good resource on why and how to use PPE in tasks like sanding.
After sanding, the wood is then ready for priming. Priming promotes better adhesion of paint or stain, increases paint durability, and provides additional protection for the material beneath.
The last step involves painting or staining the repaired area. This step is optional, particularly on staining for wood that will not be exposed to elements. However, for outdoor wood repairs, painting or staining is necessary to protect the repaired section from moisture, sunlight, and insects.
• When to Seek Professional Help
Sometimes, wood rot may be too extensive, and the repairs too complex for DIY efforts. The skill required may necessitate professional intervention. In such situations, I would recommend seeking professional help from carpentry services specializing in wood rot repair.
A good example would be Handyman Connection of Eden Prairie, renowned for providing comprehensive solutions to wood rot problems.
Having a professional take over means more than just handing over the job. Engaging a professional carpentry service places the responsibility of addressing the rotted wood problem, along with any underlying issues, in experienced hands.
Moreover, professionals have a higher likelihood of completing the job right the first time, ensuring your repair is durable and aesthetically pleasing.
Remember, the goal is not only to repair the present rot damage but also to protect the wood from future decay. Hiring a professional allows for an in-depth examination of the extent of the rot, the cause of the rot, and the best repair methodology to provide longer-lasting protection.
Rotted wood repair is crucial in maintaining the structural integrity and appearance of your home. It ensures the effective preservation of your property using the right materials and techniques.
As a long-standing expert in this field, I confidently attest there are viable options for overcoming the problem, ranging from DIY methods utilizing epoxy or wood putty to engaging professional services like Handyman Connection of Eden Prairie.
Identifying the Type of Wood Rot
The first step in repairing wood rot is understanding whether you’re dealing with dry rot or wet rot. This knowledge directs your approach, as each type of rot requires specific treatment methods. Dry rot tends to spread faster, even in the absence of moisture, while wet rot requires a moist environment.
• Inspecting the Underneath Beams
One must never underestimate the importance of checking the underneath beams during the repair process. Failure to do so could lead to overlooking potential damage, which compromises the durability of the repairs.
• Using Fungicides
Once the rot is identified, treatment begins. Commercially available fungicides play a crucial role in controlling the spread of rot. Alternatively, don’t shy away from using homemade fungicides to treat the affected wood.
• Making Repair or Replacement Decisions
Based on the extent of the damage, choose whether to repair or replace the affected wood. Repair is usually advisable for minor damages, while extensive damage necessitates replacement.
• The Role of Epoxy Consolidant
Epoxy consolidant helps in strengthening the wood fibers. Injecting the consolidant into drilled holes results in a tougher structure, preventing the recurrence of rot.
• Repairing Small Damage Areas with Wood Patching Products
For smaller areas of damage, applying a wood patching product and shaping it using an appropriate tool can effectively curb the rot, preventing further deterioration.
• Removing the Rotted Wood
When removing rotted wood, ensure to extend to at least three feet beyond the affected area. It helps stop the further spreading of the rot, guaranteeing comprehensive treatment.
• Surface Cleaning
Surface cleaning is essential in ensuring no fungi remain on the wood. Thorough cleaning paves the way for applying fungicides, thus deterring future rot growth.
• Fungicide Application
Employ a top-to-bottom approach when treating the wood surface with fungicides. Such a method ensures full protection against future rot outbreaks.
• Replacing Removed Parts with New Wood
Once the rotted wood is removed, replace it with new wood. If the damage was extensive, consider replacing the entire plank for complete restoration.
• Finishing the Repaired Wood
The proper finishing, including painting, should complete the repair process. This not only enhances the attractiveness of the wood but also seals it off from potential rot infestation.
• Understanding Wood’s Susceptibility to Rot
Appreciate the fact that wood can start to rot in as little as one week under conducive conditions. However, visible signs of rot may take up to six months to appear.
• The Quick Spread of Dry Rot
Dry rot exhibits a rapid spread, reaching up to three inches per day under optimal conditions. This remains a potential threat across the wood floor if the rot isn’t treated effectively.
• Dry Rot’s Survival Mechanism
In poorly ventilated areas, dry rot can survive without moisture. Its development can be quick, usually taking a week to ten days although visible signs may take longer.
• Dry Rot Spread Across Houses
Although dry rot spread from house to house is a rare scenario, it is possible especially if the houses share wooden parts. Thus, treating rot in one house reduces the risk of spread to neighboring houses.
• Initial Moisture Requirement for Dry Rot
It’s important to note that while dry rot can spread without moisture, initial moisture is essential for its growth.
• Regular Maintenance of Wood Floors
Maintaining wooden floors involves regular vacuuming or dry-mopping to keep them free from dust and fungi, which greatly reduces the risks of wood rot.
• Dealing with the Expansion and Contraction of Wood Floors
Expansion and contraction of wood floors can result in squeaky noises and separations between joists and subfloors, but these can be fixed, restoring the floor’s integrity.
• Sanding the Floors
Sanding a wood floor might seem like an arduous task, often best left to professionals. However, for those who choose to go the DIY route, safety precautions must be taken, including wearing protective gear during the process.
More information on this can be obtained from sites such as OSHA, a .gov non-commercial site that provides useful safety guidelines.
Understanding Dry and Wet Rot
Dry rot, scientifically named Serpula lacrymans, is a menace to wood pieces. This fungus does not need excessive moisture to survive, being able to flourish in wood with as little as 20% moisture.
Compared to wet rot, which is caused by the fungus Coniophora puteana, dry rot is the lesser of two evils. Wet rot demands extremely damp conditions to thrive and can wreak havoc in such environments.
• Recognizing the Symptoms of Wood Flooring Rot
One should be aware of the common signs indicating wood flooring rot. Whitish growth, interspersed with yellow or lilac patches, can be a definite sign. Other hallmark symptoms include shrinking, crumbly or splitting wood, any noticeable darkening with a soft, spongy feel in severe cases speaks volumes.
Moreover, a musty mushroom-like odor should raise immediate red flags. These symptoms collectively or even individually, strongly suggest the presence of rot in your wood flooring.
• Home Remedies for Combating Wood Flooring Rot
There are a number of home remedies that one can employ to address wood flooring rot. A potent yet gentle disinfectant such as vinegar, when blended with warm water, can be an effective tool to clean the affected area.
Sprinkling borax on dry wood flooring can also substantially deter additional fungal growth. In addition, maintaining a well-lit environment is advisable, as it creates less-than-ideal conditions for fungal development.
A simple mixture of water and lemon juice can be employed as an effective remedy to eliminate the foul odor that comes with wood rot. Besides, implementing measures to reduce moisture in affected areas is key.
When purchasing, opt for wood flooring that has been pre-treated against rotting, as this can provide an additional layer of protection.
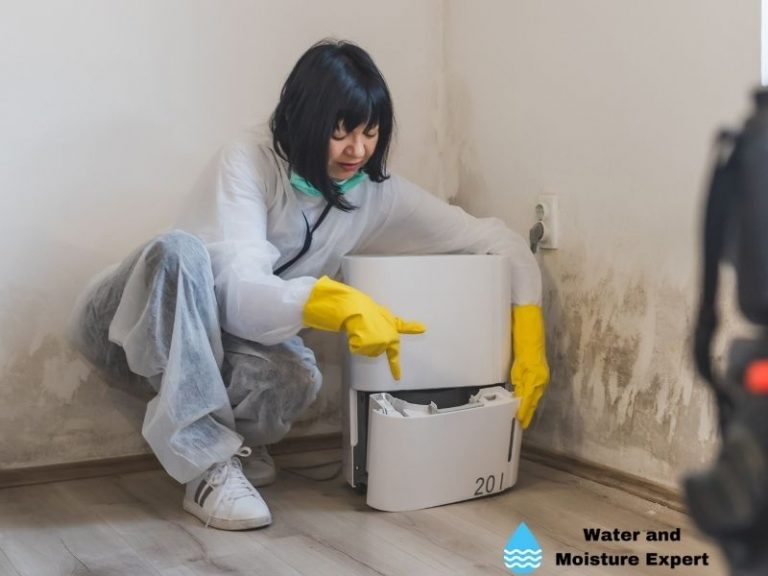
• Importance of Professional Cleaners
Having your wood flooring cleaned and disinfected by professional cleaners on a regular basis is an indispensable step for combating rot.
Professional cleaners deploy superior tools and proven strategies such as dry cleaning or steam cleaning to halt and eradicate fungus proliferation. These advanced methods can ensure that your wood survives for a long and looks great as it should.
• Regular Maintenance is Essential
The key to ensuring the quality and longevity of your wood flooring lies in consistent maintenance and prevention. Frequently checking your wood for signs of rot, strategically reducing humidity in your living area, and using protective treatments on your floors are a few recommended strategies.
Coping with the menace of wood rot requires appropriate knowledge, proactive detection, and efficient treatment. To learn more about wood rot and the best ways to manage it, the United States Department of Agriculture’s Forest Service can provide further insights.
In conclusion, being diligent about your wood’s health and getting professionals involved when needed can save you from expensive repairs and maintain the appeal and durability of your wood flooring.
Checking the Depth of the Rotted Wood
In handling rotted wood, one of the crucial initial steps is determining the extent of the damage. This can be effectively done using a simple but useful tool – a ruler.
Measure the depth of the rotted portion to help you evaluate the severity of the situation. A point to remember is that if the rot is too deep, a replacement might be deemed necessary. When it comes to wood rot, depth is not a trivial matter and hence should not be ignored.
• Importance of Removing the Rotten Part
Before starting any repair work, it is highly essential to remove as much of the rotted wood as you can. This gives you a solid and sturdy foundation for applying the filler.
By doing so, it improves the effectiveness of your repair job, ensuring a stronger and more durable finish. You can use a chisel or a wood gouge for this purpose.
• Different Types of Fillings
When it comes to filling the void left by the removal of rotted wood, there are a couple of popular choices available. The two common types of fillings include epoxy and wood putty. Both these materials have properties that make them suitable for different repair situations.
• Epoxy: The Hardening Liquid Plastic
Epoxy is a form of liquid plastic. This substance hardens as it dries, adhering to most surfaces and filling the voids left by rotted wood. The strength of the epoxy bonding ensures a strong fix.
Additionally, it is highly resistant to moisture and decay, making it an excellent option for areas susceptible to high moisture. A practical guide on how to effectively use epoxy can be found at the University of Missouri’s Extension website.
• Wood Putty: The Stiff Filler
On the other hand, wood putty, often yellowish in color, is a stiff filler that can easily be molded to match the profile of the wood.
Its high viscosity enables it to adhere to the wooden surface effectively and provide a reliable repair solution for high-profile areas. Wood putty is an excellent choice for filling smaller holes and cracks.
• Sanding, Priming, and Painting for a Seamless Finish
Once the filler, either epoxy or wood putty, has dried, it is time to work on achieving a seamless finish. The first step here is sanding the dried filler until it is smooth and blends in with the surrounding wood.
Next, apply a coat of primer to prepare the repaired area for painting. Finally, applying paint or stain that matches the original wood helps mask the repair work, resulting in a professional and seamless finish.
• Seeking Professional Help
For those who find the task of repairing rotted wood daunting, there is always professional assistance available. A recommended option is the Handyman Connection of Eden Prairie, which has carved a niche for itself in the realm of home carpentry services, particularly specializing in wood rot repair.
Trained and experienced professionals can carry out the task efficiently and deliver results that are not just sturdy but also aesthetically pleasing.
In a nutshell, while dealing with rotted wood may seem a challenging task, following the right procedure with due diligence can result in lasting and pleasing results.
Whether you choose to do it yourself or hire professionals, knowledge of the proper steps involved will ensure the task is done impeccably and your woodwork retains its aesthetic appeal and durability.
• Identifying the Cause of Wood Rot Matters
The process of tackling wood rot begins with finding the underlying cause. This is because unless we eliminate the roots, we merely treat symptoms without getting to the essence of the issue.
Potential causes include persistent water leaks, poor ventilation, and damp conditions. According to UC IPM, early attention to these causes can save property owners significant repair costs down the line.
• Risks Placed on Structural Soundness
If left untreated, wood rot, especially dry rot, can seriously compromise the structural integrity of your home. Elements like the foundation, walls, or roofing could weaken significantly, increasing the risk of catastrophic failure. Thus, speedy identification, treatment, and prevention of wood rot is crucial.
• Treating Rotted Wood with a Fungicide
Fungicides are an effective way to treat rotted wood. They come in both purchased and homemade variants. Regardless, the proper application ensures the elimination of fungi causing rot. In most cases, they can be applied through brushing or spraying, depending on the severity of the rot.
• Utilizing Epoxy Consolidant to Reinforce Wood Fibers
In instances where dry rot has compromised the wood, using epoxy consolidant is suggested. This product penetrates the rotted wood fibers, hardening them and preventing further rotting. It is an ideal solution when you wish to retain the original wood without complete replacement.
• Importance of Proper Wood Cleaning
Before any treatment, cleaning the wood surface is paramount. This practice involves removing loose paint, dirt, mold, and other substances that may hinder the effectiveness of the treatment. Remember, a clean surface allows for optimal penetration of fungicides or consolidants.
• Using Epoxy Wood Filler for Restoration
Epoxy wood filler is an excellent tool for the repair of small, rotted wood areas. It both strengthens and protects the affected wood, thereby preventing the recurrence of rot. This product is especially useful for intricate detailing that you do not wish to remove or replace.
• Understanding Wood Rot Timeline
The rate at which wood rots varies greatly due to elements such as wood type, location, and exposure to moisture. For instance, continuously damp wood would decay faster than something more shielded. Knowledge of this fact assists in early detection and treatment of wood rot, reducing potential damage.
• Possibility of Dry Rot Spreading
Unchecked dry rot can spread to other wooden areas of your house, including support beams, ceiling joists, and roof decking. Such a pervasive spread of rot raises serious concerns about your house’s structural integrity. Therefore, curbing its spread early on is crucial.
• Treating Adjacent Wood to Prevent the Evolution of Dry Rot
It is a helpful preventative procedure to treat wood close to the affected areas. This can limit the potential spread of dry rot. Employing an effective fungicide ensures that any invisible fungal spores do not take root.
• Dry Rot’s Ability to Transfer from House to House
While it is unusual, dry rot can indeed spread from one house to another. Particularly, this risk increases if houses share wooden connections or parts. This fact calls for careful attention to shared or adjoining wooden structures.
• The Connection Between Dry Rot, Moisture, and Its Spread
Interestingly, while dry rot can grow without additional moisture, its initial birth indeed relies on a damp, humid environment. Therefore, maintaining a dry, well-ventilated home minimizes the risk of dry rot infestation significantly. Recognizing this connection is key to a proactive approach against rot.
Recognizing the Signs of Wood Rot
Recognizing the signs of wood rot early can save homeowners from significant damage later on. One common sign to watch out for is a bouncy floor. This can indicate that the floor joists, which support the floorboards, are rotting away.
Similarly, musty odors emanating from your floor or walls might signify the presence of wood rot. It is often accompanied by unusual humidity conditions in the house.
Sometimes, this elevated humidity can cause condensation to form on windows and other cool surfaces. If these signs are noticed early, the damage can be restricted and treated before it becomes extensive.
• The Causes Behind Wood Rot: Moisture and More
The predominant cause of wood rot is excessive moisture, particularly in overlooked places like crawl spaces. Crawl spaces regularly accumulate moisture due to condensation, leaks, or groundwater saturation.
Over time, this moisture encourages the growth of fungi leading to mold and mildew. These, in turn, can cause wood to decompose, thereby creating a conducive environment for wood rot.
This damp setting also makes it a perfect breeding ground for rodents, insects, and other pests. To know more about crawl space moisture and fungi, visit Environmental Protection Agency.
• Effective Methods for Repairing Wood Rot
After identifying and understanding wood rot and its cause, the next step is to repair it. This often entails the involvement of professionals, as wood rot often occurs in structural parts of the building.
Moreover, it may require replacing vast sections of wood that have been compromised, which might be too complex for an average homeowner to handle.
One of the methods professionals recommend for repairing wood rot is crawl space encapsulation. This process involves covering the crawl space with a thick, durable plastic vapor barrier. This barrier insulates the space and stops moisture from progressing into your home’s wooden structures.
Another technique used is sistering floor joists. This method involves attaching new joists to the original ones that have been weakened by rot. The new joist ‘sisters’ the old one and together, they work to support the floor above.
Sometimes, the best solution might involve completely replacing the rotted wood floors. This is especially necessary if the damage has spread significantly and poses a risk to the stability of the house.
• Addressing the Root Problem: Moisture
Before any repair work begins, it’s crucial to address the source of the moisture. Treating the wood rot without eliminating the moisture will eventually lead to repeated occurrences of the same problem. Thus, understanding and rectifying the source of moisture should be the first step in any repair process.
• The Importance of Professional Assistance
Working with professionals when dealing with wood rot is extremely recommended. They have the experience and skills necessary to diagnose the extent of the damage and suggest the best repair techniques.
Trained professionals can ensure the work is done safely and effectively, thereby preserving the structural integrity of your home.
• Addressing Rotted Joists in the Basement
If the wood rot has reached the joists in the basement, professionals can assist with shoring up the floor and replacing the joists.
The replacement of rotted-out joists is a critical task that requires an understanding of floor structure and load-bearing capacity – something that seasoned professionals can handle best.
• Risks Associated with DIY Repairs
While a quick DIY fix might seem appealing, it may result in further damage. Unless you have a thorough understanding of the structure of your home and the problem at hand, attempting to repair wood rot can potentially worsen the damage.
Hence, when it comes to handling structural repairs, let trained professionals do the job. In conclusion, wood rot is a serious problem that can lead to severe damage if left unchecked.
Early detection and repair by professionals can help maintain your home’s structural integrity and save you from substantial costs and headaches in the long run.
• The Menace of Wood Rot in Buildings
Often, wood rot tends to be overlooked during building maintenance checks. Over time, wood rot can lead to the degrading of the building structure. Thus, timely detection and proper treatment are essential to preserve the longevity of buildings.
• The Root Cause of Wood Rot: Excessive Moisture
Many might still be wondering, what exactly triggers this destruction? The answer is moisture. It’s the surplus moisture that enables these conditions.
Over time, damp environments attract fungi, which in turn is conducive to wood rot. The moisture might come from leaky pipes, cracks in the walls, excessive humidity, or even poor ventilation.
• Wet Rot: A Fungal Love of High-Moisture
Diving further into the types of wood rot, wet rot turns out to be the most common. This is mainly due to the fact that it’s caused by a fungus, which thrives in high-moisture environments.
You can easily identify wet rot – the wood becomes soft and spongy, almost resembling a sponge. Plus, the color usually turns to black. The darker the color, the more extensive the damage.
• Dry Rot: The Independent Fungus
In contrast to wet rot, dry rot is caused by a specific type of fungus that doesn’t need much moisture to spread. This type of rot can be slightly more difficult to locate, especially in the initial stages.
The wood affected by dry rot turns browner in color. Another distinctive detail is the fruiting body that develops on the timber, marking the fungus’s presence.
• The Art of Repairing Wood Rot
Repairing wood rot can be a meticulous task requiring expertise and knowledge. It usually involves a systematic process. First, it is essential to identify and confirm the rot. Following identification, the wood should be treated with a suitable fungicide to halt the spread of the fungus.
In case the damage is severe, some parts of the timber may need replacement. Finally, to ensure such damage doesn’t reoccur, sealers or specifically treated wood materials should be used. It could impede the recurrence of wood rot in the future.
However, this process might be overwhelming for anyone without a background in construction or building maintenance.
• A Plea for Professional Help
As a professional with years of experience, I cannot stress enough the importance of seeking expert help. Dealing with wood rot is more than just a simple DIY task.
Professionals can address the nuances that escape an untrained eye. Experts in wood rot repair will conduct a thorough inspection, accurately identify the type of rot, and provide the appropriate treatment.
Dealing with wood rot might seem daunting initially. However, once you grasp the fundamentals, it’s far from being complicated.
You can find additional information on this topic on the University of California’s Agriculture and Natural Resources website. With their extensive resources, you should be able to understand more about wood rot and its prevention.
Keep your buildings strong and robust. Never underestimate the minimal signs of damage, and always remember: prevention is better than cure.
Understanding Dry Rot: The Ideal Conditions for It
Dry rot is quite common in many households and it could be considered the ultimate enemy to your wood fixtures. A major thing to remember about dry rot is that the fungus responsible for it thrives in woods having a moisture content of at least 20%.
Moreover, dry rot often prefers to allocate in areas that are poorly ventilated, damp, and warm. It is essential to keep your wood dry and ventilated to keep this mold at bay.
• Wet Rot: The Bane of Your Wood Flooring
Switching our perspective to a closer adversary of wood, wet rot tends to be more prevalent than dry rot, particularly in wood flooring. The reason for this is the frequent exposure to prolonged moisture.
Wood flooring is often subjected to water spills and humidity, which can unknowingly invite wet rot.
• The Devastating Signs of Wet Rot
Severe cases of wet rot are not just aesthetically appalling, but they can also cause considerable damage to the floor and lead to unpleasant odors. This can significantly impact the property’s value and general ambiance.
The signs of wood flooring rot can be quite diverse. It can range from having a matted whitish growth or shrinking, crumbly wood to having a musty mushroom-like smell. Moreover, the appearance of dark, spongy-looking flooring can be a strong indication of wet rot.
• Natural Remedies for Wood Rot
Getting rid of wood rot doesn’t always demand professional intervention. You can use natural remedies to eliminate and prevent fungi infestation. For instance, cleaning the affected area with vinegar can kill the fungi responsible for wood rot. Make sure you apply vinegar thoroughly and let it dry.
Similarly, sprinkling borax on dry wood flooring and vacuuming it after half an hour can combat mildew, fungi, and mold. Do remember to remove any excess borax and prevent any pets or kids from coming in contact with the treated area.
• Light Therapy and Lemon Magic
Several studies have demonstrated that increasing light in the room can disrupt fungus growth. So, make sure your rooms, especially those with wood flooring, are well-lit and ventilated.
To eliminate odorous smells originating from rot, a mixture of water and lemon juice works wonders. It not only has potent antibacterial properties but also leaves a refreshing smell.
• Fungal Infestation Prevention Tips
To effectively stop the spread of the fungus that causes wood rot, you need to reduce moisture in affected areas and treat or remove the affected parts. This step is crucial since moisture is a fundamental requirement for fungus growth.
Adopting a regular cleaning and disinfecting routine is key to preventing wood flooring rot. Areas like bathrooms and kitchens, where humidity is high, require special attention.
• When to Call in the Experts
While home remedies can be helpful, there are situations when you need to call professional flooring cleaners. They have the necessary equipment and proven methods to remove moisture thoroughly and prevent any form of fungal growth.
Consult with a professional if your own treatments aren’t working or the issue is widespread. You can check this link to find reputable professional cleaners near your area Harvard Home Cleaning List.
Remember, the key to a rot-free wood floor is consistent maintenance and swift action when you spot early signs of rot. It not only saves an enormous amount of time and money but also extends the life of your wood floors.
Identifying Types of Wood Rot: Dry and Wet Rot
In the world of wood decay, two primary types plague homeowners: dry rot and wet rot. Although their names suggest different moisture conditions, both types require water to instigate the decaying process.
Dry rot is caused by Serpula lacrymans, a type of fungus that destroys the parts of the wood which give it strength and firmness. Wet rot, on the other hand, is generally caused by Coniophora puteana. This fungus targets the parts of the wood that give it its rigidity, leading to a spongy and darker texture.
• How to Ascertain Wood Rot in Your Floor
Spotting the early signs of wood rot is integral to preserving the longevity of your household structures. When it comes to floors, signs may manifest in various ways.
Common signs of rot include floors feeling springy, loose, or softer underfoot or having a patch that is darker than the surrounding area. You may also notice fungal growth, a musty smell, or even disintegration when touched.
• Remediation Steps for Rotting Wood Flooring
First, it’s crucial to identify the source of moisture and remove it. Without removing the source, the rot will likely reoccur.
Then, cut out and remove the rotted section of the floor without damaging the surrounding areas. Treat the remaining wood and surrounding areas with a wood hardener and a fungicide to prevent future decay. Finally, replace the removed section with new, treated wood.
• Duration Required for Wood Decay
The speed at which wood rots can vary greatly due to several factors, such as the type of wood, its location, preservative treatments, and ambient conditions. Under favorable conditions, decay fungi can colonize wood within a few weeks but noticeable decay may take months or years to present.
• Understanding Dry Rot Spread
In the absence of barriers, dry rot may spread extensively across your property. The fungus that causes dry rot can travel through non-timber building materials to infect other wooden structures. The reach can be extensive, often causing more damage than initially meets the eye.
• Speed of Dry Rot Spread
The rate of dry rot spread can be quite alarming. Given ample moisture and a food source, dry rot spores can mature within a week and start to cause structural damage within six months.
• Continual Decay in Rotted Wood
Allowing rotted wood to remain untreated can result in ongoing decay. The persistence of favorable conditions will allow the growth and spread of rot-causing fungi, nullifying any chance of natural resolution.
• Persistence of Dry Rot
Contrary to the common belief, dry rot doesn’t cease once started. Instead, it proliferates across various structures, causing extensive damage unless treated promptly.
• Emergence of Dry Rot Symptoms
The first visible signs of dry rot typically appear between 2 weeks to 1 month after the spores mature. These signs might include flaking or crumbling wood, white fungal growth, or the appearance of orange-brown spore dust.
• The Possibility of Dry Rot Spreading from House to House
Although dry rot prefers to stay put in one location, it can spread to adjoining houses if they share timber structures or if spores are transported through air currents or human activity. However, such cross-property spread is relatively rare.
• Dry Rot Spread without Moisture
Moisture is a key ingredient in the life cycle of dry rot. Without it, the fungi cannot synthesize the required nutrients from wood and hence, cannot spread. However, it’s important to note that dry rot can lie dormant in dry conditions, awaiting a moisture source before growing again.
• Resources
Additional information on wood rot and its management can be found on university extension sites like Pennsylvania State University’s College of Agricultural Sciences, which provides a comprehensive overview of different wood-decay fungi and their implications for household structures.
• Checking the Depth of Rotted Wood
When dealing with rotted wood, it’s essential to assess the extent of the damage first. One simple method is to insert a ruler into the wood. If it goes in deeper than an inch or through the other side, the rot is severe. In such cases, you might consider replacing the wood entirely.
As a rule of thumb, less severe cases can be handled using wood fillers. Here are two commonly used fillers with their respective pros and cons.
• Use Epoxy for Rotted Wood
Among all the alternatives, epoxy is a popular choice for repairing rotted wood. This liquid plastic hardens as it dries and can adhere to various surfaces. This is its main advantage over some other fillers. It adheres well to rotted wood and creates a solid, durable repair.
Remember to remove any excess epoxy and smooth it out with a damp cloth to avoid overflow. However, make sure not to use epoxy on hanging surfaces of rotted wood, as it has the tendency to ooze out, causing an uneven repair.
You can find detailed guidelines on how to use epoxy on web pages such as those belonging to .gov or .edu domains.
• Using Wood Putty as a Substitute
Wood putty is another efficient solution for rotted wood repair. Known for its yellowish color, wood putty is sturdy enough to be applied on doors, frames, and similar surfaces.
One defining feature of wood putty that sets it apart is that it does not expand upon drying. This characteristic makes it easy to sand it flush to the wood once it’s completely dry, thus ensuring a smooth finish.
• Post-Repair: Sanding and Painting
Once your chosen filler has completely dried, it’s time for you to do some finishing work. I suggest that you sand it until it’s smooth. After rendering it smooth, you can now begin priming it. You can paint or stain the repaired area to match the rest of the wood.
• Dealing with Damaged Trim
It’s just as important to address any damaged trim when dealing with rotted wood. To ensure that the repair rolls out smoothly and without any hitches, replace the damaged trim in addition to repairing rotted wood.
• When to Seek Professional Help
Let’s face it, not all of us are handy with basic carpentry tools. If you find yourself struggling, don’t hesitate to seek professional help. There are specialized services like Handyman Connection of Eden Prairie that can take care of any rotted wood emergencies for you.
To summarize, dealing with rotted wood involves assessing the extent of the rot, selecting an appropriate filler, applying the filler, sanding it smooth, and priming and painting it.
Should these tasks be too overwhelming, recruitment of professional help is always an option. Remember to take things one step at a time and ensure each step is done meticulously to ensure a good quality repair.
The Causes of Wood Rot
Central to the understanding of wood rot is its main perpetrator – fungi. These antithetical organisms flourish in absorbent environments, causing host wood to decay unwaveringly.
Much like how plant roots absorb water, fungi secrete enzymes that degrade timber to a point where the wood becomes weakened or hollow. Considering how damaging this condition can be, it is vital to exercise preventative measures and treat wood rot proficiently.
• The Importance of Spotting Wood Rot Early
Preliminary recognition of wood rot is crucial in combating further damage. Common places prone to this fungal invasion often include the crawl space and other moist areas around the home.
Be on the lookout for discolored or damp wood, flaky wood surface, or fungus spores, usually seen as a cluster of small, fluffy clouds. The earlier you catch the wood rot, the more possible it becomes to manage the condition without needing to replace whole sections of your timber structure.
• Preventing Wood Rot with Crawl Space Encapsulation
One significant way to address wood rot is by implementing an effective crawl space encapsulation. This method prevents moisture from penetrating the crawl space, subsequently reducing the likelihood of wood rot occurrence.
The encapsulation process involves sealing the floor, foundation walls, and possibly the ceiling of your crawl space with a water vapor barrier. When complemented with a dehumidifier, it can dramatically desiccate the environment, making it unconducive for fungi to thrive.
• Extending Support with Sistering Floor Joists
Sistering floor joists is a tactic used to strengthen damaged joists that are affected by wood rot. This method involves attaching a new joist to the existing one, effectively doubling the strength of the damaged joist.
Not only does this increase structural strength, but it also boosts floor stability and lessens deflection. By sistering your floor joists, you’re providing an additional support system for your home’s structure, ensuring it stays robust and resistant against future wood rot attacks.
• When Full Wood Floor Replacement is Necessary
In extreme cases where wood rot has severely debilitated a wood floor’s integrity, a full replacement might be necessary.
Whilst it may be a significant investment, it serves as the ultimate solution to completely rid your home of the wood rot menace. Remember to hire a professional who is experienced in this field, such as professionals at JES, who can provide expert advice and tailor solutions for wood rot repair.
• Preventative Measures for Wood Rot
Addressing underlying moisture issues is crucial in preventing future instances of wood rot. Installing comprehensive drainage systems and dehumidifiers in your crawl space substantially inhibits the propagation of damaging fungi.
In addition, treating your timber with fungicides or sealants and performing regular inspections for early symptoms can help contain wood rot from spreading. Your home is an investment and it’s wise to actively protect it from the odds.
• Responding to Wood rot: Critical Strategies
When handling wood rot, speed is of the essence. Fast and efficient responses can mitigate further damage, ultimately saving you time and money in extensive repairs.
Whether it’s encapsulating your crawl space or treating your timber, keeping wood rot at bay ensures that your home retains its value and structural integrity.
You may refer to The National Pesticide Information Center NPIC for further information regarding wood rot and its management. Recognizing the signs, implementing preventive measures, and responding appropriately to wood rot is key to managing this household menace.
Remember, the last thing you want is for fungi to take residence in your living abode. Act swiftly, be vigilant, and consult a professional when in doubt. Your house, after all, is not just a collection of bricks and beams but the very foundation of your family’s comfort and security.
Recognizing Signs of Wood Floor Problems
The charm of wood floors is undeniable, but they often communicate potential issues through specific signs. Decoding these signs can prevent mild issues from escalating into costly problems.
– Gap Filling In Wooden Floors
One common issue is the presence of significant gaps between floorboards. These gaps may require gap filling. Ideally, you want your wood floor to have small, uniform gaps that give the wood room to expand and contract. Large or inconsistent gaps often indicate a problem that needs attention.
– Squeaky Floorboards
Squeaky boards are another signal of trouble beneath your feet. Generally, they are a sign of loose boards or inadequate support. Fixing this can be as simple as stabilizing the problem areas with shims or construction adhesives.
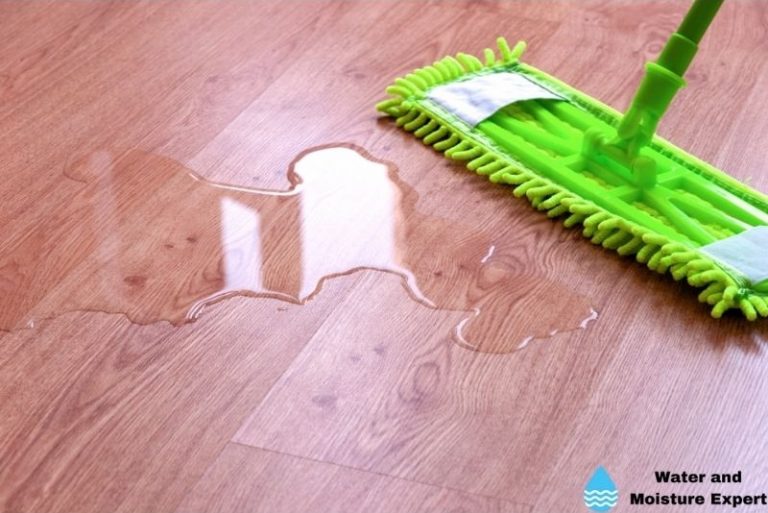
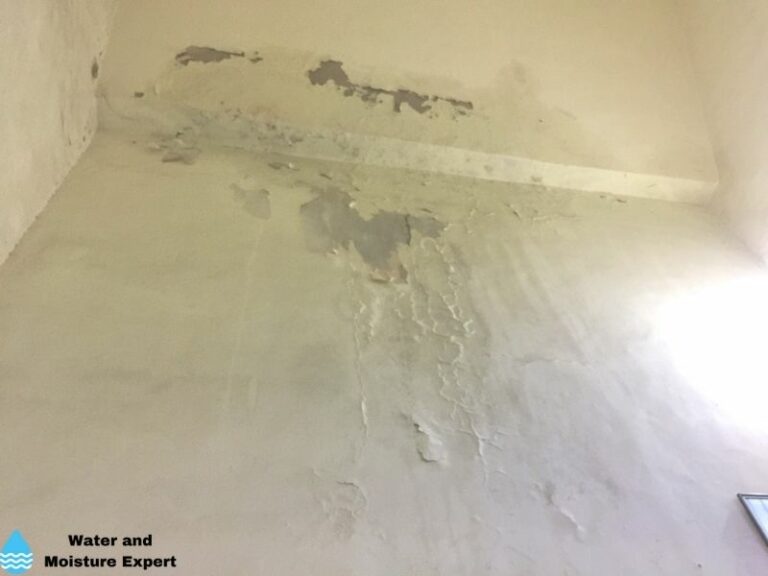
– Detecting Excessive Moisture
Beneath your wood flooring, mold, mildew, and fungus can thrive if exposed to excessive moisture. Left unchecked, these invaders necessitate professional sanding and refinishing, particularly for deep-seated problems.
– Dealing with Water Damage
Water damage can leave behind ugly stains and discoloration, marring the beauty of your wood floor. In such cases, hardwood sanding and refinishing can bring back the aesthetic appeal of your floor.
If the damage goes deeper, causing the floor to become soft and rotten with an unpleasant odor, its crucial to promptly remove the affected wood. Fixing the source of water infiltration prevents further damage.
– Coping with Floor Cupping
Floor cupping is when the floorboards take on a bow-like shape due to moisture absorption. Dehumidifying the area, removing affected boards, and using a moisture-resistant underlay are the standard responses to this problem.
– Avoiding Buckling and Crowning
Buckling and crowning are significant hardwood floor installation issues caused by excessive moisture or humidity. To rectify these, the boards must be dried, and the damaged areas should be sanded and replaced.
– Accepting Color Inconsistencies
Color inconsistencies, visible knots, and defects are common sights on wood floors. These are determined by the grade of the flooring and are often not a cause for concern.
However, blemishes near doorways, heavy furniture, or frequently used pathways need addressing. Luckily, they’re easily remedied through buffing or professional sanding services.
– Rectifying Unevenness
Unevenness in wood floors is often caused by joist issues. These can be fixed by repairing or replacing the affected joists before floor leveling.
– Dealing with Pet Stains
Pet stains on your hardwood floor can diminish the look of your floor. These can be removed either through deep cleaning techniques or low-cost sanding and refinishing services.
– Addressing Rough Surfaces
Rough surfaces on wood floors can trip you up and are generally unpleasant. Light sanding or screening the floor followed by a fresh coat of finish is an effective solution.
– Fixing Dents
Dents on wood floors are another common issue. Sanding the affected area and applying a finish generally fixes these issues.
– Managing Pest Infestations
Finally, pests like termites, powderpost beetles, drywood borers, or carpenter ants can cause serious damage to your wooden floors. These infestations require professional pest control services.
• Importance of Regular Inspection
Regular inspection and maintenance of your wood floors are incredibly important to prevent problems from escalating into costly repairs or pest infestations. I firmly recommend that you conduct periodic checks and address minor problems when they arise to preserve your wood floor’s lifespan and beauty.
Whether it’s squeaky floorboards, unevenness, dent, or moisture-related issues, learn to recognize the signs of trouble and treat them promptly with the appropriate solution, or call in professionals when the job is too big to tackle solo.