Can You Just Paint Over Water Damage? What pros say
If you plan to repair a water-damaged area in your home, you might be wondering about the best way to do it. Any time there is water damage to your home, you should take the time to find the source of the leak and repair it. Once the leak is fixed, you will be able to focus on making your repairs.
Can You Just Paint Over Water Damage
Generally, never paint over water damage directly. The first step is to find and fix the source of the water damage. The second step is to apply a suitable primer to the water-damaged area. The primer will form a barrier between the old and the new paint and ensure that the water damage does not reach the new paint. In most cases, not using a primer will result in stains on the fresh paint.
It’s easy only to want to fix the cosmetic parts of water damage, but there is usually more damage behind what you can see. I see many people try to paint over water damage only to find out that they should have taken the time to make some necessary repairs and use a primer before worrying about painting.
Contents
- 1 How Do You Remove Water Stains From Ceiling Without Pain?
- 2 Will Vinegar Remove Water Stains On A Ceiling?
- 3 How To Fix Bubbling Paint From Water Damage
- 4 How Do You Dry A Wet Patch?
- 5 How Do You Paint Over Water Streaks?
- 6 How Do You Cover Water Stains On Drywall?
- 7 How Do You Paint Water Damaged Plasterboard?
- 8 Can You Paint Over Water Stains On Baseboards?
- 9 How To Repair Water Damaged Wall Plaster
- 10 The Importance of Professional Consultation for Wood Rot and Damage
- 10.1 • The Perils of Painting Over Rotted Wood
- 10.2 • Termite Infestations and Rotted Wood
- 10.3 • The Role of Moisture in Wood Rot
- 10.4 • Mould Growth and its Association with Moist Rotted Wood
- 10.5 • Expert Assistance for Handling Rotted or Damaged Wood
- 10.6 • Addressing Moisture Issues
- 10.7 • Safety First: The Lead Test
- 10.8 • Calling Professional Help
- 10.9 • Don the Gear, Reduce the Risk
- 10.10 • No Lead, DIY Repaint
- 10.11 • Prepping the Surface
- 10.12 • The Best Patch For The Job
- 10.13 • Primer Is The Key
- 10.14 • A Tough Top Coat
- 10.15 • Alternatives For The Finish
- 10.16 • Water Damage: A Peril to Exterior Wood Elements
- 10.17 • Steps of Damage Recognition
- 10.18 • Dealing with Minor Damages
- 10.19 • Preparing the Surface
- 10.20 • Addressing Localized Rot
- 10.21 • Application of Wood Hardener
- 10.22 • Filling the Voids
- 10.23 • Smoothening the Surface
- 10.24 • Primer Application
- 10.25 • Painting
- 10.26 • Additional Coats
- 10.27 • Final Thoughts
- 10.27.1 – Proper Drying of Wood Before Repair
- 10.27.2 – Importance of Removing Rot or Damaged Wood
- 10.27.3 – Treating Water Stains on Wood
- 10.27.4 – Stripping a Wood Finish
- 10.27.5 – Using Auto Body Filler for Gaps and Cracks
- 10.27.6 – Sanding Wood Before Finishing
- 10.27.7 – Re-gluing Loose Joints
- 10.27.8 – Applying Stain or Paint to Achieve Desired Look
- 10.27.9 – Sealing and Protecting With Varnish
- 10.27.10 – Preventing Cupping or Warping with a Dehumidifier
- 10.27.11 – Importance of Wearing Protective Gear
- 10.28 • Identifying Water Damage
- 10.29 • Drying Water-Damaged Wood
- 10.30 • Preparing the Wood for Refinishing
- 10.31 • Tools and Materials You’ll Need
- 10.32 • Refinishing the Wood
- 10.33 • Seeking Professional Help
- 10.34 • Consideration for the Future
- 11 Checking for Water Damage before Painting Over Stains
- 11.1 • Importance of Drywall Drying
- 11.2 • Removal of Wet Insulation
- 11.3 • Speeding Up the Drying Process
- 11.4 • Checking for Structural Damage
- 11.5 • Replacing Damaged Sections
- 11.6 • Treating Mold and Patching Small Spots
- 11.7 • Removing Water Stains without Paint
- 11.8 • Using a Stain-Blocking Primer
- 11.9 • Top Five Effective Primers for Water Stains
- 11.10 • Step-by-Step Process for Painting a Water-Damaged Ceiling
- 12 Identifying and Repairing the Source of the Water Leak
- 12.1 • Significance of Applying Primer
- 12.2 • Dangers of Painting Over Unrepaired Damage
- 12.3 • Removing Water Stains from an Unpainted Ceiling
- 12.4 • Fixing Bubbling Paint from Water Damage
- 12.5 • Expedite Drying Process for Wet Patches
- 12.6 • Painting Over Water Streaks
- 12.7 • Covering Water Stains on Drywall
- 12.8 • Painting Water-Damaged Plasterboard
- 12.9 • Dealing with Water Stains on Baseboards
- 12.10 • Repairing Water-Damaged Wall Plaster
- 12.10.1 – Addressing Water Damage Quickly
- 12.10.1.1 – Using Selleys Sugar Soap for Cleaning
- 12.10.1.2 – Removing Flaking Paint with a Scraper
- 12.10.1.3 – Applying Zinssers Water-Based Peel-Stop
- 12.10.1.4 – Using Selleys Polyfiller as a Filler
- 12.10.1.5 – Sanding the Surface
- 12.10.1.6 – Using a Water-Based Primer
- 12.10.1.7 – Choice of Paint Products
- 12.10.1.8 – Using Berger Water-Based Enamel in Gloss for Architraves
- 12.10.1 – Addressing Water Damage Quickly
- 13 Identifying and Repairing the Root Cause of Water Stains
- 13.0.1 • Addressing Roof Leaks
- 13.0.2 • Fixing Radiator Leaks
- 13.0.3 • Resolving Upstairs Bathroom Leaks
- 13.0.4 • Preparing the Stained Area
- 13.0.5 • Applying Primer to Cover the Stain
- 13.0.6 • Choosing the Right Paint Roller
- 13.0.7 • Painting with Ceiling-Specific Paint
- 13.0.8 • Applying Multiple Coats for Even Coverage
- 13.0.9 • Verifying the Outcome
- 14 Importance of Proper Assessment Before Repainting
- 14.1 • Drying: An Essential Pre-painting Step
- 14.2 • Mold Elimination Considerations
- 14.3 • Why Using Stain-Blocking Primer is Non-negotiable
- 14.4 • The Need to Paint the Entire Area
- 14.5 • Professional Painting Contractor: A Resource Worth Considering
- 14.6 • Southington Painting Company: A Trusted Player
- 15 Waiting for Drywall or Plaster to Dry After Water Damage
- 15.1 • Checking for Mold or Mildew
- 15.2 • Consulting a Professional
- 15.3 • Protecting Surfaces and Ventilation Requirements
- 15.4 • Primer Application
- 15.5 • Achieving a Uniform Finish
- 15.6 • Hiring a Professional Painting Company
- 15.7 • Dealing with Popcorn Ceiling Texture
- 15.8 • Identifying Causes of Water Stains
- 15.9 • Addressing the Source of the Leak
- 15.10 • Preparing for Stain Removal
- 15.11 • Primer Application
- 15.12 • Spraying vs. Rolling Primer
- 15.13 • Applying the Ceiling Paint
- 15.14 • Ceiling-specific Paint
- 15.15 • Perfecting the Paint Finish
- 15.16 • Concluding the Stain Removal Process
- 16 Checking for Underlying Damage
- 16.1 • Ensuring Dryness Before Painting
- 16.2 • Addressing Any Structural Damage
- 16.3 • Cleaning Water Stains with Bleach Solution
- 16.4 • Choosing the Appropriate Primer and Paint
- 16.5 • Painting a Water-Damaged Ceiling
- 16.6 • Concluding Steps
- 16.7 • Identifying and Addressing the Cause of Water Stains
- 16.8 • Choosing the Right Paint To Cover Water Stains
- 16.9 • Using Oil-Based Undercoat or Gloss as a Homemade Stain Blocker
- 16.10 • Feathering Paint Edges for Seamless Blending
- 16.11 • Applying Fresh Coats of Paint for Consistency
- 16.12 • Using a Bleach Solution for Stubborn Stains
- 16.13 • Importance of High-Quality Paint Tools
- 16.14 • Summary
- 17 Identifying The Source Of Water Damage
- 17.1 • Application Of Suitable Primer
- 17.2 • Addressing Stubborn Stains with a Bleach Solvent
- 17.3 • Using Vinegar as an Effective Solution
- 17.4 • Repairing Bubbling Paint
- 17.5 • Efficiently Drying Wet Patches
- 17.6 • Steps Before Painting over Water Streaks
- 17.7 • Handling Water Stains On Drywall
- 17.8 • Repainting Water-Damaged Plasterboard
- 17.9 • Repairing Water-Damaged Wall Plaster
- 17.10 • Water Stains On Baseboards
- 18 Cleaning and Preparing the Affected Area
- 18.0.1 – Scraping Off Old Paint
- 18.0.2 – Applying Peel-Stop or Sealer Binder
- 18.0.3 – Filling For Smoothness
- 18.0.4 – Sanding the Surface
- 18.0.5 – Primer Application
- 18.0.6 – Choose the Appropriate Paint
- 18.0.7 – Painting the Surface
- 18.0.8 – Roller for a Smooth Finish
- 18.0.9 – Before and After The Transformation
- 18.0.10 – Remember, Practice Makes Perfect
- 19 Assessing the Drywall Moisture Level
- 19.1 • Identifying and Dealing with Damaged Drywall
- 19.2 • Assembling the Necessary Supplies
- 19.3 • Addressing Wood Composite Issues
- 19.4 • Seeking Professional Help
- 19.5 • Identifying Water Damage
- 19.6 • Contacting a Plumbing Professional
- 19.7 • Cleaning Walls Affected by Water Damage
- 19.8 • Applying Water-Based Primer/Sealer
- 19.9 • Applying Multiple Coats for a More Effective Seal
- 19.10 • Feathering the Edges for an Even Application
- 19.11 • Recoating for Uniform Appearance
- 19.12 • Getting Professional Help for Drywall Repair
- 19.13 • Utilizing Water Damage Services
- 19.14 • Scraping and Cleaning the Damaged Area
- 19.15 • Filling and Sanding
- 19.16 • Prep Work Before Painting
- 19.17 • Support the Drying Process
- 19.18 • Conclusion
- 20 Identifying and Resolving Water Damage Prior to Painting
- 20.1 • The Role of Primer in Preventing Water Damage
- 20.2 • Treating Water Stains Using Household Products
- 20.3 • Dealing with Bubbling Paint and How to Fix It
- 20.4 • Drying Wet Patches Before Painting
- 20.5 • Painting Over Water Streaks on Ceilings or Walls
- 20.6 • Covering Water Stains on Drywall with Paint
- 20.7 • Prepping Water Damaged Plasterboard for Painting
- 20.8 • Repairing and Painting Over Water Stained Baseboards
- 20.9 • Fixing Water Damaged Wall Plaster
- 20.10 • The Root Cause of Water Stains on Ceilings
- 20.11 • Windows and Doors as Water Stain Sources
- 20.12 • Drying Before Paintwork
- 20.13 • Towels and Dehumidifiers
- 20.14 • Understanding Mold Growth
- 20.15 • Priming Water-Damaged Areas
- 20.16 • The Challenge of Blending Paint
- 20.17 • The Role of Professional Painters
- 20.18 • Turning to Williams Professional Painting
- 21 Addressing the Underlying Cause of Water Damage
- 21.1 • The Importance of Professional Repair
- 21.2 • The Drying Process
- 21.3 • Tackling Mold and Mildew
- 21.4 • The Role of a Professional Contractor
- 21.5 • Possible Wall Replacement
- 21.6 • Using a Stain-Blocking Primer
- 21.7 • Painting the Affected Area
- 21.8 • Contracting a Professional Painting Contractor
- 21.9 • Southington Painting Company
- 21.10 • Cleaning the Water-Damaged Area
- 21.11 • Removing Flaking Paint
- 21.12 • Applying Water Sealer
- 21.13 • Popular Peel-Stop Sealer
- 21.14 • Using a Filler
- 21.15 • Sanding for a Smooth Finish
- 21.16 • Priming the Surface
- 21.17 • Selecting and Applying Paint
- 21.18 • Architraves Painting
- 21.19 • The Impact of Water Damage Repairs
- 22 Addressing the Root Cause of Water Damage
How Do You Remove Water Stains From Ceiling Without Pain?
If you have an unpainted ceiling with water stains, it is possible to remove them. Keep in mind; you will need to find the source of the leak that is causing the stains. If you don’t repair the leak, it will continue to drop water on your ceiling and cause even more stains. Once you have made the repairs, you can use any of these products to remove the stain effectively,
- Vinegar
- Dish soap
- Hard water stain remover
- Commercial products
For tough stains, I recommend using a homemade bleach solvent. Mix three cups of water with one cup of bleach. This will fade more tough stains. It also has the added benefit of removing lingering mildew.
Will Vinegar Remove Water Stains On A Ceiling?
Vinegar is great at removing water stains from ceilings. The vinegar will absorb the water’s mineral deposits to lift the stains. You can apply vinegar to the stains by using a spray bottle. Allow the vinegar to soak into the stain for several minutes. You can use a brush to scrub it gently if needed. You do not need to rinse the vinegar once the stain is gone. The scent of vinegar will fade once it dries.
How To Fix Bubbling Paint From Water Damage
If you have a leak and it affects a ceiling or wall that is painted, you may need to make repairs. If your ceiling is bubbling, follow these tips to repair it:
● Step 1: Remove flaking paint
Remove any flaking paint from the ceiling. You can do this with a chisel or paint scraper. Make sure to remove all signs of paint, so the ceiling is as smooth as possible.
● Step 2: Sealing damaged areas
Seal the damaged areas. You can find a peel-stop product at your local home improvement store. This will prevent any new paint from peeling.
● Step 3: Fill all holes or uneven areas
Use a filler to fill in any missing pieces or holes that are present. This will also create a smooth finish that is ready for painting.
● Step 4: Sand the area
Sand the entire wall or ceiling to smooth out any cracks or areas that got too much filling. Make the ceiling flat and smooth.
● Step 5: Prime the damaged area
Use a suitable primer and paint to cover the wall or ceiling again. Make sure you apply thin, even strokes with a roller to hide any brush marks. You may need to apply more than one coat of primer to create a smooth surface for your paint.
● Step 6: Painting
When the wall or ceiling is completely dry, you can start painting. If the damaged area is more extensive or the original paint is much older, I recommend repainting the entire wall or floor. In most cases, the color difference between the old and fresh paint will be such that it is worth the effort.
How Do You Dry A Wet Patch?
Wet patches can be applied to your room if there is a small leak. It’s best just to let them air dry when possible. Wait until a warm, dry day to apply the wet patch. You can direct a fan to help dry the areas sooner if necessary.
If the damaged area is more extensive, you can also use a dehumidifier, but I always recommend renting a commercial one. Those can remove a lot more water per hour than a residential dehumidifier. A dehumidifier pulls in the moisture from the air and dries it out to release dry air back into the room. When used with a fan, this can be highly effective at drying out the drywall quickly.
How Do You Paint Over Water Streaks?
If you notice water streaks on your ceilings or walls, it is possible to paint over them. But, I always suggest first assessing what is causing the damage and repairing it before you start to paint over the streaks. Follow these steps for proper paint coverage:
● Step 1: Clean the damaged area
Clean the area thoroughly to remove any dust or dirt. Allow the area to dry completely before you start painting. This will ensure the paint sticks and covers properly. You should remove any dust and dirt from the area and wipe it down with a damp cloth.
● Step 2: Apply a primer
Apply a suitable primer to the walls or ceiling you need to paint. You may decide to repaint the entire area to ensure it all looks the same. The primer will help cover up the stains so the paint will go on smoothly and hide them completely. Not using a primer will most likely make the water-damaged area visible on the fresh paint.
● Step 3: Paint the area
Apply your paint and allow each coat to dry before applying the next one. Make sure you are applying the paint in even stroke, and when possible, use a roller instead of a brush to avoid brush marks. The primer should allow you to cover the water streaks with just a couple of coats of paint.
How Do You Cover Water Stains On Drywall?
The best way to cover water stains on drywall is with paint. Of course, you don’t just want to paint right over the stains. You will need to follow these steps to make sure the paint looks great when you are don:
● Step 1: Remove the stain
Apply a mixture of bleach and water to the stains and allow it to dissolve the water stains. Do this as many times as needed until you notice the stains are fading. I recommend using a homemade bleach solvent. Mix three cups of water with one cup of bleach. This will fade more tough stains. It also has the added benefit of removing lingering mildew.
● Step 2: Apply a primer
Apply a suitable primer. The primer will help cover up the stains if any of them remain and make it easier for the paint to cover them. In most cases, not using a primer will make the water stain show up again on the fresh paint.
● Step 3: Paint the wall or ceiling
Paint the walls or ceiling. Once the primer is dry, you can apply the paint. You can add as many coats as needed to get the finish you want. Be sure to let each coach dry before adding the next. If you expect some color difference between the old and fresh paint, I recommend repainting a larger area.
How Do You Paint Water Damaged Plasterboard?
Painting plasterboard is not difficult, but hiding any water stains caused by water damage does require some extra steps. If you are going to repaint your plasterboard, you need to make sure there are no signs of a leak. You should also use a primer with a stain sealer. Once the stains are sealed and covered, you can primer and paint your plasterboard the way you would any other surface.
Can You Paint Over Water Stains On Baseboards?
If your baseboards only have water stains and no other sides of damage, you can paint over them. Before you paint, be sure to check them for signs of swelling or cracks. If there is damage, you may be able to repair it and then paint it. If the damage is too severe, you might want to simply get new baseboards as they may not be worth painting.
How To Repair Water Damaged Wall Plaster
If you have water-damaged wall plaster, you may be wondering what you can do to fix it. It is possible to repair it and not just replace it. Follow these steps to repair it properly:
● Step 1: Ensure the leak is fixed
Assess the damage to be sure there are no leaks or drips that could be causing the damage. Don’t attempt to repair the plaster damage until you ensure there is no longer a chance the new plaster could be damaged like the old.
● Step 2: Remove damaged plaster
Use a scraper to remove the damaged areas of plaster. You can simply scrape them until they are smooth. This will give you a smooth area to paint and repair.
● Step 3: Clean the area
Clean the area thoroughly. You will need to do this carefully so you can remove all the dust and particles that are likely present from the scraping. You can use a damp cloth to wipe down the area to ensure no small particles are present. A shop vac can also help you remove all the particles.
● Step 4: Seal the damaged area
Seal the damaged area with a suitable commercial sealer. This will prevent any other water damage from occurring and give you a smooth surface to work on. You will apply the seal with a brush and then wait for it to dry. Check to make sure the entire area has been covered and wait for the seal to dry entirely before preparing to patch it.
● Step 5: Patch the damaged plaster.
Patch the damaged plaster, and ensure your patches cover the entire damaged area. Use sandpaper to smooth them down to have a smooth surface for painting. You may need to do this several times to achieve the desired look. Your patch should be smooth enough to blend in with the rest of the plaster and thick enough to cover the holes or damaged areas.
● Step 6: Paint the damaged area
Paint the plastered area to finish the project. You may need to apply a primer before painting it to help hide any water stains or streaks. Be sure to use a roller to ensure the paint goes on smoothly and doesn’t have any streaks or brush marks. Add as many coats as needed.
The Importance of Professional Consultation for Wood Rot and Damage
When dealing with wood rot or damage, the best approach that I can recommend from my experience is to seek professional help, such as from Five Star Painting. Professionals bring to the table invaluable expertise in addressing these issues accurately and efficiently.
They possess the skills to identify underlying issues like termite infestations, moisture damage, and mold growth, which may go unnoticed by a layman.
• The Perils of Painting Over Rotted Wood
People often mistakenly think that painting over rotted wood can hide the problem. However, this can actually exacerbate the issue, accelerating the deterioration of the wood.
Plus, painting over rot does not address the root of the problem and could potentially lead to structural issues inside the home.
• Termite Infestations and Rotted Wood
Termite infestations are often synonymous with rotted wood. If you try glossing over termite damage by painting, you will not eradicate the infestation problem. More so, it can lead to legal ramifications, especially when selling a house.
Home inspectors are trained to detect such cover-ups. To prevent such situations, enlist a professional’s help at the first sign of termite damage before it worsens.
• The Role of Moisture in Wood Rot
Moisture exacerbates wood rot. Once again, painting is not a solution to this problem. If there are any traces of moisture in the wood, it is imperative to rectify any leaks or sources of moisture before you start painting. By doing this, you would be acting proactively to prevent further wood rot.
• Mould Growth and its Association with Moist Rotted Wood
In the presence of moisture-damaged wood, mold growth becomes a significant concern. The quick fix of painting over mold does not solve the problem; worse still, it spreads mold spores to other parts of the house, causing health hazards.
Therefore, it is crucial to address and eradicate mold growth appropriately to maintain a healthy home.
• Expert Assistance for Handling Rotted or Damaged Wood
As I’ve stressed throughout, professional consultation is indispensable for treating rotted or damaged wood. Professionals are experienced in identifying the cause of wood damage and providing the best methods to repair it.
Involving professionals ensures that you don’t gloss over the issue but deal with it head-on, maintaining your home’s longevity and safety.
For those not aware, a reliable source of information on wood rot and damage is the U.S. Department of Agriculture’s Forest Products Laboratory which can provide more in-depth knowledge on this matter.
As you can notice from the coupled information, every issue associated with wood rot, whether it’s termite infestations, moisture accumulation, or mold growth, requires proper attention and immediate resolution.
As tempting as it could be to paint over these issues and hide them visually, the problem remains unresolved under the surface. It poses a threat to the safety and longevity of your home.
Therefore, my strong recommendation is always to consult a professional when dealing with such significant concerns related to your nest.
• Addressing Moisture Issues
Before you even think about tackling that cracked paint, it’s absolutely essential to rectify any moisture problems first. Humidity, condensation, and the like can wreak havoc on your window sills and the paint on them.
If you leave moisture build-up unattended, you’ll simply be painting over a problem that will continue to worsen.
To analyze the extent of your moisture problem and possible solutions, the Environmental Protection Agency provides some great information regarding the prevention of moisture problems here.
• Safety First: The Lead Test
If your apartment was built before 1978, don’t rush to scrape off the old cracked paint right away. There’s a good chance that the paint might contain harmful lead particles. It’s prudent to get your paint tested for lead to ensure the safety of everyone present in your living space.
• Calling Professional Help
If the paint on your windowsills tests positive for lead, it is advisable to call in a certified lead abatement professional to get the job done. They are specially trained in handling lead paint safely, thus reducing the risk of lead exposure significantly.
• Don the Gear, Reduce the Risk
Safety always comes first. If lead is found in the paint, make sure to wear protective gear before getting down to work.
This includes a white Tyvec jumpsuit, goggles, a mask with a HEPA filter system, and gloves. These precautions will greatly reduce your chances of inhaling or ingesting harmful lead particles.
• No Lead, DIY Repaint
If your paint test comes back negative for lead, you’re good to go for a DIY repaint! Just remember, before you start on your repainting project, make sure the wood is thoroughly dry. Moisture and paint are not a good mix.
• Prepping the Surface
Your next step is to scrape off any loose, flaking paint and apply a patching material to create a smooth painting surface. You don’t need any fancy tools for this; a putty knife should do just fine.
• The Best Patch For The Job
With a sea of options available, choosing a patching product can be overwhelming. From personal experience, I recommend using a high-quality interior patch for trim, such as DAP. This product has proven to give consistent results in providing a smooth and durable surface.
• Primer Is The Key
Once you’ve patched the area, don’t be tempted to slap on the paint directly. Using a primer first will give your paint something to adhere to, making the paint job last much longer.
I recommend an oil primer, like Benjamin Moores Alkyd Enamel Underbody Primer, which offers great coverage and is easy to apply.
• A Tough Top Coat
When it comes to the top coat, go with something that can withstand wear and tear yet gives a beautiful finish to your windowsills.
Benjamin Moores Satin Impervo, with its low-luster finish and durable surface, is a fantastic choice. Do be aware, though, that the white color of this product has a tendency to yellow over time.
• Alternatives For The Finish
If you’re worried about the color yellowing over time with the Benjamin Moores Satin Impervo, I suggest Benjamin Moore Aqua Glo. Not only does it have excellent durability and a beautiful finish, but also it can be used over an oil-based primer, saving you a step in the process.
It’s a good choice for those who want a maintenance-free solution that will keep your windowsills looking fresh and clean for years to come.
• Water Damage: A Peril to Exterior Wood Elements
Exterior wood elements are often the highlights of a home’s aesthetics. However, features such as fences, decks, and sidings are prone to water damage. When the protective finish on these elements begins to fail, water may seep into exposed wood.
The continued penetration of water may result in a raised grain and a rough surface. In severe cases, prolonged exposure to water can create rot in the wood.
• Steps of Damage Recognition
To address this peril, begin by inspecting the wood surface. You can use a metal putty knife or scraper to scrape the damaged area. Next, remove any loose chunks of damaged wood or peeling paint. This initial step ensures that we are dealing with sound wood.
• Dealing with Minor Damages
For minor damages like small holes in sound wood, paintable wood filler proves effective. You can apply this filler with the assistance of a putty knife.
• Preparing the Surface
Once you’ve filled the holes, sand the damaged area using medium-grit sandpaper. It’s crucial to follow the wood grain’s direction to ensure consistency in texture and appearance. When repainting a localized area and the surrounding surface, blend the new paint with the old one seamlessly.
• Addressing Localized Rot
In situations of localized rot, you will need to remove all the decayed wood. A chisel can be an efficient tool for this task. Follow this by creating holes in the surrounding solid wood using an awl or a drill with a small drill bit.
For more about how to deal with localized rot, The University of Vermont provides a comprehensive guide.
• Application of Wood Hardener
Post the process of creating holes, apply a wood-hardening solution to the entire area. Remember to adhere to the instructions mentioned by the manufacturers of the wood hardener.
• Filling the Voids
Preparing a two-part epoxy wood filler or auto-body filler is the next step. Followed the filler’s application using a putty knife, ensuring to fill the void and smoothen the surface completely.
• Smoothening the Surface
To prepare a suitable surface for primer adhesion, sand the filler surface. After sanding, a damp cloth can be used to wipe the area and remove any dust particles. Let the surface dry entirely before the next step.
• Primer Application
Apply an even coat of exterior primer using a good quality paintbrush and let it dry completely. This crucial step creates an excellent base for the paint.
• Painting
Once the primer has dried, paint the wood using a high-quality paintbrush or roller. Ensure that the paint is well-mixed before application and allow it to dry after application.
• Additional Coats
To obtain the desired finish, apply additional coats of paint if necessary. Letting the first coat dry before the next coat is applied ensures a smooth, uniform finish.
• Final Thoughts
By diligently following these steps, you can effectively repair and restore damaged wood. Keeping these recommendations in mind will ensure your wood’s longevity and good appearance. Remember, proper and timely maintenance is the key to preserving exterior wood elements in their best form.
– Proper Drying of Wood Before Repair
Allowing your wood to air dry is an essential first step in any repair process. I recommend giving it 24 to 48 hours before proceeding.
Moist wood isn’t conducive to effective wood repair, as ongoing dampness can lead to further wood deterioration. North Dakota State University offers some excellent tips on wood drying strategies.
– Importance of Removing Rot or Damaged Wood
In my experience, one of the commonly neglected steps when repairing wood is the removal of any rot or damaged parts. Weak, rotting wood can spread the deterioration to healthier parts, compromising the entire repair efforts.
– Treating Water Stains on Wood
Often when dealing with damaged wood, you’ll face the challenge of water stains. In my line of work, I have tested various products to treat water stains; these include mayonnaise, petroleum jelly, lemon juice, toothpaste, mineral spirits, dish soap, and oxalic acid.
They each boast unique stain removal strengths, and choosing which to use will significantly depend on the wood type and the staining intensity.
– Stripping a Wood Finish
If your wood has a finish, you’ll need to strip it completely before initiating any repair. Stripping can be done through sanding or using a chemical stripper. Sanding provides a hands-on approach and is great for smaller items, while chemical strippers work best for larger pieces or intricate details.
– Using Auto Body Filler for Gaps and Cracks
Filling in gaps and cracks in your wood is a crucial step for a successful repair. For this, I highly recommend auto body filler. It smoothly fills, hardens quickly, and sands down well to seamlessly blend with the surrounding wood.
– Sanding Wood Before Finishing
Preparation is always key in woodworking, and sanding is an essential preparation step before any finishing is applied. By sanding, you acquire a smooth surface that serves as a perfect base for your finish to lay on.
– Re-gluing Loose Joints
If you encounter any loose joints in your repair process, consider re-gluing them. This ensures a solid structure and avoids any future issues related to loosening joints.
– Applying Stain or Paint to Achieve Desired Look
Stain or paint is the step where you give your renewed wood your personal touch. Apply several coats until you achieve your desired look. Allow each layer to dry before applying the next for the best results.
– Sealing and Protecting With Varnish
Once your paint or stain is dry and you are satisfied with the look, seal and protect your work with varnish. This will enhance the wood grain and protect the finish from wear and tear.
– Preventing Cupping or Warping with a Dehumidifier
In areas where cupping or warping of floorboards is a recurring issue, consider using a dehumidifier. It helps control moisture levels, reducing the chances of your wood warping or cupping.
– Importance of Wearing Protective Gear
Working with certain products in the wood repair process can expose you to harmful substances. Your safety is paramount. Always make sure to don protective gear.
Remember, achieving a perfect wood repair comes from meticulous attention to detail and following the above-guiding tips.
• Identifying Water Damage
The first signs of water damage on wood are often subtle but if left untreated, can result in extensive damage. These may include water-shaped stains, which usually form irregular shapes on the wood surface.
Additionally, it’s common to spot white spots or discoloration, which indicate a fungal attack due to excessive moisture. You may also observe musty smells, a sign of rotting wood. Lastly, soft surfaces are clear indications of water intrusion.
Moreover, it is crucial to remember that damages may vary, and sometimes, these signs may not be visibly noticeable. Therefore, conducting regular checks can help detect and repair water damage early.
• Drying Water-Damaged Wood
Before embarking on the refinishing process, it’s advisable to let the wood dry first. Ideally, this should be for a couple of days. However, patience is key here as the drying process might take longer depending on the extent of the damage and the type of wood.
For faster results, an electric fan can be used to speed up the process. This is recommended because the faster the wood dries, the lesser the damage it sustains.
• Preparing the Wood for Refinishing
The next step involves emptying the surface of the wood. Removing any items from the surface allows for thorough work, as you can easily access all the parts. Furthermore, any foreign objects might compromise the efficiency of the operations to follow.
• Tools and Materials You’ll Need
In your quest to refinish water-damaged wood, some specific tools and materials are necessary. These range from coarse grit sandpaper, auto-filler, primer, paint, and wood sealant.
• Refinishing the Wood
Sanding comes first in the refinishing process. It involves rubbing the surface with a rough material (in this case, sandpaper) to smooth it. This process removes any rotten wood and sands down swollen or stained areas.
Next, turn to fill in any cracks, dents, and fissures in the wood with the help of an auto-filler. This creates an even surface that is easier to paint. Give the auto-filler time (a few hours should do) to dry before sanding it to achieve an even surface.
After sanding, the next step involves priming – this prepares the wood for painting. Using a shellac-based, oil-based, or alcohol-based primer will provide the best results.
Painting is the next step and requires careful execution since this is a significant part of the aesthetic appeal. For best results, apply multiple coats of paint, but remember to let each layer dry before laying the next one.
Finally, apply a water-resistant sealant, providing the last line of protection against future water damage.
• Seeking Professional Help
If water damage is significant and affects structural areas, don’t hesitate to seek professional help. Handling it on your own might worsen the damage or pose safety risks.
• Consideration for the Future
Perhaps, as a prevention strategy, consider using naturally water-resistant wood species like teak, cedar, or white oak for your next projects.
Furthermore, using water-resistant primer, paint, and sealant will significantly increase the durability of your wood, thus further protecting it against water damage.
According to a study by Oregon State University, combining prevention strategies like using water-resistant wood together with protective measures like applying water-resistant products can significantly lengthen the lifespan of your wood!
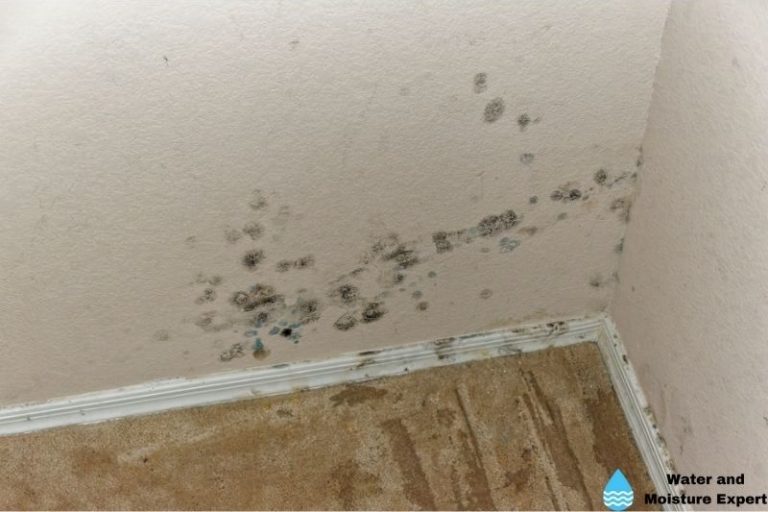
Checking for Water Damage before Painting Over Stains
When identifying water damage, it is important to look for traces of leaks or condensation before painting over water stains on the ceiling. Leaks may indicate further damage hidden beneath the surface, so it’s essential not to overlook this step.
You can examine the surrounding structures for dampness or discoloration, which marks a leak.
• Importance of Drywall Drying
Before embarking on repairing the ceiling, it is crucial to allow the drywall to dry completely. This ensures the wall’s longevity by averting potential degradation and collapse. It also helps the paint to adhere properly without bubble formations or peeling off shortly after application.
You can tell if a drywall is adequately dry by touching it lightly; it should feel dry to touch and have no signs of dampness.
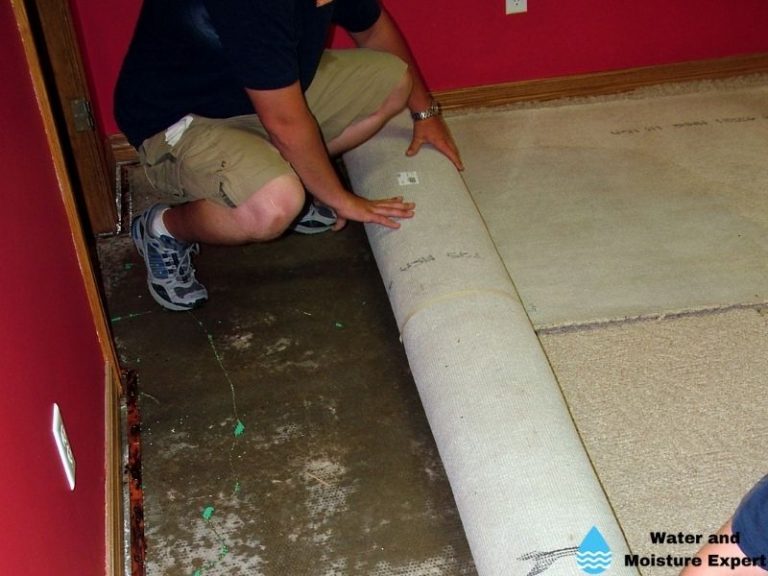
• Removal of Wet Insulation
In the process of checking and drying out your drywall, especially in severe cases of water damage, it may also be necessary to remove wet insulation from the affected area.
Wet insulation can foster the growth of mold or fungus; it’s best to get rid of this as soon as possible to avoid further complications. More details about safely removing wet insulation can be found on the EPA website.
• Speeding Up the Drying Process
Using devices like space heaters, fans, or dehumidifiers can help to speed up the drying process. These appliances generate heat or air movement that enhances evaporation, helping the surface to dry faster. Remember to use these devices safely and ensure sufficient ventilation.
• Checking for Structural Damage
Another key step before painting over water stains is checking for any structural damage to the ceiling or wall. Cracks or loose plaster could be signs of serious structural issues. If these are not addressed, new water stains could reappear shortly after painting.
• Replacing Damaged Sections
Certain instances may require you to replace sections of the drywall, paint, or plaster that have crumbled or chipped. Severely damaged areas need to be cut out and replaced with new pieces to prevent the damage from spreading or affecting the newly painted surface.
• Treating Mold and Patching Small Spots
For areas with mould or mildew, treating these sections with a bleach and water mixture is effective before proceeding with paint. Also, small spots on the surface can be patched using a spackle. Once dried, these spots can be sanded to a smooth finish ready for painting.
• Removing Water Stains without Paint
If you have white or light-coloured paint, it is possible to remove water stains without repainting. This can be achieved using a bleach and water mixture. Ensure you rinse thoroughly, though because if the bleach mixture is not removed completely, it could affect the paint’s color.
• Using a Stain-Blocking Primer
When painting over water stains, it is recommended to use a stain-blocking primer. This type of primer prevents chemicals or substances present in the water stain from penetrating through the applied paint over time. This helps maintain the painted surface’s look for a longer period.
• Top Five Effective Primers for Water Stains
Choosing the right primer can make all the difference. The following primers have proven effective in blocking water stains: KILZ Premium High-Hide Stain Blocking Primer, Zinsser B-I-N Shellac-Base Primer, Rust-Oleum Mold Killing Primer, KILZ Restoration Maximum Stain and Odor Blocking Primer, and Sherwin-Williams ProBlock Oil-Based Primer.
• Step-by-Step Process for Painting a Water-Damaged Ceiling
The painting process should involve a series of steps, including:
- Finding and repairing the water leak.
- Allowing the water stain to dry.
- Checking for drywall damage.
- Prepping and protecting the area.
- Cleaning the water stain with bleach.
- Applying a stain-blocking primer.
- Applying a top coat.
By following these steps, you can successfully paint over water stains and transform the aesthetic of your space to its original glory.
Identifying and Repairing the Source of the Water Leak
Before plunging into the task of repairing water damage, it’s crucial to first detect and repair the source of the leak. This step is vital to prevent further damage to your walls, ceiling, or other afflicted areas.
Be it a pipe leak or a roof leak, fixing the source should be your initial task. You can read more on the EPA site about water damage safety requirements. EPA Site
• Significance of Applying Primer
Applying a primer to water-damaged walls or ceilings is an integral part of the repairing process. A suitable primer forms a barrier between the old and new paint. This barrier effectively prevents any water stains from becoming visible on the fresh paint.
• Dangers of Painting Over Unrepaired Damage
One pitfall to be aware of is the risk associated with trying to paint over water damage without adequately treating it. If unaddressed, the residual water damage can cause unsightly stains on the fresh paint, marring your efforts.
• Removing Water Stains from an Unpainted Ceiling
A vinegar, dish soap, hard water stain remover, or commercial products can be deployed to extricate water stains from an unpainted ceiling.
For stubborn stains, a homemade solution of bleach and water may be necessary. Vinegar stands out as a potent solvent as it absorbs the water’s mineral deposits, lifting the stains effectively.
• Fixing Bubbling Paint from Water Damage
Bubbling paint is a common casualty of water damage. Addressing it involves several steps. Start by removing any flaking paint and sealing the damaged areas with a peel-stop product.
Next, fill any holes or uneven areas with a suitable filler, and sand the area smooth. Apply a layer of primer, and then repaint the damaged area.
• Expedite Drying Process for Wet Patches
Wet patches on your walls or ceilings can be air-dried. To accelerate this, you can deploy a dehumidifier and a fan. These tools work synergistically to expedite the drying process of water-damaged areas.
• Painting Over Water Streaks
Water streaks on your walls or ceiling can be dealt with in three steps thorough cleaning, the application of a suitable primer, and performing even strokes painting with a roller.
• Covering Water Stains on Drywall
Water stains on drywall, although conspicuous, are treatable. You can mask these by applying a mixture of bleach and water to the discolored wall or ceiling. Following this, apply a suitable primer, then proceed to paint the area.
• Painting Water-Damaged Plasterboard
Plasterboard falls victim to water damage as well. Addressing it calls for identifying and fixing the source of the leak, applying a primer with a stain sealer, and then painting it as you would any other surface.
• Dealing with Water Stains on Baseboards
Water stains on baseboards are manageable too. If the damage is not severe, these stains can be painted over. However, if the damage is too severe to be cosmetically improved, it may make more sense to replace the baseboards.
• Repairing Water-Damaged Wall Plaster
Taking on the task of repairing water-damaged wall plaster involves a series of steps: ensuring the source of the leak is fixed, removing damaged plaster areas, cleaning the area thoroughly, sealing it with a commercial sealer, patching the damaged plaster, and then painting the restructured area.
Use these steps as a reliable roadmap to restore your walls to their former glory.
– Addressing Water Damage Quickly
One cannot stress the importance of addressing water damage promptly enough. Water damage can quickly escalate from a small seepage to a full-blown structural issue if not tackled promptly.
Dampness can erode the structural integrity of walls and foundations if left untreated, leading to expensive repairs and even posing a danger to inhabitants.
– Using Selleys Sugar Soap for Cleaning
By using products like Selleys Sugar Soap, a well-regarded solution for cleaning water-damaged areas, you can effectively scrub hands clean of accumulated dirt and soapy residue, which can detract from the success of restoration efforts.
Its deep cleaning properties ensure the affected area is free of debris and grime before you proceed with the repair process.
– Removing Flaking Paint with a Scraper
After the cleaning is done, a scraper comes in handy to remove flaking paint. This step ensures a smoother finish when new paint is applied, maintaining the aesthetic appeal of the space while preventing any underlying infection from spreading.
– Applying Zinssers Water-Based Peel-Stop
The next crucial step is the application of products like Zinssers Water-Based Peel-Stop. It’s peel-stop or sealer binder property assists in keeping the peeling paint intact, providing a firm surface for the application of new paint.
Opting for a water-based product enables easier clean-up and faster drying times.
– Using Selleys Polyfiller as a Filler
Once the sealer is applied and allowed to dry, filling in the damages on the surface is next. Selleys Polyfiller, a versatile and compatible filler, works wonders in concealing any imperfections left after the initial damage. Filling in the gaps, makes the surface even and ready for the following steps.
– Sanding the Surface
Immediately following the filler process, it is best to sand the surface until it attains a smooth texture. Smooth surfaces are the best canvas for paint, enabling a stunning and even finish.
A coarse-grit sandpaper is excellent for this stage, progressively moving towards finer grit as the surface becomes smoother.
– Using a Water-Based Primer
The preparation of the surface before the paint application is done using a water-based primer or sealer. The primer helps the paint stick better and increases the paint’s durability. Furthermore, it helps to block any stains or dark colors from the underlying layers from seeping through.
– Choice of Paint Products
Regarding the specific paint products recommended, Berger Everlast for walls is a wise choice. Its durability and resistance to wear and tear make it a favorite among professionals.
To add an element of color, Dulux Snow Season Quarter adds a light, snowy hue to the surface, keeping the area looking refreshed and open.
– Using Berger Water-Based Enamel in Gloss for Architraves
To create a harmonious look, using Berger Water-based Enamel in Gloss for architraves will tie the look and feel of the room together. Its glossy finish is not only aesthetically pleasing but is also known for its durability.
To conclude, water damage is an insidious problem that requires prompt action. The products mentioned herein have proven their effectiveness over time and have been recommended by experts in the field.
By following these steps and using these recommended products, you’ll be able to mitigate water damage and restore your surfaces efficiently and effectively while maintaining a beautiful and clean aesthetic.
All of these can be found in home improvement stores that offer a wide array of reliable products for any homeowner’s needs.
Identifying and Repairing the Root Cause of Water Stains
Identify and repair the root cause of water stains to prevent recurrent damage. In essence, it’s like getting to the root of a problem before trying to mitigate its effects. Never attempt to cover up water stains without addressing the root cause first.
• Addressing Roof Leaks
For prevalent roof leaks, damaged shingles, flashing, or seals should be your focus. The shingles or seals may require repair or replacement. Roof leaks are primarily due to damaged shingles and flashing caused by shifting of roof structures or climatic effects.
Therefore, by correcting these defects, you prevent potential leaks which may result in water stains.
• Fixing Radiator Leaks
Radiator leaks, on the other hand, present another unique challenge. These leaks might be caused by issues with the radiator body, valve, pipe, or bleed point. In such cases, it’s essential to inspect thoroughly and repair or replace the defective part to fix the underlying problem effectively.
• Resolving Upstairs Bathroom Leaks
Leaks emanating from the upstairs bathroom can be caused by several factors, such as old caulking, overflowing toilets, or clogged drains. Each of these issues would require a different approach to address effectively.
Drainage-related problems can be resolved by unclogging the drains while overflowing toilets may require a repair or replacement.
• Preparing the Stained Area
After you’ve addressed the cause of the leak, it’s time to deal with its aftermath: the stain. Begin by cleaning the stained area with a bleach solution made from one cup of bleach and three cups of warm water. This solution effectively eliminates potential mildew and mold caused by the water leak.
• Applying Primer to Cover the Stain
A base coat of stain-blocking primer should be applied next. Choose an oil-based, mold-resistant primer that closely matches your existing ceiling color. This step is crucial in camouflaging the stain and preventing it from resurfacing.
• Choosing the Right Paint Roller
If you have a smooth ceiling, I recommend using a paint roller with an extension and a -inch nap roller cover for applying the primer. This technique will ensure smooth and even coverage. For textured ceilings, a thicker nap roller cover or a can of stain-blocking primer for spraying may be necessary.
• Painting with Ceiling-Specific Paint
Next comes the painting stage. After priming, ceiling paint should be applied to blend the stained area with the rest of the ceiling. To achieve the best result, it’s advisable to use ceiling-specific paint.
I usually recommend latex or Alkyd ceiling paint. Consider latex paints because they dry faster and produce fewer fumes.
• Applying Multiple Coats for Even Coverage
Bear in mind that multiple coats of paint may be necessary for even coverage, especially when the stains are more prominent and the coverage from a single coat is unsatisfactory.
• Verifying the Outcome
Once the paint has dried, the water stains should be effectively covered, and the ceiling should appear blemish-free. You will need to closely inspect the previously stained area to ensure the stain is completely covered.
For more information about dealing with water stains, check out this helpful guide from Berkeley Lab. As asserted by the Berkeley Lab, treating water stains should be taken seriously as it not only impacts the aesthetic appeal of your property but could also signal bigger issues such as a leaky roof or plumbing. Therefore, addressing water stains properly is crucial to preserving the integrity and value of your property.
Importance of Proper Assessment Before Repainting
It is of paramount significance to accurately evaluate the origin of water intrusion before diving into a repainting exercise. Why is this assessment necessary?
If you simply paint over a damaged area without understanding where the water is coming from, you’ll face recurring water damage issues.
It’s akin to wearing a raincoat with a hole in it. It offers a temporary solution, but the core issue persists. So, make sure to rectify the source of water entry to minimize future water damage.
• Drying: An Essential Pre-painting Step
Once the root of your water issue is isolated and addressed, your next step is to thoroughly dry up the area to be painted. This step cannot be understated. Moisture can trap inside the wall or ceilings, which perpetuates a perfect environment for mold growth.
Based on my experience, pat dry the stained area to tackle superficial moisture and utilize a dehumidifier for deeper-level dryness.
• Mold Elimination Considerations
Suspect a mold or mildew infestation on your water-stained drywall? If yes, I’d strongly recommend hiring a professional contractor to exterminate the contaminant safely.
According to the Centers for Disease Control and Prevention (CDC)^1^, exposure to mold and its different species can bring about health responses such as nasal stuffiness, throat irritation, coughing, and dermal sensitivity. Thus, ensure safety by seeking expert intervention.
• Why Using Stain-Blocking Primer is Non-negotiable
A key product that should occupy your shopping list whilst gearing up for repainting is a stain-blocking primer. This product renders an indispensable job – nullifying any chances of water stains being visible through your newly-painted surface.
It’s not an avenue to cut corners on. A quality stain-blocking primer forms a resilient barrier between your wall or ceiling and water stains.
• The Need to Paint the Entire Area
While it may appear tempting to simply dab a patch of paint over a water stain, this method can leave an uneven appearance. For a slick and consistent finish, your ideal bet is to paint the entire area around the stain.
It might appear cumbersome but the result speaks for itself when you allow uniformity to spread across the painted surface, an important wisdom that has shaped my painting endeavors for years.
• Professional Painting Contractor: A Resource Worth Considering
If you’re thinking about efficiency and precision, consider soliciting the services of a professional painting contractor.
Not only do they snag experience and capability in tackling repairs, but they can also be your valuable partner in eliminating mold infestations, priming stained sites, and adorning your walls and ceilings with an exact painting process.
This way, you can be sure of competent hands handling your requirements masterfully.
• Southington Painting Company: A Trusted Player
For our friends situated in central Connecticut, explore the potentials of Southington Painting Company. They demonstrate experience across a range of services, including interior painting, drywall repair, and exterior painting.
Their professional touch not only rejuvenates your surroundings but also fittingly gears up your establishment to tackle potential water damage. You won’t be disappointed.
Waiting for Drywall or Plaster to Dry After Water Damage
In my experience, it is a cardinal rule always to wait for the drywall or plaster to dry completely before attempting any repairs or before applying any primer.
Acting hurriedly can cause more harm than good and may lead to additional structural damage to the wall. Unfortunately, many homeowners overlook this crucial step.
• Checking for Mold or Mildew
While waiting for the drywall or plaster to dry, make a thorough check for any signs of mold or mildew. The presence of these microscopic fungi may indicate a larger issue that needs attention.
I recommend dealing with the root cause of mold or mildew accordingly before proceeding further with wall repairs. The US Environmental Protection Agency has some practical guidelines and advice on mold and mildew control.
• Consulting a Professional
Next, evaluate the extent of the damage caused by water. If the drywall or plaster is severely sagging or showing signs of significant structural damage, it is undoubtedly higher than a simple DIY task.
From my experience, it would be most beneficial to entrust the repair work to a professional contractor or painter.
• Protecting Surfaces and Ventilation Requirements
Before applying primer, ensure that you protect the surfaces not meant to be painted. Tape and tarps can help in this regard. When priming, always follow the ventilation requirements as stated on the product label.
Adequate ventilation not only ensures an even coat but also safeguards against health hazards linked to primer fumes.
• Primer Application
For severe water stains, the application of a single coat of primer might not suffice. In such cases, I would suggest a second coat of primer. This additional layer will effectively cover the water stains and provide a permeable surface for the final paint coat.
• Achieving a Uniform Finish
If the repaired and primed area of the water damage is still visible, you might be looking at a larger project to paint the entire ceiling. Repainting the entire ceiling might seem like a daunting chore, but, in my experience, it is necessary for a uniform and seamless finish.
• Hiring a Professional Painting Company
When it comes to water damage assessment and remediation, it might be a good idea to consider seeking expert assistance, especially if you’re not comfortable handling DIY repairs.
A professional painting company can provide a comprehensive and durable solution for water damage. This will give you peace of mind knowing that the job has been executed properly.
• Dealing with Popcorn Ceiling Texture
Finally, if your ceiling has a popcorn texture and it has endured water damage, it’s a challenging situation. The texture is hard to replicate and requires specialized tools and skills to do it right.
To derive the best results, it’s wise to consider hiring professional painters who also have experience dealing with popcorn ceiling texture.
The guidelines herein will help you effectively manage the quite stressful reality of water damage. The tips provided are based on my years of professional experience in painting and water damage remediation.
With patience, the right tools, and a professional approach, you can restore the beauty of your home following water damage.
• Identifying Causes of Water Stains
The sight of water stains disfiguring your ceiling can be disheartening. These unsightly marks are often caused by leaks from the roof, heating appliances, or plumbing systems. Before embarking on the stain removal process, it’s paramount to identify the exact source of that leak.
• Addressing the Source of the Leak
Neglecting the root cause and focusing solely on covering up the water stain is a grave mistake. It’s akin to putting a band-aid on a symptom while the underlying disease wreaks havoc. Therefore, addressing the source of the leak prevails as a critical primary step.
Should the cause be elusive or the leak proves challenging to repair, it’s advisable to seek professional help. Plumbers, roofers, and heating technicians are equipped with the knowledge and experience to provide the requisite aid in such scenarios.
The US Department of Housing and Urban Development offers guidelines on preventive maintenance that can be hugely beneficial.
• Preparing for Stain Removal
Having addressed the root leak, the next step involves making a homemade bleach solution. This mild solution is effective in fading the stain while also efficiently cleaning off dirt and dust prevalent on the ceiling surface.
It’s worth noting that protection is key during this step. This is where painter’s tape comes into play, providing effective coverage for the ceiling trim before the application of any primer or paint.
• Primer Application
The significance of a base coat of stain-blocking primer cannot be overstated. The base coat serves to prevent the water stain from seeping into the paint, ensuring the stain does not reclaim its unsightly visibility once the paint is applied.
For blocking water stains, I recommend an oil-based primer that is mold-resistant and carries strong stain-blocking capabilities. The mode of application relies heavily on the type of ceiling in question. If it’s smooth, a brush or roller could serve efficiently.
• Spraying vs. Rolling Primer
However, a textured ceiling poses a different dynamic. In such cases, spraying the stain-blocking primer using a can becomes a viable option.
• Applying the Ceiling Paint
Upon setting the primer, the next task involves covering the primed area with ceiling paint. The color matched to suit the rest of your ceiling to ensure continuity in your room’s aesthetics.
The choice between latex and alkyd (oil-based) ceiling paint lies with you. However, it’s critical to note, latex options offer faster drying times and emit fewer fumes, making them less volatile.
• Ceiling-specific Paint
When it comes to painting ceilings, ceiling-specific paint is the go-to choice. This paint variant is thicker than traditional paint and has a non-reflective finish that helps to hide imperfections.
• Perfecting the Paint Finish
The application of paint requires skill and patience. It’s best done using a roller for an even spread. Being sure to let the first coat dry before moving on to the second coat ensures better coverage and a seamless finish on your ceiling.
• Concluding the Stain Removal Process
After allowing the second coat to dry, your efforts bear fruit. If covered effectively, the water stains should no longer be visible. The ceiling will look refreshed, as good as new, and free from unsightly water stains.
In the end, the process may seem tedious, but adhering to these steps ensures that water stains are fully covered and leave your ceiling looking as good as it was before the water damage.
Above all, maintaining an eye on possible leak points can help prevent the issue from recurring in the future.
Checking for Underlying Damage
Before you embark on painting over water stains, it’s crucial to check for any underlying damage. This refers to any issues that might have caused the water leakage in the first place.
For instance, you may have broken pipes within your walls that are continuously dripping water. Ensure that you have effectively rectified the source of the water leak before commencing your painting task.
• Ensuring Dryness Before Painting
A vital step you should never overlook during this process is drying the water-stained drywall. It’s essential that you let the water-damaged area dry out completely to avoid mold growth. Mold can present serious health risks and additional expenses to eradicate.
Therefore, prevent it by making sure the affected area is thoroughly dry. You can use tools such as space heaters, dehumidifiers, or fans, which will aid in speeding up the drying process.
• Addressing Any Structural Damage
In some cases, water damage might lead to structural issues – such as crumbling drywall. Any such damage should be taken care of before painting over the water stains.
Failing to do so would only camouflage the problem for a while and cause you to repeat the entire painting process sooner rather than later.
For guidance on how to repair this, the U.S. Department of Housing and Urban Development provides useful resources that homeowners might find helpful.
• Cleaning Water Stains with Bleach Solution
Next in line for your water stain problem is cleaning the affected spot. Consider using a mixture of bleach and water to deal with the water stains. This solution can effectively remove stains particularly if the area has not been painted previously or primed.
I suggest you mix one part of bleach with three parts of water and apply this using a sponge to the affected area.
• Choosing the Appropriate Primer and Paint
After cleaning, the next critical step is selecting the appropriate primer and paint for your water-damaged ceiling. It would be best if you used a primer that blocks tough stains and odors, preferably water-based primers.
However, depending on the severity of your stains, you might find oil-based or shellac-based primers to be more appropriate. Ultimately, your choice of primer and paint should be of excellent quality to ensure durability and an excellent finish.
• Painting a Water-Damaged Ceiling
The part that you have been waiting for is now here – painting. To start, ensure that the area is adequately prepped and protected to avoid a mess or unintentional paint drops on your furniture or floor.
Following this, clean your stain with the bleach solution as earlier stated. After these steps, you can apply the primer.
You might need one to two coats of stain-blocking primer to efficiently cover the water stain. Once you notice that your primer has dried up completely, proceed to paint using your chosen top coat paint. Again, you may require one to two coatings for a clean finish.
In my experience, it is typically advisable to apply the top coat within 48 hours of the primer. This time frame allows for optimal bonding and therefore ensures a smooth finish.
• Concluding Steps
Having discussed the crucial steps to paint over water stains, it’s worth noting that addressing any underlying issues is equally, if not more, critical. Also, ensuring the area is dry, and using the necessary steps correctly, considerably contributes to attaining a fresh and clean-looking ceiling.
By adhering to these recommendations, you will address not only the aesthetic side of water stains but also possible health and structural hazards associated with water damage.
• Identifying and Addressing the Cause of Water Stains
Experience has taught me that painting over water stains can be a Band-Aid solution if you do not identify the root cause of the issue. Water stains are often caused by leaks from the ceiling, pipes, or even windows.
Therefore, the first step is to locate the source of these leaks and address this issue. Taking care of the underlying problem will help minimize the chance of the stain reappearing.
This Consumer Reports guide on spotting and dealing with water leaks in homes can be a useful starting point https://www.consumerreports.org/home-maintenance-repairs/how-to-check-for-water-leaks-in-a-home/.
• Choosing the Right Paint To Cover Water Stains
To combat water stains, a simple emulsion paint won’t suffice, as such products are water-based. That means they won’t form a sturdy barrier against the stain, which might cause the water stain to seep through the paint again.
For a more permanent solution, I recommend using a specialist stain blocker or oil-based paint.
• Using Oil-Based Undercoat or Gloss as a Homemade Stain Blocker
If unavailable, a viable alternative can be an oil-based undercoat or gloss, which you might have around the house. This can be used effectively as a homemade stain blocker to create that needed waterproof barrier.
The oil-based undercoat or gloss can be applied directly on the stain or mixed with the gloss to increase its volume.
• Feathering Paint Edges for Seamless Blending
Don’t forget the importance of feathering the edges of the paint. This technique helps the paint blend smoothly with the surrounding area, eliminating any noticeable differences. To feather edges, slightly reduce the pressure as you move the brush away from the painted area.
• Applying Fresh Coats of Paint for Consistency
In some cases, merely covering the stain may result in a patchy appearance due to different paint sheens or slight color differences between old and new paint. To achieve the best results, I recommend quickly applying a few fresh coats of paint to the entire wall or ceiling.
• Using a Bleach Solution for Stubborn Stains
At times, painting over water stains might not be an option due to their immense size or intensity. In such cases, a simple homemade solution can come in handy.
Mix three parts of warm water with one part of bleach to create a potent stain remover. This solution works quite well, especially on white or light-colored walls and ceilings.
• Importance of High-Quality Paint Tools
Using high-quality paint rollers and brushes can make a significant difference in the overall painting outcome. These tools ensure even paint application, reducing the likelihood of streaks or patchy areas. So, ensure you invest in high-quality painting tools for a pristine finish.
• Summary
Dealing with water stains calls for keen attention to detail and the right techniques. Understanding and addressing the source of the stains, selecting the right paint, or utilizing a homemade stain blocker can help you effectively deal with water stains.
Feathering paint edges and applying several fresh coats of paint may improve the overall appearance of your wall or ceiling. Moreover, always ensure you have high-quality painting tools to guarantee a successful paint project.
Identifying The Source Of Water Damage
To halt future damage, pinpointing the source of water damage becomes a primary task. This could range from a leaky pipe to a roof defect or even condensation.
It’s crucial to seek professional help if you’re unable to identify the root cause. Only then is it possible to carry out effective repairs and prevent future occurrences.
• Application Of Suitable Primer
Water-damaged areas need to be painted to restore their former look. However, a particular step that’s often overlooked but exceedingly important is the application of a suitable primer.
A primer not only helps in preventing stains on the fresh paint but also ensures that the new paint adheres better to the surface. Hence, it increases the longevity and quality of the paint job.
• Addressing Stubborn Stains with a Bleach Solvent
If faced with stubborn stains that a regular detergent can’t handle, consider using a homemade bleach solvent.
Mix a part of bleach with three parts of water and gently apply it to the stained area using a sponge or cloth. Be careful not to saturate the area, as bleach can further damage delicate surfaces.
• Using Vinegar as an Effective Solution
Vinegar may seem like an odd solution, but it’s an effective tool in removing water stains from ceilings. The acetic acid in vinegar can remove tough stains on various surfaces without causing additional damage.
Using white vinegar is especially beneficial as it does not leave behind any color residue. You can learn more about the effectiveness of vinegar as a cleaning agent from The Vinegar Institute.
• Repairing Bubbling Paint
Water damage often results in bubbling paint, which can be an eyesore. Some simple steps to repair such areas involve:
- Removing flaking or thrifty paint using a scraper.
- Sealing damaged areas with a proper primer.
- Filling holes and uneven regions with a filler.
• Efficiently Drying Wet Patches
Dry the water-damaged area as much as possible before any repairs. Ideally, let it air dry, but if you’re short on time or the damage is quite considerable, use a dehumidifier to speed up the process.
• Steps Before Painting over Water Streaks
Cleaning is the first step to ensure a smooth and even paint job. After cleaning, apply a suitable primer. This prepares the surface to accept the fresh paint and ensures the water streaks do not bleed through the new paint application.
• Handling Water Stains On Drywall
Stains that find their way into drywall can be particularly challenging to remove. An equal parts mixture of bleach and water can be an effective solution. Remember to apply a primer before painting to prevent the reappearance of the stains.
• Repainting Water-Damaged Plasterboard
Fixing plasterboard that’s faced water damage is a simple routine but requires attentiveness. After identifying and fixing the leaks, use a primer that contains a stain sealer before painting.
This will ensure the new paint job appears as fresh as possible and the old water damage doesn’t show through.
• Repairing Water-Damaged Wall Plaster
If wall plaster is subjected to water damage, the repair process involves:
- Fixing the leak source.
- Removing and cleaning the damaged plaster.
- Applying a suitable commercial sealer.
- Patching and painting the damaged area.
Each of these steps ensures that the repair is comprehensive and prevents recurrences.
• Water Stains On Baseboards
For baseboards that show water stains, if there is no structural damage, you can paint over the existing surface. However, if the damage is severe, replacing the baseboards may be the only viable option. In such cases, seeking advice from a professional is often beneficial.
Cleaning and Preparing the Affected Area
Addressing water damage requires thorough preparation, starting with carefully cleaning the affected area. It’s crucial to eliminate dust, debris, or any traces of moisture to ensure the reparative measures adhere well.
To aid in this process, a high-quality vacuum cleaner or mop can be useful to remove surface dirt and grime.
– Scraping Off Old Paint
Next, inspect the water-damaged area for any flaking or peeling paint. Don’t skip over this step; it’s crucial for creating a solid base needed for effective repairs.
One tool that can come in handy for this is a good-quality paint scraper. It will help create a smooth and consistent surface by removing irregularities, thereby making the next steps easier and more efficient.
For more information on paint scrapers, you can refer to this guide by the National Park Service.
– Applying Peel-Stop or Sealer Binder
Once the surface is smooth, use a peel-stop or sealer binder to cover the water-damaged area. This product functions as a glue for crumbling surfaces; it strengthens the area and prevents damage in the future. Allow at least an hour for the peel-stop to dry.
– Filling For Smoothness
Now, it’s time to use a filler to make the surface smooth and ready for painting. You’ll need to select a suitable quality filler for this task. Apply it as evenly as possible and allow it to dry for at least a full day before proceeding to the next step.
– Sanding the Surface
After the filler has thoroughly dried, sand the surface to remove any bumps or irregularities. Don’t apply excessive pressure; it’s crucial to use consistent strokes.
– Primer Application
Next, apply a water-based primer or sealer to prepare the surface for paint application. For gyprock surfaces, it’s especially effective to use a water-based primer. A primer essentially provides an extra layer of protection and ensures the paint applies smoothly and lasts longer.
– Choose the Appropriate Paint
It’s imperative to choose the right paint for your walls and architraves. Oil-based paints are perfect for high-traffic areas, while latex-based paints work well for areas with moderate traffic. Make sure to consider the room’s usage and the paint’s durability.
– Painting the Surface
Apply the chosen paint in thin, even coats. Let each coat dry thoroughly before moving on to the next. This process ensures coverage and contributes to the durability of the paint job.
– Roller for a Smooth Finish
For a smoother finish, use a roller instead of a brush to apply the paint. Brushes can sometimes leave marks and uneven layers of paint. Rollers, on the other hand, provide a more even and professional finish.
– Before and After The Transformation
The transformation of a water-damaged living room, as demonstrated in this informative video, is phenomenal. It’s evidence of the effectiveness of the process explained above.
– Remember, Practice Makes Perfect
In my professional experience, the success of repairing water-damaged areas heavily depends on thorough preparation and patient execution. Do not rush the process. Give each step the time it deserves, and the results will speak for themselves.
Practicing these steps will undoubtedly lead to proficiency over time, leaving you better equipped to handle any water damage encountered in the future.
Assessing the Drywall Moisture Level
Before you initiate any painting project, one of the initial steps to take is to assess the moisture level of the drywall. This step is vital because painting over damp or wet drywall can lead to a plethora of issues later on.
For instance, the paint may peel off, bubble, or won’t adhere properly to the surface. Thus, ensuring the drywall is sufficiently dry is paramount.
When assessing the drywall, you need to look out for certain indications to ensure it’s in the right condition to be painted. One such sign is if the drywall feels soft or saggy to the touch. This means that there’s a high level of moisture, which is likely to cause significant damage to the structure.
• Identifying and Dealing with Damaged Drywall
In situations where you notice that the drywall is soft or its paint is bubbling or peeling, the first step is to remove the loose, peeling paint using a scraper. If done correctly, this technique should effectively clear all the damaged paint and prep the area for sanding.
To properly repair the damaged drywall, it needs to be sanded until its surface is smooth. Furthermore, if there are any holes in the drywall, they need to be patched up. The U.S. Department of Energy offers a comprehensive guide on how to patch drywall effectively.
• Assembling the Necessary Supplies
To successfully carry out the above tasks, you need to have the appropriate supplies on hand. The primary ones are a scraper, putty knife, sandpaper, texture spray, drywall compound, and a paintbrush or roller. Additionally, you’ll need primer and paint, which are key components in painting jobs.
There’s the tendency to overlook the importance of these supplies; however, based on my experience, having these at your disposal beforehand facilitates the whole process. They help in the identification of problems and the application of solutions making your paint job seamless and durable.
• Addressing Wood Composite Issues
If your interior detailing includes baseboards or crown molding made of wood composite, there might be an extra step required before painting. These elements are especially susceptible to water damage. If they’ve been compromised by water, you need to replace them rather than simply repainting.
Replacing these materials, as opposed to repainting them, ensures that your home’s structural integrity is preserved. Moreover, it prevents future problems such as mold buildup and peeling paint.
• Seeking Professional Help
Sometimes, despite your best DIY efforts, you may still encounter challenges that necessitate professional help. For instance, if mold is detected or if your wood composite materials need replacement.
Professionals have the training and skills to efficiently handle such situations, ensuring that your home is safe and your handiwork is sustainable.
Opting for professional help can significantly ease the process and offer long-term benefits. Professionals can help identify and rectify any underlying issues that you may miss, ultimately saving you time and money.
In summary, always perform an in-depth assessment of your drywall and other materials before starting a paint job. Prep well with the right tools and supplies, and don’t hesitate to seek help from professionals when needed. Always prioritize quality and safety over short-term convenience.
• Identifying Water Damage
Water damage on walls can lead to various issues. These include paint bleeding through, manifested in discoloration and peeling paint, unsightly water stains, and weakened structure of the walls. Additionally, these damages can substantially increase the cost of repairs needed to fix them.
• Contacting a Plumbing Professional
The first step in dealing with water damage should be to identify and fix the source of the leak. I recommend that for this, you call a plumber. This is almost always the best course of action to ensure the core issue is addressed and the water leakage is permanently resolved.
Plumbing professionals have the necessary technical knowledge and tools to provide an efficient solution.
• Cleaning Walls Affected by Water Damage
Once the source of the water leakage is fixed, it’s time to clean the affected walls. This may be necessary to remove mold or mildew that has likely formed due to the water damage. I advise to use a diluted mixture of chlorine bleach and water for the cleaning process.
This mixture is powerful against mold and mildew and helps to sanitize the wall, improving its condition before you begin the actual repair work.
• Applying Water-Based Primer/Sealer
Mildew-resistant, water-based primer/sealers tend to form a protective sealing layer over the wall.
This layer not only helps to block out existing stains but also improves paint adhesion, setting a better base for your wall paint. Its main benefit, however, is that it protects the wall from future water damage.
• Applying Multiple Coats for a More Effective Seal
Depending on the extent of water damage, it may be necessary to apply multiple coats of primer/sealer for a more effective seal. This can help to adequately conceal the discoloration and damage, thus providing a smooth and even surface for your new paint layer.
• Feathering the Edges for an Even Application
While applying the primer/sealer, it would be beneficial to use a technique called feathering. Feathering the edges helps achieve a more even application and prevents visible overlap marks.
It creates a gradual transition between the primed and non-primed areas, which in turn results in a smoother, more professional-looking finish.
• Recoating for Uniform Appearance
I would strongly suggest considering recoating the entire wall. This often becomes necessary to ensure a uniform appearance. Patch repairs, especially on larger or multiple areas, can lead to visible color differences when the paint dries.
Recoating aims to provide a uniform color, texture, and sheen across the entire wall, regardless of the repairs.
• Getting Professional Help for Drywall Repair
Sometimes, the water damage might be so extensive that the actual drywall needs repair or replacement. In such cases, it is crucial to hire a professional to ensure that the job is done right.
Drywall installation is a specialized job that may require licensed carpenters due to the skill, precision, and knowledge it entails.
In conclusion, dealing with water-damaged walls involves several careful steps, starting with fixing the leak source and cleaning the wall before sealing and repainting. For extensive damage, professional help may be required to ensure a high-quality repair.
Remember, the objective isn’t just to hide the water damage but also to strengthen and protect your walls against future damage.
• Utilizing Water Damage Services
Hiring a professional water damage service can significantly ease the cleaning process after a flood. Companies like these bring their expertise to manage water damage and mimic techniques used by professionals for remediation and restoration.
These professionals help salvage as many items as possible and prevent mold and mildew proliferation. You can take a look at the Environmental Protection Agency’s guidelines for proactive measures following water-related damages.
• Scraping and Cleaning the Damaged Area
The first step in the restoration process is removing the damaged paint and dirt. Using a wire brush proves effective in this task. The bristles of a wire brush can reach into crevices and remove remnants of dirt and loose paint.
• Filling and Sanding
After cleaning, applying a thin layer of wood filler is advised. A bent putty knife can be perfect for this job. It allows you to press the filler deeper into the damaged areas, providing a flat and stable surface for repainting.
Once the filler is in place, it should be left to dry for a few hours. While filler drying times may vary, it’s crucial to ensure it is fully hardened before moving on.
Following filler application, sanding is critical to smooth out any rough spots or irregularities. Fine-grit sandpaper works best. Used sparingly to avoid sanding away the filler.
• Prep Work Before Painting
When the sanded surface is smooth, applying a primer comes next in the process. Either a sealer or a water-based primer should be used. The primer creates a bonding surface for the paint, helping to prevent peeling and chipping down the line.
Before painting over the primer, considering repainting the whole wall is recommended. A full wall paint job can help achieve a seamless look and eliminate any signs of prior damage or patchwork.
• Support the Drying Process
To facilitate the drying process after painting, ensure the room is well-ventilated. Opening doors and windows is a natural way to increase airflow. Using fans can also speed up the drying time.
Remember, it is also advisable to remove baseboards and molding beforehand to avoid water seeping into these areas.
Further, any peeling or flaky paint should be treated with filler before primer and paint are applied. Brush off any loose paint and prime the area before painting, especially if the area in question is small and the margins are still intact.
• Conclusion
By following these steps, one can manage water damage repair effectively. Just remember, hiring a professional service should never be ruled out when dealing with extensive water damage.
These professionals know how to ensure your space returns to a safe, clean, and attractive state.
– Taking Care of Dampness Before Painting
When dealing with water-damaged walls, the first crucial step is to ensure all areas are thoroughly dried. This isn’t merely airing out the room or wiping the water down but using professional equipment like dehumidifiers to ensure hidden moisture pockets are utterly dried out.
The Department of Housing and Urban Development (HUD) recommends this step to minimize any health hazards. It’s a process that might take time and needs patience, but it’s worth every second to ensure a great paint job.
– Addressing Mold and Mildew
The second step deals with mold and mildew that often accompany dampness, particularly if the dampness has persisted for a while. They are more than just unsightly; they pose significant health risks. You need to completely get rid of any traces of mold and mildew before the painting job.
Notably, this is a task that might require the hand of a professional if the mold and mildew have grown extensively through the wall. CDC.gov provides a thorough guide on how to deal with mold and mildew, stating this is a necessary step before starting any painting work over water damage.
– Preparing the Damage Area
Once the walls are dry and free of mold and mildew, preparing the damaged area comes next. This preparation involves scraping off any flaking or bubbling paint off the wall. The idea is to create a clean and even surface for the forthcoming paintwork.
Abrasive materials such as sandpaper are needed to sand down rough patches or uneven areas. Scraping and sanding down may sound easy, but they’re detailed tasks that require careful execution.
– Using a Sealer Binder
Once the wall has been sanded and is as smooth as you can get, you might want to use a sealer binder on the drywall. A sealer binder acts as a protective layer over the drywall, creating a water-resistant bond.
This step ensures the wall is protected from any future water damage, minimizing repair costs. It’s an added measure to guarantee longevity in your painting job. An authority site like EPA.gov suggests that making such an effort can significantly pay off in protecting your property.
– Priming Before Painting
Having prepped and sealed the drywall, applying one to two coats of primer is recommended before painting the wall. A primer is designed to provide a suitable surface for the paint to adhere to and helps enhance the vibrancy of the paint color.
Additionally, using a primer will help hide any stains left from the water damage, ensuring a smooth, unified look. Its application may be labor-intensive, but the result justifies the work put in.
– Finding the Right Contractor
Finding an experienced professional contractor is of utmost importance when dealing with painting over water damage. A professional contractor will have access to the right tools, knowledge, and experience, making all the difference in the quality of work.
I personally recommend All Dry USA, a painting contractor specializing in painting over water damage. Their quality of work and customer service is unmatched, ensuring your paint job will stand the test of time and, importantly, future water damage.
Carrying out these steps professionally and with great detail will ensure a high-quality painting job. The tasks might seem many and tedious, but skimping on them can result in an underwhelming result.
Therefore, give it your all, or hire a trusted pro to ensure your paint job is flawless and long-lasting.
Identifying and Resolving Water Damage Prior to Painting
Addressing water damage before painting over it is crucial. To achieve long-lasting results, it’s important to determine and rectify the cause of water damage first. Ignoring this could lead to more severe problems down the line.
I highly recommend following the process of treating the affected area, drying it up, and ensuring the source of water damage is completely resolved before proceeding with your painting project.
Here’s an insightful article from the University of Florida’s Family, Youth, and Community Sciences that provides a comprehensive guide on handling domestic water damage.
• The Role of Primer in Preventing Water Damage
A suitable primer acts as a protective barrier between the old and fresh paint, thereby helping prevent water damage from reaching the new coat. The absence of a primer might result in unwanted stains appearing on the freshly painted surface.
Primer ensures smooth application of the new paint and effectively locks out the dampness from reaching it.
• Treating Water Stains Using Household Products
There are multiple methods and products to remove water stains from ceilings. Vinegar is particularly effective at removing water stains.
Other products include dish soap, hard water stain removers, as well as commercial products. Vinegar can be applied using a spray bottle and then wiped off, providing a cost-effective and valuable solution.
• Dealing with Bubbling Paint and How to Fix It
Bubbling paint is a common sign of water damage. To fix it, start by removing flaking paint and sealing damaged areas. Next, fill in any holes or uneven areas and then sand the area. Once it’s smooth, apply the primer to the damaged area before proceeding with the final coat of paint.
• Drying Wet Patches Before Painting
Wet patches on walls or ceilings must be thoroughly dried before being painted over. You can either air-dry the patches naturally or speed up the process by using a fan or dehumidifier. Until the wet patches are fully dry, painting over them would lead to a skewed paint job.
• Painting Over Water Streaks on Ceilings or Walls
Water streaks on ceilings or walls pose no significant challenge when painting over them. Simply ensure the area is clean, apply a high-quality primer, and paint the area with thin, even strokes for a polished finish.
• Covering Water Stains on Drywall with Paint
Water stains on drywall can be unsightly. Following the process used for ceilings and walls stain removal, primer application, and then painting will effectively cover any water stains on drywall.
• Prepping Water Damaged Plasterboard for Painting
For painting over water-damaged plasterboard, it’s crucial to ensure that there’s no active leak and that a primer with stain sealer has been used. This ensures the paint adheres well to the plasterboard and provides a clean, seamless finish.
• Repairing and Painting Over Water Stained Baseboards
You can paint over water stains on baseboards if there’s no additional damage. However, remember that extensive damage might necessitate replacement. If it’s just stained, the areas can be prepared, primed, and painted just like drywall or plasterboard.
• Fixing Water Damaged Wall Plaster
Water-damaged wall plaster calls for a detailed repair process. After ensuring that the leak causing the damage is fixed, remove the damaged plaster and clean the area. Once clean, seal the damaged area and patch the plaster. The final step is to paint the area, leaving it looking fresh and vibrant.
Remember, attending to water damage promptly and professionally not only improves the aesthetic appeal of your home but also preserves its structural integrity.
Whether it’s bubbling paint, water stains, or wet patches, addressing these issues quickly and correctly guarantees a successful and durable paint job.
• The Root Cause of Water Stains on Ceilings
When water stains appear on your ceiling, the main culprit is likely a roof leak. The leakage might be located near vents, vent pipes, chimneys, or any other areas where water can potentially sneak in.
Over time, rainwater can penetrate these vulnerable spots, resulting in noticeable water stains on your indoor ceiling.
• Windows and Doors as Water Stain Sources
However, not all water stains trace back to the roof – some can testify to issues regarding windows or doors. If you notice water stains near windows or doors, this points towards faulty caulking, deteriorated wood, or a malfunction in the window or door itself.
As such, these areas need to be examined thoroughly to rectify the problem.
• Drying Before Paintwork
One critical rule in dealing with water stains is to dry the area completely before attempting to paint. Undertaking paintwork while the surface is still damp will only exacerbate the issue as the moisture might become trapped, fostering mold growth over time.
• Towels and Dehumidifiers
Your best allies in the drying process are towels and a dehumidifier. Towels should be used to absorb any visible puddles of water. As for the remaining moisture, a dehumidifier can expedite the drying process to prepare the area for the next steps.
• Understanding Mold Growth
When dealing with water stains, mold growth is often an unwelcome guest. If mold is present, you’re strongly recommended to get professional help.
It can be dangerous to use mold-killing sprays without taking the necessary precautions. Some detailed information on mold growth can be found on EPA’s site.
• Priming Water-Damaged Areas
Prepping is a key step to achieving a long-lasting result. Primer creates an adhering surface that seals the water-damaged area. Notably, use a stain-blocking primer to ensure the water stain does not bleed through the fresh coat of paint.
• The Challenge of Blending Paint
Another issue is that a small patch of fresh paint can challenge the uniform look of the ceiling or the wall due to a subtle variation in the color or sheen. To overcome this, consider painting the entire surface to maintain a consistent appearance.
• The Role of Professional Painters
For substantial leaks and mold issues, enlisting a professional painter can be a wise investment. Skilled painters can accurately assess the condition, propose suitable treatments, and deliver high-quality results.
A professional company specializing in water damage repair and painting can guarantee the longevity and attractiveness of the new paint.
• Turning to Williams Professional Painting
Among reliable painting companies, Williams Professional Painting has gained recognition for its adeptness in handling homes with water damage.
Utilizing a comprehensive approach, they provide painting services that not only address the visible issues but also ensure the attractiveness and durability of the new paint going forward.
Overall, water stains require immediate attention to prevent further damage.
By understanding the causes, utilizing effective drying methods, considering professional painting services, and thinking ahead about the full painting process, you’re well on your way to restoring your home’s beauty and comfort.
Addressing the Underlying Cause of Water Damage
When faced with water damage, it’s vital to address the root issue before even thinking about painting it. This might mean dealing with a leaking roof or a bursting pipe.
While it may seem like a short-term solution to simply cover the water damage with a fresh coat of paint, this approach is shortsighted. Ignoring the cause of the water damage will inevitably lead to more serious issues later on.
• The Importance of Professional Repair
To properly repair the source of your water damage, I advise enlisting the services of a specialized professional.
This may be a seasoned roofer or an experienced carpenter, depending on the specifics of the problem. Their expertise will ensure that the issue is effectively resolved, preventing potential future damages.
• The Drying Process
After addressing the source of the leak, your next responsibility is to thoroughly dry the affected area. I find that using a dehumidifier or a fan can be of great help in this regard. This step is crucial to curtail further damage.
• Tackling Mold and Mildew
If the water-damaged area shows signs of mold or mildew, eliminating this is necessary before you proceed with painting. Mold poses serious health complications, and painting over moldy drywall will only trap the problem, making it worse over time.
Mold advice from the EPA can give further insight into how to handle mold infestation.
• The Role of a Professional Contractor
To completely and safely remove mold, I’d highly recommend hiring a professional contractor. Most mold-killing sprays are toxic, and it’s best for health reasons to leave this to a professional.
• Possible Wall Replacement
Sometimes, if the infestation is severe, it might call for a section of the wall or ceiling to be replaced. Recognizing when this is necessary and acting swiftly can forestall extensive renovations.
• Using a Stain-Blocking Primer
Once the wall or ceiling is thoroughly dry and mold-free, the next step is to prime the area. I advise using a stain-blocking primer to prevent water stains from seeping through the topcoat. This guarantees a clean, fresh surface for your new paint.
• Painting the Affected Area
Following the priming process, you can now paint over the water-stained area. To ensure a proper blend with the new paint, I suggest painting the entire wall or ceiling around the damaged area.
• Contracting a Professional Painting Contractor
At this point, you might find it valuable to hire a professional painting contractor. Their expertise ensures a flawless finish. Plus, it saves you the hassle of attempting a DIY job which could lead to less-than-desirable outcomes.
• Southington Painting Company
One of the painting companies I wholeheartedly recommend is Southington Painting Company. They are a seasoned team based in central Connecticut.
Their range of services extends beyond interior painting to include drywall repair and exterior painting. Should you need to contact them, they’re always ready to provide more information or schedule an estimate.
• Cleaning the Water-Damaged Area
Before we leap into water damage repair, it’s essential to thoroughly clean the affected location. Selleys Sugar Soap, which can be obtained from most home improvement stores, can be a fine choice for this task.
All you need is a bit of this product and a damp cloth to wipe the surface clean. This crucial first step can make the repair process simpler and more effective.
• Removing Flaking Paint
After you’ve cleaned the affected area, the next step is to get rid of any flaking paint. For this purpose, a basic scraper would do the trick. It essentially prepares the damaged surface for repairs and ensures better bonding of the materials applied afterward.
• Applying Water Sealer
Once you’ve readied your surface, it’s time to apply a sealer binder to the water-damaged area. I would suggest using Zinssers Water Based Peel-Stop, an excellent adhesive that prevents water from seeping back through the surface. It also acts as a shield, protecting the surface against future damage.
• Popular Peel-Stop Sealer
To ensure the effectiveness of the peel-stop, it should be allowed to dry for at least an hour. The whole purpose is to ensure that the surface is completely solid and dry. Remember, patience is key during this step to achieve optimal results.
• Using a Filler
The next step is to use a filler to mend any holes or imperfections in the damaged area. Selleys Polyfiller is a great choice as it effortlessly fills gaps and smoothes the surface.
• Sanding for a Smooth Finish
After your filler has completely dried, it’s time to smooth the area. Using sandpaper, sand the surface until it is smooth and ready for the next step: painting.
• Priming the Surface
Now that we have a sleek foundation, the primer can be applied. A water-based primer/sealer like Berger Triple Prep is highly recommended to properly prepare the surface for paint application. Priming is an important part of the process as it ensures that the paint will adhere better.
• Selecting and Applying Paint
Choosing the right paint color that complements your room can make a huge difference. Berger Everlast or Dulux Snow Season Quarter are excellent choices for a top-quality finish. Simply apply your chosen paint over your well-prepared wall.
• Architraves Painting
When it comes to architraves (wood trims around doors or windows), opt for water-based enamel paint like Berger Water-based Enamel in Gloss. If left untinted white, it can lend a clean and classic finish.
• The Impact of Water Damage Repairs
The impact of a well-executed water damage repair can be noticeable. It can change a previously damaged and unappealing space into a refreshing and comfy living area.
For more information on water damage restoration, check EPAs website, which includes a comprehensive guide and helps homeowners understand the process better.
Remember, dealing with water damage may seem daunting, but with a bit of effort and the right products, you can rejuvenate your living space, making it fresh and welcoming again.
Addressing the Root Cause of Water Damage
Identifying and addressing the root cause of water damage is an essential step before making any cosmetic repairs. Water damage may have various causes, such as a leaking pipe or roof or even due to flooding.
To effectively fix the issue, these causes must first be dealt with to prevent further damage. This could involve activities like sealing leaks, replacing damaged parts, or damp-proofing the area. The Environmental Protection Agency provides helpful guidelines on this matter.
• Selecting the Right Type of Paint
Once the cause of the water damage has been resolved, the next step is selecting the right type of paint for the repair. Ordinary water-based paints will not form a waterproof barrier; hence stains may reappear over time.
It would be more effective to use an oil-based paint or a specialist stain blocker which provides a more resilient barrier against water intrusion.
• Repairing Physical Damage
Water stains often result in physical damage to the surface, including cracks or flaking plaster. If this is the case, be sure to repair these damages prior to painting. The plaster can be re-applied and sanded to match the surrounding surface.
Specialty products such as vinyl spackling can be used for minor repairs. I recommend using DAP’s DryDex Spackling, which goes on pink and dries white to ensure all repairs are complete and secure.
• Ensuring a Seamless Painting Job
After repairs have been made to the water-damaged area, you can now proceed to paint. Feathering, or the technique of blending the edges of the painted area, should be employed during this process.
This technique will help incorporate the new paint with the surrounding area, maintaining consistency and making the repair less noticeable.
• Painting the Entire Surface
In some cases, it might be necessary to paint the entire ceiling or wall to achieve a flawless and balanced result. This generally applies to larger or deep-stained areas.
The displacement of paint colors can be more obvious in such instances; hence, repainting the whole surface can result in a more even and unified appearance.
• Elimination of Water Stains
A solution of bleach and water can be used to eliminate water stains, particularly on white or light-colored surfaces. This mixture effectively lightens the stain and creates a cleaner surface for the paint to adhere to.
However, care should be taken to handle bleach correctly, as it can be a health hazard. OSHA provides a helpful guide on chemical safety which includes handling bleach.
• Using High-Quality Painting Tools
The kind of tools used in a paint job affects the overall outcome. Using high-quality paint rollers and brushes ensures a professional and pristine finish.
These tools help in the uniform application of the paint, avoiding visible brush or roller marks. Regardless of the cost, investing in superior tools can deliver satisfactory and lasting results.
By implementing these steps carefully, water-stained walls or ceilings can certainly be restored back to their prime condition.
Remember that the key to a successful repair job is identifying the root of the problem, using the right materials and tools, and applying the proper techniques. These insights, as informed by years of experience, will deliver impeccable results.