Water Damage Subfloor. Tips from professionals
When you find your floor flooded with water, a lot of things can go through your mind. You probably hope that the damage is not severe. The worst-case scenario is that the water has been standing in the room for a long time and has soaked into your subfloor. If you need to replace the subfloor, it can turn into a big job.
How Do You Fix Water-Damaged Subfloor:
- Step 1: Assess The Damage
- Step 2: Mark The Area
- Step 3: Cut Out The Damaged Areas
- Step 4: Add The New Flooring
- Step 5: Install Flooring
Not only do you have to worry about the actual subfloor, but you also need to remove your flooring and may have to worry about structural damage as well. If you find that your subfloor is damaged, I recommend following these steps to fix it.
In this blog post, I will explain the steps in more detail. And how you can know if a subfloor needs to be replaced and the best way to remove the moisture.
Contents
- 1 How Do You Fix Water-Damaged Subfloor?
- 2 How To Tell If The Subfloor Needs Replaced
- 2.1 ● Signs Subfloor Needs Replacing: Floor Looks Uneven
- 2.2 ● Signs Subfloor Needs Replacing: You Can Feel The Floors Moving
- 2.3 ● Signs Subfloor Needs Replacing: The Floorboards Squeak
- 2.4 ● Signs Subfloor Needs Replacing: Furniture Is Uneven
- 2.5 ● Signs Subfloor Needs Replacing: Cupping
- 2.6 ● Signs Subfloor Needs Replacing: Leaking Ceiling
- 2.7 ● Signs Subfloor Needs Replacing: Bad Odors
- 3 Will the Wet Subfloor Dry Out?
- 4 How Do You Get Moisture Out Of A Subfloor?
- 5 Suitability of Wet Plywood Subfloors
- 5.1 • Dealing with Slight Warping
- 5.2 • Replacing Bowed Plywood Subfloors
- 5.3 • Creating Optimal Conditions for Drying Indoor Plywood Subfloors
- 5.4 • Dealing with Outdoor Plywood Subfloors
- 5.5 • Handling Minor Water Leaks on Subfloors
- 5.6 • Timing and Considerations for Sealant Application
- 5.7 • Moisture Reduction Tactics
- 5.8 • Importance of Ventilation
- 5.9 • Preventing Dry Rot and Mold Growth
- 5.10 • Drying Outdoor Subfloors After Rain
- 5.11 • Recommended Types of Plywood
- 5.12 • Protecting Subfloors from Moisture
- 5.13 • The Drying Process of OSB
- 5.14 • Surface Moisture Removal From OSB
- 5.15 • Water Draining in OSB
- 5.16 • Use of Carpet Drying Fans in OSB Drying
- 5.17 • Attention to Detail: OSB Joints, Corners, and Edges
- 5.18 • Moisture Testing of Dried OSB
- 5.19 • Repairing Moisture Problems in Existing Homes
- 5.20 • Checking Existing Home Subfloor’s Moisture Levels
- 5.21 • Removing the Finished Flooring in Existing Homes
- 5.22 • Handling Structurally Compromised OSB
- 5.23 • Use of Commercial Fans and Dehumidifiers
- 5.24 • Moisture Tests Post Drying
- 5.25 • Final Stages: Replacement and Finishing
- 6 The Implications of Water Damage on Subfloors
- 7 Importance of Moisture Content Measurements
- 8 Hiring Professionals for Water-Damaged Subfloors
- 8.1 • Identifying Signs of Water-Damaged Subfloors
- 8.2 • Quick Response to Water Leaks
- 8.3 • Importance of Ventilation for Drying Subfloors
- 8.4 • Use of Dehumidifiers or Air Conditioners
- 8.5 • Deciding Whether to Repair or Replace Water-Damaged Floors
- 8.6 • Refinishing Water-Damaged Hardwood Floors
- 8.7 • Insurance Coverage for Water-Damaged Subfloors
- 8.8 • Selection of Flooring Options and Treatments for Different Rooms
- 9 Water Damage to Subfloors
- 9.1 • Assessing the Extent of Damage
- 9.2 • Marking for Replacement
- 9.3 • Removing Damaged Regions
- 9.4 • Installing New Subfloor
- 9.5 • New Flooring Installations
- 9.6 • Identifying Damaged Subfloor
- 9.7 • Acting Swiftly to Prevent Further Damage
- 9.8 • Ventilation: Your Friend in Drying out Moisture
- 9.9 • Employing Household Help like Towels
- 9.10 • Deploying Dehumidifiers and Air Conditioners
- 9.11 • Identifying Water Damage on Wooden Floors
- 9.12 • Prevention Methods
- 9.13 • Dealing with Water Damage on Wood Floors
- 9.13.1 – The Effects of Water Damage on Wood Floors
- 9.13.2 – Water Damage Sizes vary
- 9.13.3 – Initial Response to Water Damage
- 9.13.4 – Use of Fans or Air Movers
- 9.13.5 – Handling Flood Situations
- 9.13.6 – The Drying Process
- 9.13.7 – Risks of Water Underneath Wood Flooring
- 9.13.8 – Wooden Subfloors and Water Damage
- 9.13.9 – Decision on Water Damaged Subfloors
- 9.13.10 – The Reliability of Waterproof Flooring Types
- 9.13.11 – Observation of Water Beneath LVP Floors and Laminate
- 9.14 • Shut Off The Water Supply to Prevent Further Damage
- 9.15 • Document the Water Damage for Insurance
- 9.16 • Drying the Plywood Subfloor Before Repair
- 9.17 • Removing Baseboards for Thorough Inspection
- 9.18 • Consult a Professional for Extensive Damage
- 9.19 • Adhere to Manufacturer’s Guidelines for New Flooring
- 9.20 • Ensure Proper Ventilation
- 9.21 • Personal Protective Equipment is Crucial
- 9.22 • Addressing Underlying Plumbing Issues
- 9.22.1 – Water-Induced Subfloor Damage: Why Removal of Flooring is Crucial
- 9.22.2 – The Art of Subfloor Repair
- 9.22.3 – Clean Before Install: Important Yet Ignored
- 9.22.4 – Prolonged Water Exposure: A Replacement Trigger
- 9.22.5 – Quick Action: A Preventative Measure
- 9.22.6 – Drying Tactics: Ventilation and Dehumidification
- 9.22.7 – Revisiting the Cause: Time to Fix the Leak
- 10 Assessing and Marking Damaged Areas of the Subfloor
- 10.1 • Potential Cost of Professional Repairs
- 10.2 • Use of LP Legacy Premium Sub-Flooring
- 10.3 • Tips on Preventing Water Damage to Subflooring
- 10.4 • LP Building Solutions and the First Street Foundation
- 10.5 • Health Risks Associated with Water-Damaged Subfloors
- 10.6 • Building Codes and Regulations
- 10.7 • Case Studies
- 11 Proper Safety Measures in Flooring Replacement
- 11.1 • Identifying Damaged Floor Joists
- 11.2 • Choosing the Right Replacement Plywood
- 11.3 • Keeping Room for Expansion
- 11.4 • Importance of Cleaning Prior to Replacement
- 11.5 • Estimating the Cost of Subfloor Repair
- 11.6 • My Recommendations
- 11.7 • Understanding Subflooring
- 11.8 • Spotting Subflooring Issues
- 11.9 • Handling Subflooring Water Damage
- 11.10 • The Need for Professional Inspection
- 11.11 • Subfloor Replacement & The Role of Professionals
- 11.12 • Proactive Steps in Managing Subflooring Damage
- 11.13 • The Implications of Ignoring Subfloor Damage
- 11.13.1 – Understanding the Factors Affecting Subfloor Water Damage
- 11.13.2 – Why Immediate Water Removal is Crucial?
- 11.13.3 – Subfloor Material and the Severity of Damage
- 11.13.4 – Counteracting Humidity with Adequate Ventilation
- 11.13.5 – The Dilemma of Refinishing Hardwood Floors
- 11.13.6 – To Repair or Replace – Weighing Important Factors
- 11.13.7 – Room-specific Considerations
How Do You Fix Water-Damaged Subfloor?
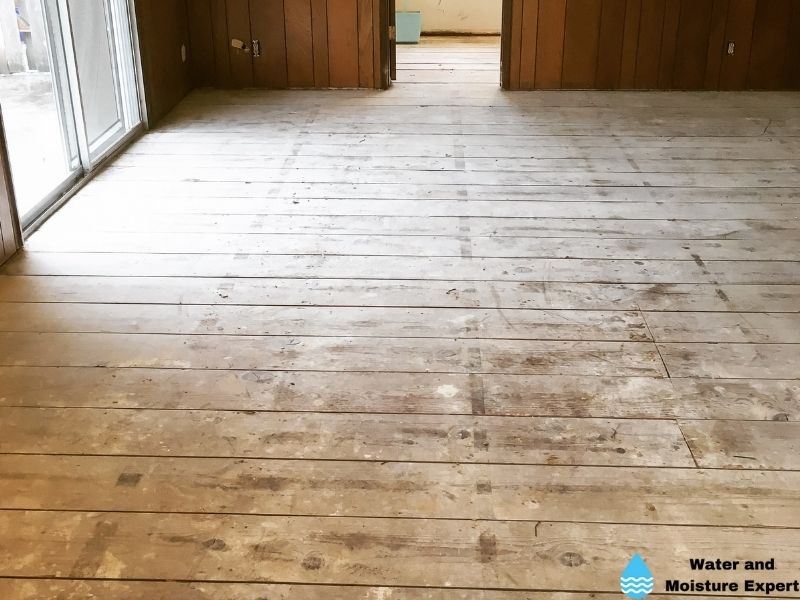
If you have had a flood or a pipe has burst in your home, there’s a good chance the subfloor may be damaged and need to be replaced. Follow these steps to help you replace it if your skills are up to it. If you are less experienced or do not have enough time, I recommend asking a professional for help. In some situations, the subfloor damage can be challenging to check and replace if needed.
● Step 1: Assess The Damage
It’s always a good idea to get a good look at things before you start any repairs. Be sure to pull up the flooring in your home so you can have a good look at the subfloor. Once you know how bad the damage is, you can come up with the best way to repair or replace it.
● Step 2: Mark The Area
Take some time to inspect the area and mark the parts that need to be replaced. You may not need to replace the entire floor, but you will need to work on the damaged sections. You should measure and mark with a piece of chalk or a marker.
● Step 3: Cut Out The Damaged Areas
Use a saw to cut out the damaged areas. Be sure to make your cuts clean so you can easily fit in the new subfloor. The more accurately you measure and the straighter you cut the damaged pieces, the easier adding the new subfloor and the better the finished result will look.
● Step 4: Add The New Flooring
Put your new flooring in the proper location. Be sure to secure it in place and pound flat any screws or nails that could be sticking up. The new subfloor should fit right in the space of the old portions that were removed.
● Step 5: Install Flooring
If you plan to install new flooring over the sunflower, you can do so. Be sure to clean up the area to ensure no dust or dirt could prevent the new flooring from adhering to the subfloor or cause lumps and bumps that might lead to more damage.
Do You Have To Replace Wet Subfloor?
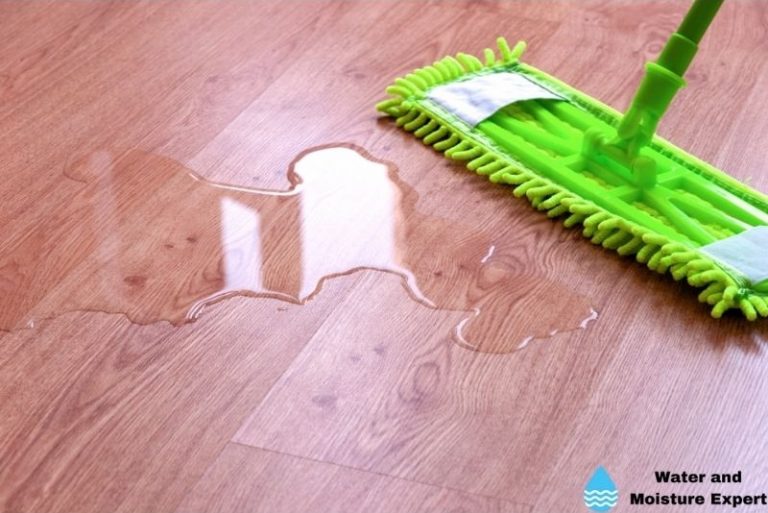
The subfloor may not need to be replaced as long as you are able to remove the water quickly. It takes some time for the water to get under your surface flooring and damage it. By removing the water quickly, you won’t have to worry about it damaging the subfloor. Of course, it also depends on the type of subfloor. When it is, for example, made from concrete, you have less to worry about.
How To Tell If The Subfloor Needs Replaced
If you notice the water has been on your subfloor for a while, you may need to replace the subfloor. Before you start working on your floor, be sure to check for some of these issues that will tell you the repairs are necessary:
● Signs Subfloor Needs Replacing: Floor Looks Uneven
Check the floors to see if any parts look uneven. You may notice that some areas appear to be sunken in, or some parts are higher than others. It could mean the subfloor is damaged and will need to be replaced.
● Signs Subfloor Needs Replacing: You Can Feel The Floors Moving
If you step on the floors and feel them moving, it may mean you need to replace the subfloor. The subfloor can be soft in some places and may give out when any weight is put on it. It can take some time for the floors to become soft or loose enough to shift, but once it starts to happen, it can affect the entire floor.
● Signs Subfloor Needs Replacing: The Floorboards Squeak
There are many reasons your floors may squeak, but if you recently had a flood or a leak and there is a chance the water could have gotten into the subfloor, the squeak could be a sign that it’s time to replace it. The squeak will likely get worse as time goes on, and it could be really noisy in your home.
● Signs Subfloor Needs Replacing: Furniture Is Uneven
You likely have furniture in your room, and if you notice that it no longer sits right and seems to be tilting or uneven, it may mean the subfloor is weak. Furniture is heavy, and if the flooring is soft, the furniture may be sinking into it and even poking through it. Even if the leak or floor didn’t occur in the same room, it might have spread to that area and made that subfloor weak.
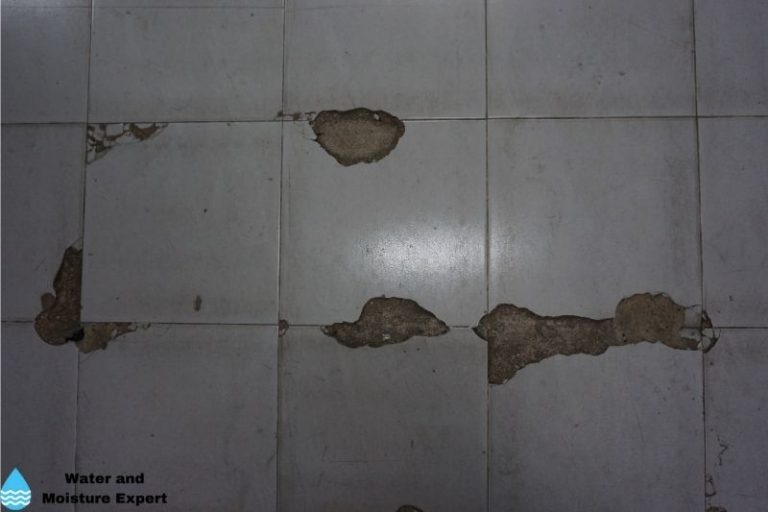
● Signs Subfloor Needs Replacing: Cupping
If you notice cupping on your floor, it could mean that there is still water in the subfloor or that the subfloor has become so weak it can no longer support the flooring in your home, and it is starting to buckle from the weight. In some cases, you can make repairs, but you may need to replace it if it is severe.
● Signs Subfloor Needs Replacing: Leaking Ceiling
If you are in a house that has more than one floor, and you notice the ceiling above you is leaking, it may mean that the flooring on that floor is damaged and needs to be replaced. A leak could cause this in a pipe or a flood in the bathroom.
You may not even know there is damage to the floor until you see the water dripping from the ceiling. This might also mean that you need to replace your ceiling.
● Signs Subfloor Needs Replacing: Bad Odors
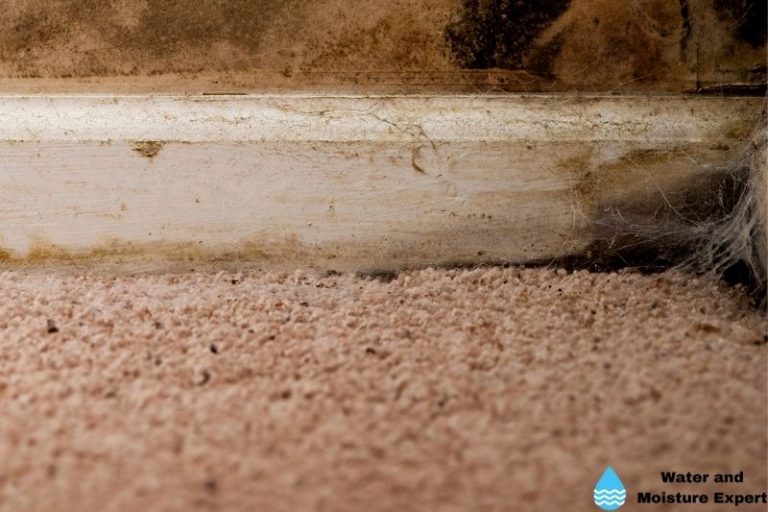
You won’t always see signs that your subfloor is damaged and needs to be replaced. Sometimes you will smell the signs first. If you walk into your room and notice there is a musty or moldy smell, it may mean that the water has made it down to your subfloor.
Mold may be growing and causing the smell, or there may just be water inside the subfloor that you can smell when you walk into the room.
Will the Wet Subfloor Dry Out?
Your subfloor will dry out in time, but the sooner you can dry it, the less likely there will be as much damage. The longer the water is left on the subfloor, the more likely the floor will swell and become damaged.
Once the subfloor has absorbed enough water to swell, it may have to be repaired or even replaced. Always act quickly if and when you see water on your floors so you won’t have to worry about it soaking into the subfloor and causing more costly damage.
How Do You Get Moisture Out Of A Subfloor?
If you think there could be moisture in your subfloor from a leak or flood, you may be worried about what the moisture will do if it’s there for a long time. There are a few ways to remove the moisture from your subfloor so it doesn’t become damaged.
In general, ventilation is key. If you plan to use natural ventilation, always know that this only works if the humidity outside is at an average level. If you live in a humid area, you probably need to use other measures like a dehumidifier or your AC.
Here are a few measures to get the moisture out of a subfloor:
● Remove Moisture From A Subfloor: Air Dry
While this could be a slow process, you can let the room air dry without other measures. It will likely take some time for all the moisture to leave the subfloor, and it could have already caused damage by the time it dries.
● Remove Moisture From A Subfloor: Open The Windows
You can help move the air around in your room by opening the windows. With air circulation, your subfloors are more likely to dry faster. Since you need to work fast, anything that can help move the moisture out is a great option. Opening the windows will pull out any moisture and help it dry faster.
● Remove Moisture From A Subfloor: Fans
Fans can also help dry out a room or a subfloor. If you are able to set up commercial fans, they may work even faster. Personal fans can also work if that’s all you have. The fans will help move air around in the room and reduce the chance of the subfloor getting so wet that it starts to swell or allow mold to grow.
● Remove Moisture From A Subfloor: Towels
As long as you are able to change them out as needed, you can use towels to help pull out the moisture that may be in the subfloor. Once the towels are saturated, you should remove them and put down dry ones to continue to absorb the water.
● Remove Moisture From A Subfloor: Dehumidifier or your air conditioner
A great way to quickly remove moisture from your subfloor is by using a dehumidifier or your air conditioner system. This is particularly true if you live in an area where the humidity outside is high.
You can use a residential dehumidifier, but I always recommend renting a commercial dehumidifier. They can remove a lot more water per hour than a residential dehumidifier.
A dehumidifier pulls in the moisture from the air and dries it out to release dry air back into the room. When used with a fan, this can be highly effective at drying out the drywall quickly.
Suitability of Wet Plywood Subfloors
Even after getting wet, plywood subfloors can remain suitable for use. The key lies in ensuring they are properly installed and tightly fitted together with nails or screws. This robust installation minimizes the potential for negative impacts that moisture can cause.
• Dealing with Slight Warping
During the drying process, it’s common to notice slight warping on the edges of the subfloors. However, this shouldn’t be a cause for concern. In most cases, the warping can be corrected by simply nailing or screwing the edges back to their original position.
• Replacing Bowed Plywood Subfloors
In instances where moisture damage has caused significant bowing in the subfloor, prompt replacement is advised. It’s best to cut out the affected areas and replace them to prevent further damage.
• Creating Optimal Conditions for Drying Indoor Plywood Subfloors
Creating the right conditions for drying a plywood subfloor can expedite the process significantly. There are a variety of ways to achieve this: increasing room temperature, turning on the heating, opening a window, or using a dehumidifier.
All of these will go a long way toward reducing humidity and creating an environment conducive to drying.
• Dealing with Outdoor Plywood Subfloors
Drying plywood subfloors outdoors presents a different challenge, as weather conditions are unpredictable. However, the emphasis here should be on mitigating water exposure during construction rather than fixing issues after exposure.
• Handling Minor Water Leaks on Subfloors
Generally, sporadic minor water leaks are unlikely to cause long-term damage. However, it is advisable to clean up spills promptly and to dry the wood as fast as possible to prevent moisture from spreading.
• Timing and Considerations for Sealant Application
After a leak, indoor subfloors typically dry out in a couple of days, depending on the severity of the leak. It’s crucial to ensure the subfloor is fully dry before applying any sealant or installing a finished floor. This wait is necessary to prevent trapping moisture underneath, which can lead to damage in the long term.
• Moisture Reduction Tactics
Apart from increasing the room temperature, other moisture reduction tactics such as mopping up excess water, using a dehumidifier, or opening a window can aid in reducing the subfloor’s moisture content.
• Importance of Ventilation
Ventilation plays a pivotal role in the drying process; it should not be overlooked. Without proper airflow, residual moisture may lead to wood rot. For a deeper understanding of the role of ventilation, you could read up on this article on Barrie Home Inspection the website here.
• Preventing Dry Rot and Mold Growth
Boosting the airflow under the subfloor can prevent dry rot and mold growth. In severe leak cases, removing a plank to allow airflow can speed up drying.
• Drying Outdoor Subfloors After Rain
Outdoor subfloors that have been heavily rained on should ideally be left to dry naturally under sunny weather conditions. If long-term rainfall is expected, untreated plywood sheets should be taken inside or covered to protect them from water exposure.
• Recommended Types of Plywood
For the best protection against water damage, WBP plywood, Marine Grade plywood, or pressure-treated plywood come highly recommended owing to their superior water resistance compared to other types of plywood.
• Protecting Subfloors from Moisture
Covering subfloors when they’re not in use, especially overnight and during periods of high moisture, is critical. Various materials like rosin paper or fan fold insulation with Luann on top can be used to cover subfloors. Consequently, seams should be taped to prevent any water seepage.
• The Drying Process of OSB
In many construction or renovation projects, it’s critical to understand that Oriented Strand Board (OSB) dries slower than plywood.
This difference stems from the unique characteristics of the materials used in OSB’s manufacture. To ensure effective drying, it is crucial to understand and follow appropriate procedures.
• Surface Moisture Removal From OSB
Eliminating surface moisture accumulated on OSB can be achieved by sweeping or sucking. The excess water should be swept off or vacuumed up when identified.
This is an essential first step before proceeding to other drying methods. It is important not just for the drying process but also to guarantee the material’s integrity.
• Water Draining in OSB
For larger puddles of water, more stringent approaches may be necessary. One recommended technique is drilling holes into the OSB to facilitate water drainage. This effective method can help diminish the total water content within the material, speeding up the drying process.
• Use of Carpet Drying Fans in OSB Drying
The use of carpet drying fans is a common and highly effective method for drying out OSB. These fans are designed explicitly for the job and help to significantly speed up the drying time by promoting proper airflow. This plays a crucial role in removing moisture trapped deep within the OSB layers.
• Attention to Detail: OSB Joints, Corners, and Edges
When working with OSB, never neglect the finer details. Particular attention should be dedicated to drying the joints, corners, and edges of the OSB. These areas are notorious for retaining moisture and, if overlooked, can lead to mold or rot problems which can compromise the structural integrity of the OSB.
• Moisture Testing of Dried OSB
Once every precaution and procedure has been pursued, bringing out a moisture meter is a critical step to confirm that the OSB is now sufficiently dry. The OSB must be moisture-free to meet safety standards and ensure efficient performance.
• Repairing Moisture Problems in Existing Homes
Addressing a wet subfloor in an existing home involves first fixing the source of the water leak or moisture problem. Without resolving the moisture issue at its origin, the subfloor may continue to get wet and cause problems.
• Checking Existing Home Subfloor’s Moisture Levels
It is also advisable to pull up sections of the finished floor to test the underlying subfloor’s moisture level in an existing home. Persistent dampness can lead to the growth of mold and can compromise the structure. If the moisture level is above 20%, the affected subfloor needs full and immediate attention.
• Removing the Finished Flooring in Existing Homes
Depending on the moisture level, it might become necessary to remove the finished flooring to expose the entire affected subfloor. This allows for a detailed investigation of the dampness and a more efficient resolution of the problem.
• Handling Structurally Compromised OSB
If the OSB in a wet subfloor appears structurally compromised, the recommended action is removal. A damaged OSB can impact the integrity of the entire structure and poses a safety risk.
• Use of Commercial Fans and Dehumidifiers
Drying out the remaining damp OSB in an existing home can be achieved using powerful commercial fans and dehumidifiers. These machines promote effective evaporation, considerably bringing down the moisture levels within the subfloor.
• Moisture Tests Post Drying
Upon completion of the drying process, it is advisable to run another moisture test. This step ensures that the subfloor is dry and thereby prevents potential structural issues in the future.
• Final Stages: Replacement and Finishing
Once the wet subfloor issue is resolved, it’s time to replace any removed OSB and install the finishing materials. This step signifies the successful restoration of the subfloor and its complete readiness to support the home structure.
For more in-depth guidance and resources, I strongly recommend visiting a site like the National Wood Flooring Association’s official website, a reputable .org site that offers valuable guidance on dealing with wet and damp wood materials.
Their guide to the Acclimation and Conditioning of Wood Flooring provides more information on moisture levels in wooden flooring materials and your home’s environment.
In all these steps, patience and thoroughness are the keys. Being methodical in your approach ensures an effective and lasting resolution to damp OSB materials. Remember, maintaining a well-conditioned and moist-free subfloor is vital to the structure and health of your home.
The Implications of Water Damage on Subfloors
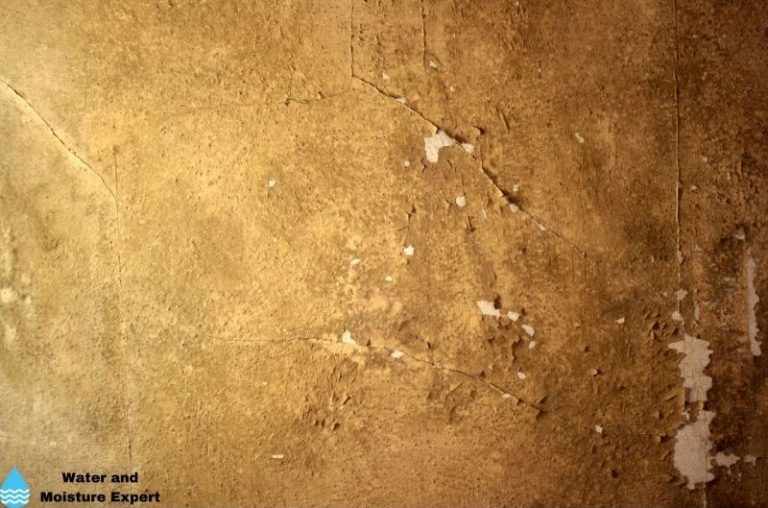
Water damage to subfloors is a serious issue. If not promptly addressed, it can lead to consequences such as warping, sagging, and even rotting subfloors. The severity of these damages depends heavily on the type and nature of the subfloor material.
• Vulnerability of Wood Subfloors to Water Damage
Wood subfloors are typically more susceptible to water damage than their concrete counterparts. Their porous nature allows water to be readily absorbed, leading to swift and significant damage if not addressed right away.
This type of flooring may require intense efforts for restoration or might even necessitate damage-control measures.
– Threat to OSB Wood Floors
OSB (Oriented Strand Board) subfloors especially come with this menace, being prone to rapid mold growth. Quick drying is crucial in the aftermath of water damage to prevent exacerbation of the issue.
– Concrete Subfloors and Damage Control
Contrary to common perception, concrete subfloors, while being more resistant to water damage, are not wholly immune. They can develop mold if not adequately dried out after exposure to water. In fact, moisture can seep into the tiny pores in concrete, creating an ideal environment for mold to thrive.
– Water Damage A Major Driver for Mold Growth
It is crucial to note that water damage lays down a fertile breeding ground for mold, regardless of the subfloor material. Long-standing water acts as the perfect harbor for various kinds of mold to grow on wet, untreated subfloors.
– The Importance of Swift and Effective Cleanup
Cleaning up water damage effectively is a crucial part of the process. Expeditious and competent action can help prevent additional damage and curtail the rampant growth of mold.
• Proactive Measures for Restoring Water-Damaged Subfloors
A strategic approach to dealing with water-damaged subfloors comprises a few key steps:
- Identify and arrest the source of the leak to prevent further water influx.
- Pull out any soaked items from the affected area to enable thorough cleanup.
- Use tools like a wet-dry vacuum or absorbent towels to rid the area of standing water.
- Clean the affected areas with an antimicrobial solution to eliminate mold or bacteria.
- Foster drying out by using dehumidifiers, fans, and other drying methods to remove the remaining moisture.
– Inspection Necessary before New Installation
Before installing fresh flooring, a close inspection of the subfloor for signs of rot or other structural damage by moisture is key. This will prevent the new installation from suffering subsequent damage.
– Costs of Repairing Water-Damaged Subfloors
The cost of restoring water-damaged subfloors can vary, depending on the degree and nature of the damage sustained. It’s advisable to ensure an in-depth assessment to avoid underestimating the damage, which can influence overall repair costs.
– Professional services for Water-Damaged Subfloor Repairs
Should the situation call for it, professional help is available, with industry experts like Mold Safe Inspections providing services in regions such as San Diego and Orange counties. They offer specialized consultation and solutions to navigate the deluge damage.
For better understanding and learning, I recommend visiting The United States Environmental Protection Agency, which provides comprehensive resources on handling water damage and mold.
All in all, it’s crucial to approach any instance of water damage with urgency and an action plan. Doing so will prevent long-term, severe consequences while preserving the quality and longevity of your subfloors.
Importance of Moisture Content Measurements
Ensuring the delivery of high-class and long-lasting wood flooring installations requires careful monitoring of the moisture content in both the wood flooring and the subfloor.
Proper moisture content measurements are paramount; they should be taken at three crucial stages: before, during, and after installing the wood floor.
By collecting this moisture content data, one can significantly improve the vitality and durability of installed floors, thereby preventing future subfloor moisture issues.
• Moisture Testing Procedure
In context: The process of testing moisture content is relatively straightforward. However, it requires attention to detail. The ideal method is to test both the wood flooring and the subfloor in multiple spots throughout the room.
Adopting this approach ensures that every inch of your installation is accounted for, thereby nullifying the chances of moisture-related defects in due time.
There are many resources available, such as The National Oak Flooring Manufacturers Association, that provide excellent guidelines on these moisture testing procedures.
• Utilization of Flooring Underlayment with Vapor Retarder
To further fortify your installation against potential moisture-based adversities, I recommend using a flooring underlayment with a vapor retarder. This material operates by reducing moisture migration from the subfloor to the flooring materials.
The result is a significantly reduced risk of moisture-based damage or defect in your wood flooring installation, thereby ensuring a longer lifespan for your floors.
• Recommended Products: Base Kings ES-Cushion & ES-Barrier System
There are several products in the market that can assist in managing the moisture levels of flooring installations. One product that I frequently recommend is the Base Kings ES-Cushion and ES-Barrier System products.
These products are tailor-made for projects where moisture is a concern, as they possess excellent moisture barrier qualities. They also boast a high moisture-resistant adhesive that further enhances their effectiveness in moisture management.
• Preventive Measures Against Moisture Problems
Even after installation, the potential for moisture-related issues still exists. Hence, it is important to adopt preventive measures. One such strategy is for building occupants to use dehumidifiers.
Dehumidifiers work by reducing and maintaining the level of humidity in the air, a crucial factor contributing to moisture retention in flooring installations.
Building occupants can also install a vapor-barrier flooring underlayment. When paired with a dehumidifier, the underlayment functions as an excellent moisture management system that actively prevents moisture problems.
In conclusion, managing and preventing moisture issues in wood floors require a multilevel approach that begins with proper moisture measurements and ends with the adoption of exceptional moisture management products and practices.
By following these guidelines, you can ensure the longevity and robustness of your flooring installations.
Hiring Professionals for Water-Damaged Subfloors
Even though replacing a water-damaged subfloor can be a DIY endeavor, it is advisable to hire a professional whenever there is limited time or experience. Professionals offer specialized and timely services, reducing the risk of further damage and unnecessary costs in the long run.
More often than not, they are conversant with different types of subfloors, including concrete, and thus can effectively gauge the extent of damage and the subsequent need for replacement.
• Identifying Signs of Water-Damaged Subfloors
To effectively deal with water-damaged subfloors, early detection of signs is pertinent. Typical red flags for subfloor damage include uneven floors, movement, squeaking sounds, unevenly placed furniture, cupping, leaking ceiling, and bad odors.
Once you notice these signs, it is recommended to take immediate action to prevent more damage to your subfloor or even the entire building structure.
• Quick Response to Water Leaks
Act swiftly to remove water when you detect signs of leaks or flooding. Quick responses mitigate the extent of damage, saving you from the costly replacement of the entire subfloor.
• Importance of Ventilation for Drying Subfloors
Proper ventilation will make a significant difference in drying your damaged subfloor. This process may involve natural ventilation, such as opening windows and using fans, or even basic techniques, like using towels to absorb moisture.
Remember that proper ventilation helps in the evaporation process, thus accelerating your subfloor’s drying time.
• Use of Dehumidifiers or Air Conditioners
Using a dehumidifier or air conditioner is an effective way to pull out moisture from a subfloor, especially in humid areas. For the best results, consider renting a commercial-grade dehumidifier. Not only is it more efficient, but it also speeds up the moisture removal process.
• Deciding Whether to Repair or Replace Water-Damaged Floors
When it comes to dealing with water-damaged floors, several factors need consideration. These include the severity of the damage, type of water involved, availability of time, and whether to DIY or hire a professional.
A realistic assessment of these factors will ease decision-making, thus saving money, time, and resources.
• Refinishing Water-Damaged Hardwood Floors
If your house has hardwood floors, and they’ve sustained water damage, you could consider refinishing the floors as a cost-effective alternative. However, be informed that this might result in color variations, necessitating refinishing of the entire floor to maintain a consistent look.
• Insurance Coverage for Water-Damaged Subfloors
It is essential to understand your insurance coverage when dealing with water-damaged subfloors. Policies differ, with some providing coverage for specific scenarios such as storm damage or foundation seepage. Check with your insurance provider to understand the extent of your coverage before initiating any repairs or replacements.
• Selection of Flooring Options and Treatments for Different Rooms
No room is immune to the effects of water damage. That being said, different rooms have varying susceptibility to water damage, necessitating specific flooring options and water-proofing treatments.
For instance, bathrooms require water-resistant flooring due to frequent exposure to water, while a living room may just need a robust sealer.
For additional information on recognizing and dealing with water-damaged subfloors, visit an educational and non-commercial site like EPA.gov. This website provides comprehensive content about different types of subfloors, damages, and possible interventions.
Water Damage to Subfloors
Water damage is a serious threat to subfloors. Its effects can be extensive, leading to structural damage and making it mandatory to replace the affected portion.
• Assessing the Extent of Damage
It is of utmost importance to gauge and verify the extent of the damage before initiating any repair operations. Take a meticulous overview of the affected area to understand the extent of damage accurately. This step serves as a preliminary check to inform the remainder of the repair process.
• Marking for Replacement
Once the extent of the damage is thoroughly assessed, remember to mark the specific areas that need replacement. These markings will ensure you make accurate measurements when selecting new materials for replacement.
• Removing Damaged Regions
When removing the damaged sections of the subfloor, make clean cuts to make the installation of the new subfloor easier. Neat cuts reduce the amount of patching required, making for a smoother installation process Floor Skills.
• Installing New Subfloor
Following the removal of all damaged sections, proceed to secure the new flooring in place. Make certain that any screws or nails used are flush with the surface of the flooring for a clean and even finish.
• New Flooring Installations
New flooring can be installed over the repaired subfloor once all repairs are completed. Ensure it complements the existing flooring for a uniform and cohesive look.
• Identifying Damaged Subfloor
Identifying a damaged subfloor is as critical as repairing it. Be aware of signs such as uneven floors, floors that move or squeak, furniture that seems uneven, cupping, ceilings that leak, and unpleasant odors. These are definite indicators of subfloor damage.
• Acting Swiftly to Prevent Further Damage
It is crucial to act promptly when you come across any water damage. Quick action can curb the damage and prevent further deterioration. Remove as much water as possible to avoid escalation.
• Ventilation: Your Friend in Drying out Moisture
Ventilation is your ally in the battle against dampness. Opening windows, using fans, and allowing a draft can significantly speed up the process of drying out moisture in subfloors.
• Employing Household Help like Towels
Common household items like towels can be critical in your effort to absorb moisture from subfloors. The absorbent nature of towels makes them ideal for this purpose.
• Deploying Dehumidifiers and Air Conditioners
Electronic devices like air conditioners and dehumidifiers can be a boon when trying to remove moisture from subfloors swiftly. Their design and functionality make them effective in handling this task.
• Identifying Water Damage on Wooden Floors
Some signs like warped floorboards, discoloration, mold, and mildew growth usually denote water damage to wooden floors. Look out for these symptoms to detect water damage early on The University of Missouri Extension.
• Prevention Methods
Preventing water damage is better than curing it. Employ methods like opting for water-resistant flooring and being aware of signs of damage. These can go a long way in safeguarding your wood floors from potential water damage.
Therefore, the process, from identifying water damage to the subfloor to finally preventing it, involves vigilance, a keen understanding of signs, prompt action, meticulous execution, and preventive measures. This approach will ensure that your home remains a safe and comfortable space.
• Dealing with Water Damage on Wood Floors
– The Effects of Water Damage on Wood Floors
Water damage can seriously damage wood floors. The aftermath can range from warping and blistering to loose or uneven boards and the delamination of engineered flooring boards layers. All these translate to the deterioration of aesthetic appeal and functionality.
– Water Damage Sizes vary
Damage is most prominent in situations of large leaks, floods, or prolonged water exposure. However, quick action on small spills can minimize the damage.
– Initial Response to Water Damage
The first step after noticing water damage is to halt the water source and get rid of visible water on the floor. This quick action helps to mitigate the damage extensively.
– Use of Fans or Air Movers
An effective approach in the drying process is employing fans or air movers. However, you’d need a flooring professional to gauge the moisture content and prescribe the subsequent steps in restoring the floor to its initial state.
– Handling Flood Situations
In the event of a complete flood, it is paramount to eliminate and clean any negatively impacted materials. Introducing fans and air movers facilitates the drying process.
A flooring professional or restoration agency should be entrusted with assessing the moisture content and any concealed damage beneath the flooring.
– The Drying Process
Drying a water-damaged wood floor can take quite a considerable amount of time, ranging from a few weeks to beyond. It is recommended to use a moisture meter to monitor moisture content to ensure the floor has dried entirely relevant to the climate.
– Risks of Water Underneath Wood Flooring
Water that seeps beneath wood flooring is particularly problematic and takes a longer time to dry out. This type of water damage can potentially lead to extensive damage or encourage the growth of mold.
– Wooden Subfloors and Water Damage
Wooden subfloors are generally more vulnerable to water damage compared to their concrete counterparts. If you observe water beneath your flooring, it’s important to check the condition of the subfloor too.
– Decision on Water Damaged Subfloors
Deciding whether to replace a water-damaged subfloor hinges on factors such as any structural damage that may have occurred, the possibility of drying it out, and contamination risks.
A flooring professional can examine the moisture content of the subfloor and suggest the best action to take. You can access more information on subfloors from the University of Florida’s EDIS publication.
– The Reliability of Waterproof Flooring Types
Certain types of flooring, like laminate and luxury vinyl plank (LVP), are advertised as waterproof. While they can stand up to surface moisture and mild water leaks, severe leaks can be damaging.
Water that gets through the seams or edges and reaches the subfloor can render the entire floor replacement necessary.
– Observation of Water Beneath LVP Floors and Laminate
You can check for water underneath the laminate or LVP floors by drying the surface moisture. If water surfaces through the seams or you hear a squishing sound, it means there’s water beneath the surface.
• Shut Off The Water Supply to Prevent Further Damage
When dealing with a water-damaged floor, your first step should be to turn off the main water supply. This action helps prevent further flooding and additional water damage. Remember, the less water you have to deal with, the easier the whole recovery process will be.
• Document the Water Damage for Insurance
It’s wise to document the extent of your water damage before initiating any cleanup or repair. Pictures or videos serve as tangible evidence for your insurance company. Choosing to skip or forget this step could complicate the claim process and impact potential reimbursement from your insurer.
• Drying the Plywood Subfloor Before Repair
If your subfloor is made from plywood, it’s crucial to allow it to dry thoroughly before initiating repairs. Doing this prevents warping and mold growth, both of which can lead to further flooring damage and create an unhealthy indoor environment.
Tools like dehumidifiers can speed up the drying process in damp or humid conditions.
How to Dry a Flooded Subfloor- University of California
• Removing Baseboards for Thorough Inspection
In specific cases, you might need to remove the baseboards surrounding your affected flooring. This removal allows you a clear view to inspect the subfloor properly. While this might seem like a nuisance, overlooking potential damage by not doing this could create bigger problems in the future.
• Consult a Professional for Extensive Damage
Sometimes, DIY repair isn’t possible due to substantial damage or structural issues. If the subfloor is extensively damaged, I recommend consulting a professional. They can accurately assess the condition and provide expert guidance on necessary repairs.
• Adhere to Manufacturer’s Guidelines for New Flooring
When installing a new subfloor or floor, always adhere to the manufacturer’s instructions regarding installation methods and recommended materials. Sticking to these directions ensures a successful installation and guarantees the new flooring will perform as expected.
• Ensure Proper Ventilation
Make sure to ventilate the affected area adequately during and after the repair process. Ventilation ensures faster drying and prevents the possibility of mold and mildew growth, both significant concerns in water damage repair.
• Personal Protective Equipment is Crucial
When dealing with water-damaged materials, wearing personal protective equipment such as gloves and a mask is a must. The protective wear helps you to guard against possible contact with contaminants and mold spores. Safety should always be a priority.
• Addressing Underlying Plumbing Issues
To prevent repeating the water damage cycle, it is essential to address underlying issues. These could include leaks or plumbing problems that may have contributed to the subfloor damage initially.
Seeing these issues first is a step you’ll appreciate down the line. In conclusion, dealing with water-damage situations requires care and attention. The pursuit of effective resolution not only improves your living conditions but also extends the lifespan of your structure.
– Water-Induced Subfloor Damage: Why Removal of Flooring is Crucial
Identifying and assessing damage to the subfloor of a home caused by water is a pressing task. This often necessitates removing the existing flooring material. This process is quintessential in revealing the state of the subfloor, which often hides beneath layers of tile, laminate, or hardwood.
Subfloors bear the brunt of water damage and it’s crucial to make a thorough check for any such issues. Indeed, from experience, the distressing impact of leaving water damage unchecked can result in unnecessary costs and repair headaches down the line.
– The Art of Subfloor Repair
Once any damage is identified, it then becomes necessary to cut out those harmed areas. This makes room for the new flooring material to go in. The objective here is simple – remove all waterlogged and potentially warped elements that would impede the installation and stability of your new flooring.
This point cannot be overstressed. The last thing you want is a springy or loose board becoming a point of costly damage later on. Therefore, always prioritize securing your new flooring properly. Pound down any obstinate nails or screws that stick out.
Done right, this will ensure a smooth and even surface for whatever flooring material you then choose to install.
– Clean Before Install: Important Yet Ignored
A significant step that homeowners tend to overlook is cleaning the subfloor area before laying new flooring. Mistakenly viewed as an unnecessary step, it’s, however, fundamental to creating a dust- and dirt-free area for your new floor.
It’s important to ensure nothing interferes with the adhesive connection between the subfloor and the new material.
– Prolonged Water Exposure: A Replacement Trigger
If water has been allowed to sit on the subfloor for an extended period, you may face the increased likelihood of replacing the entire area. This is primarily due to potentially serious and widespread damage, which may prove impossible to repair simply.
Keeping an eye out for signs such as uneven floors, squeaky sections, cupping of floorboards, or persistent bad odors can all indicate a need for replacement. Here is a useful resource on how to identify subfloor water damage from the Massachusetts Government website.
– Quick Action: A Preventative Measure
Acting quickly to remove water from a subfloor is crucial. Use towels, a dehumidifier, or even an air conditioner to soak up the moisture. This measure can help you prevent further damage and save your subfloor from requiring a complete overhaul.
A commercial dehumidifier rental, although a seemingly extravagant step, turns out to be a more effective tool in combating moisture. From experience, I highly recommend going this route if possible.
– Drying Tactics: Ventilation and Dehumidification
Drying your subfloor involves several factors. Window ventilation proves key to this as it allows fresh and dry air to circulate throughout the affected area. In more humid climates, supplementing with an air conditioner system or a dehumidifier can expedite the drying process significantly.
– Revisiting the Cause: Time to Fix the Leak
Last but certainly not least, it is crucial to circle back to the origin of the water damage. We must identify and eliminate any broken pipes, leaky appliances, or similar faults that may be the source. Fixing these elements will help prevent future water damage to your beloved home.
Remember, proper and timely action can often keep minor subfloor water damage from escalating into a disaster that requires the significant expense of complete subfloor replacement. Boiled down to its essence, ultimately, it’s all about being informed, staying vigilant, and taking appropriate action rapidly.
Assessing and Marking Damaged Areas of the Subfloor
Assessing and marking the damaged areas of the subfloor is the first step toward effective repair. While doing so, always remember to wear protective gear such as gloves and goggles.
This not only keeps debris out of your eyes but also prevents nasty cuts from splintered wood. It’s important to preserve personal safety while carrying out these tasks, and the Occupational Safety and Health Administration shares extensive information on how to protect oneself during construction-related jobs.
• Potential Cost of Professional Repairs
Considering professional repairs for water-damaged subfloors is a valid option for those who lack the time, tools, or confidence to DIY.
The cost can range from a few hundred to several thousand dollars, depending on the extent of the damage. This consideration should be taken into account during your early assessment.
• Use of LP Legacy Premium Sub-Flooring
One of the effective solutions for replacing damaged subfloors is the use of LP Legacy Premium Sub-Flooring. However, procuring the product requires knowing where and how to purchase it. Various home improvement stores, both physical and online, stock this product.
A simple Google search with the product name followed by “near me” should give you viable options. The product is also available in different sizes and materials, catering to your specific needs.
• Tips on Preventing Water Damage to Subflooring
Prevention, as they say, is better than cure. In order to prevent water damage, regular inspections for leaks are crucial.
Appliances and plumbing systems should be properly maintained to avert any potential leaks. Should any signs of water damage appear, it’s imperative to address them immediately to prevent the problem from escalating.
• LP Building Solutions and the First Street Foundation
The partnership between LP Building Solutions and the First Street Foundation drives home the importance of collaborating for a cause.
Builders interested in accessing support or solutions from this partnership or getting involved with the foundation can reach out directly through the contact information provided on their respective websites.
• Health Risks Associated with Water-Damaged Subfloors
Water-damaged subfloors do more harm than just impairing the architectural integrity of the building. They may also promote the growth of mold, which can exacerbate asthma and cause allergic reactions.
Disposal of damaged materials should be done in accordance with local health department guidelines to prevent further health hazards.
• Building Codes and Regulations
Paying attention to building codes is a requirement not just to maintain standards but also to ensure safety. Regulations related to subfloors and water damage vary by location. Therefore, it’s important to review local building codes and mandates before initiating any repair work.
• Case Studies
Getting a handle on the potential severity and consequences of water damage to your subflooring is best done by reviewing case studies. For instance, the Florida Solar Energy Center offers a range of case studies on its website that detail real-life situations and outcomes of various types of water damage.
Reading these can not only educate homeowners about the potential pitfalls of ignoring water damage but also offer measures to avoid such damages and possible solutions if they do occur. So, the next time you notice possible water damage to your subfloors, remember these stakes and act accordingly.
Proper Safety Measures in Flooring Replacement
When diving into any major home improvement project, such as subfloor repair and replacement, safety is of the utmost importance. Utilizing necessary protective equipment like gloves and protective eyewear is a significant aspect of this process.
To prevent potential injuries from sharp debris, dust, or splinters, it is highly advised to wear durable gloves and goggles during flooring removal.
• Identifying Damaged Floor Joists
One of the challenging aspects of flooring repair can be dealing with damaged floor joists. It’s not uncommon for floor joists to show signs of water damage, given their proximity to potential sources of moisture.
In case you identify any such signs, proceed with reinforcing these joists. Using 2×6 boards for this task gives you the added strength and stability to support the subfloor efficiently.
• Choosing the Right Replacement Plywood
From my experience, the selection of appropriate replacement plywood plays a crucial role in the longevity of the repair work.
The plywood should be 5/8 inch thick, making it sturdy enough to support heavy foot traffic and furnishings. Predominantly, exterior-grade plywood is best suited for this purpose due to its enhanced resistance against moisture.
• Keeping Room for Expansion
An integral but often overlooked step in replacing a subfloor is leaving an adequate gap between the old and new one – typically about 1/8 inch.
This gap is necessary to allow for potential expansion of the plywood due to changes in temperature or humidity conditions which prevent warping or buckling of the flooring.
• Importance of Cleaning Prior to Replacement
Before commencing the replacement work, make sure that the area is devoid of any debris. This aids in laying the new floor seamlessly and preventing any unwanted raised points or unnecessary gaps. Clearing debris also eliminates potential safety hazards during the installation process.
• Estimating the Cost of Subfloor Repair
However straightforward a flooring replacement appears, it’s not just about removing the old and placing the new. The cost of a subfloor repair largely depends on a variety of factors, primarily the size of the area to be repaired and the materials involved.
Using this non-commercial repair cost estimator provided by the .org site ‘National Association of Certified Home Inspectors’, you can get an idea of your expected expenses.
• My Recommendations
As someone deeply indulged in home improvement tasks, my advice would be to invest time and efforts in identifying high-quality, moisture-resistant plywood for replacement.
Find a pair of sturdy protective gloves and goggles to guard yourself against potential injuries, and don’t shy away from reinforcing your floor joists if needed. Lastly, remember to clean up before you start the replacement and leave an adequate gap for expansion. Good luck with your repair!
• Understanding Subflooring
Subflooring is fundamentally a key structural component in buildings. Generally made of softwood or plywood, it spans the floor joints providing vital support and stability. Its design and placement play a significant role in the structural integrity of any building, proving its crucial role in construction.
• Spotting Subflooring Issues
Subflooring issues are often subtle yet can lead to significant damage when overlooked. Common signs indicating potential problems include squeaking or creaking floors, a classic symptom of loose or damaged subflooring.
Another tell-tale sign is an area of the floor that has low spots or sinking sections, suggesting possible underlying damage to the subfloor.
Loose or cracked tiles can also signify problems, particularly if these are in moisture-prone areas such as bathrooms and kitchens. Wherever water is present, there is an increased risk of subflooring damage due to potential leaks and spillages.
• Handling Subflooring Water Damage
Water damage to the subfloor is manageable; however, the key lies in the promptness of the response. Quick remediation techniques might save the subflooring if the water damage issue is addressed without delay. These may include swift and thorough drying or minor patch repairs.
However, repeated instances of water damage, or a delay in the mitigation efforts, can lead to deep-set damage that necessitates complete subfloor replacement. Hence, prompt response to any instance of water damage is critical.
• The Need for Professional Inspection
A comprehensive inspection by a restoration professional is highly advised in the event of potential subfloor damage.
These experts are able to accurately assess the extent of the damage and the potential cause and take necessary steps, such as removing mold and mildew growth which often accompanies water damage.
Purdue University Extension is an excellent resource for information about how professional inspections can help in assessing subflooring damage.
• Subfloor Replacement & The Role of Professionals
Subfloor replacement is not a DIY task. It requires an intricate understanding and practical expertise that trained professionals possess. Companies like Rainbow Restoration cater to this particular need by offering full-service reconstruction.
These professionals can further identify and rectify any accompanying issues, such as foundational flaws or deep-set mold problems, ensuring a comprehensive resolution of the problem.
• Proactive Steps in Managing Subflooring Damage
Proactivity goes a long way in dealing with subfloor damage. Addressing issues like sagging or sinking floors at the earliest can prevent further damage and help in major cost savings ultimately.
Long-term negligence could mean having to shoulder the larger burden of completely replacing the subfloor. Also, routine inspections are a worthy investment for ensuring subfloor health.
• The Implications of Ignoring Subfloor Damage
Ignoring subflooring damage can have more than just financial implications. The subfloor is paramount to the structural stability and safety of a home.
Neglecting its maintenance could pose a risk to the home’s strength and its occupants’ safety. Therefore, it is essential to address any signs of subflooring issues promptly.
In conclusion, maintaining the subfloor in your building is of utmost importance. Prompt detection and repair of any damages are crucial for the building’s safety and structural integrity.
Do not overlook the relevance of professional assistance, as their expertise could be invaluable in ensuring the longevity and wellness of your subflooring.
– Understanding the Factors Affecting Subfloor Water Damage
There’s no denying the fact that the extent of damage to a subfloor largely depends on multiple factors. This includes the type of water source causing the damage and the duration of the water exposure.
In light of these factors, even minor water intrusion can significantly impact the structure, functionality, and aesthetics of your subfloor.
Water can be categorized into three types – clean water, grey water, or black water, which can have varying effects on your floors. Clean water poses less damage, while black water, often coming from raw sewage lines, can severely contaminate and erode subfloor materials.
Continuous exposure to water can drastically degrade the subfloor, causing it to swell, split, warp, or even rot, which may further result in issues like mold or mildew.
– Why Immediate Water Removal is Crucial?
Before water damage turns into a nightmare, timely removal is key. Immediately addressing the waterlogged scenario can help significantly mitigate further damage to the subfloor.
Some of the most common ways to fast-track the drying process are through the use of fans, towels, and shop vacuums. This can help in evaporating the moisture as well as suctioning it out from the subfloor.
– Subfloor Material and the Severity of Damage
The type of subfloor material you have also plays a key role in determining the severity of water damage. Concrete subfloors, for instance, may absorb water quite rapidly but can also dry out effectively, thereby affecting the severity of the damage.
On the other hand, materials like plywood, if not addressed promptly, can trap moisture, leading to an upsurge of mold and mildew. Here, you may also come across structural issues due to prolonged wetness.
– Counteracting Humidity with Adequate Ventilation
In some instances, even a well-ventilated space might not hinder the subfloor from absorbing moisture. Natural ventilation may not necessarily be effective in regions with excessive humidity.
Thus, you might have to resort to additional measures like dehumidifiers or air conditioning units to remove moisture effectively.
The use of dehumidifiers can be a game-changer by controlling the overall room moisture levels and drying out damp subfloors. You can avail of commercial dehumidifiers on rent for more efficient water removal from the affected area while balancing the room’s relative humidity.
– The Dilemma of Refinishing Hardwood Floors
Water damage on hardwood floors presents a unique challenge. In most cases, refinishing hardwood floors can help blend the water-damaged areas with the rest of the flooring.
However, it’s quite possible to witness color differences with the existing flooring post-refinishing if only a portion of the floor is refurbished.
– To Repair or Replace – Weighing Important Factors
Making the decision to repair or replace water-damaged floors should take into consideration various factors. This includes the extent of damage, the time you have at your disposal, the cost of repairs compared to replacement, and whether your insurance coverage includes water damage.
The University of Florida IFAS Extension provides insights on decision-making post-disaster that can be useful in such a scenario (view resource).
– Room-specific Considerations
Different rooms in the house may warrant different considerations when it comes to water damage. The kitchen and bathrooms, which are more prone to water leakage or overflow, might require a pragmatic approach in selecting the appropriate flooring options.
In conclusion, it’s evident that dealing with water-damaged subfloors isn’t as straightforward as it seems. Understanding the factors contributing to the damage, adopting appropriate remediation approaches, and making a suitable decision on the repair and replacement aspects are essential.
This not only helps in restoring your property to its former condition but also safeguards it for the future.