Water Damage Behind Shower Wall. Tips from professionals
Your shower is designed to get wet, but only on the outside of the wall. When moisture is trapped under tiles, it may create many issues. If left too long, it may ruin the drywall or other backing, create rot, and even cause the tiles to crack or break. In the worst-case situation, water damage underneath your tiles might result in mold growth.
Water Damage Behind Shower Wall
If you notice any signs of water damage behind the shower wall, the first step is to determine the cause. Check your shower tiles to see if they are firmly in place and for cracks in the tile grout. The problem can come from the shower area or from outside. Fix the leak causing the water damage and check for mold.
This article will provide you with in-depth details about water damage behind the shower wall and how to detect it. I will explain how you can tell if your shower wall is damaged and answer some frequently asked questions about mold and how to dry a shower wall.
Contents
- 1 Can You Detect Water Damage?
- 2 What happens if water gets under tile in the shower?
- 3 How do you fix water-damaged shower walls?
- 4 Mold behind plastic shower walls
- 5 Water leaking behind tiles in shower
- 6 How can you tell if a shower wall is water damaged?
- 7 How do you tell if there’s mold behind shower tiles?
- 8 How to Prevent Mold in the Bathroom
- 9 Frequently Asked Questions
- 10 Regular Checkup for Water Damage Behind Shower Walls
- 10.1 ● Proper Sealing and Maintenance of Grout and Caulk
- 10.2 ● Optimal Ventilation for Bathrooms
- 10.3 ● Using Dehumidifiers or Fans
- 10.4 ● Removal of Tiles or Alternative Methods in Severe Water Damage Cases
- 10.5 ● Seeking Professional Help for Extensive Water Damage or Mold growth
- 10.6 ● Regular Cleaning and Maintenance of the Shower Area
- 10.7 ● Applying Anti-Mold Solutions or Treatments
- 10.8 ● Prevention Tips Against Bathroom Mold
- 10.9 ● Installation of Proper Bathroom Fans
- 10.10 ● Repairing the Source of the Water Leak
- 11 The Importance of High-Quality Epoxy Grout for Moisture Prone Areas
- 11.1 • The Significance of Periodic Grout Sealing for Porous Grout
- 11.2 • The Risk of Acidic Cleaners on Shower Tiles
- 11.3 • Maintaining Dry Conditions to Prevent Water Damage
- 11.4 • Enlisting Expert Hard Surface Restoration Services
- 11.5 • Seeking Professional Intervention for Mold Removal
- 11.6 • Free In-Home Evaluation for Possible Water Damage
- 12 The Underlying Dangers of Hidden Shower Leaks
- 12.1 • The Unseen Damage: Mold and Mildew Growth
- 12.2 • Structural Risks: Wood Rot and Pest Infestations
- 12.3 • Early Repairs: Preventing Home Damage
- 12.4 • Troubleshooting: Be Sure It’s a Hidden Leak
- 12.5 • Finding the Leak: A Methodical Approach
- 12.6 • Choosing the Right Method: Pipe Repair
- 12.7 • The Trap of Temporary Solutions: Pipe Patches
- 12.8 • DIY Solutions: Calling in a Professional vs. Temporary Fixes
- 13 Spotting Water Damage Indicators in Bathroom Showers
- 13.1 • Signs of Water Damage on Bathroom Walls
- 13.2 • Humidity and Dampness as Water Damage Signs
- 13.3 • Detecting Water Damage through Smells
- 13.4 • Loose Tiles as a Predictor of Water Damage
- 13.5 • Hiring Professional Help for Water Damage Assessment
- 13.6 • Reducing Air Moisture to Prevent Water Damage
- 13.7 • Enhancing Air Circulation in the Bathroom
- 13.8 • Upgrading to Quality Shower Systems
- 14 The Necessity of Regular Inspection for Shower Leaks
- 14.1 • Understanding the Financial Implications of Water Damage Repair
- 14.2 • Preventing Water Damage in Shower Walls
- 14.3 • Health Risks Associated with Mold Growth
- 14.4 • Effective Cleaning and Removal of Mold
- 14.5 • Impacts on Bathroom Structural Integrity
- 14.6 • Role of Professional Assistance in Water Damage Repair
- 14.7 • Alternative Solutions for Water Damage Repair
- 14.8 • Impact of Water Damage on Home Resale Value
- 14.9 • Legal and Insurance Implications of Water Damage
- 14.10 • Long-term Consequences of Untreated Water Damage
- 15 Tile and Grout Repair Costs
- 15.1 • DIY Tile Repair Options
- 15.2 • Costs Based on Repair Type
- 15.3 • Costs for New Tiles and Shower Repairs
- 15.4 • Refinishing and Water Damage Costs
- 15.5 • Cost of Repairing Different Tile Materials
- 15.6 • Pool Tile Repair Costs
- 15.7 • Factors Affecting Tile and Grout Repair Costs
- 15.8 • Hiring Tile and Grout Repair Contractors
- 15.8.1 – Using High-Quality Epoxy Grout for Preventing Water Damage
- 15.8.2 – The Role of Professional Hard Surface Restoration Companies
- 15.8.3 – Importance of Regular Maintenance Routines
- 15.8.4 – Comprehensive Services Offered by Sir Grout
- 15.8.5 – Skilled Technicians at Your Service
- 15.8.6 – Availing of a Free In-Home Evaluation for Leakage
- 15.8.7 – Effective Addressing of Water Damage
- 16 Estimating Water Damage Restoration Costs
- 16.1 • Factors Influencing Water Damage Restoration Costs
- 16.2 • Category of the Damage
- 16.3 • Class of the Damage
- 16.4 • Types of Water Damage
- 16.5 • Damage Location and Extent
- 16.6 • Geographic Consideration
- 16.7 • Labor Costs
- 16.8 • Additional Costs
- 16.9 • Insurance Coverage
- 16.10 • Should you Hire a Professional?
- 16.11 • Quick and Effective Measures
- 16.12 • Choose a Reliable Restoration Company
- 16.13 • Typical Range for Water Damage Restoration Cost
- 16.14 • Variable Factors Affecting Water Damage Restoration Cost
- 16.15 • Role of Insurance in Water Damage Restoration Cost
- 16.16 • Categorization and Classification of Water Damage
- 16.17 • Restoration Costs for Different Categories of Water Damage
- 16.18 • Extent of Damage and its Impact on Cost
- 16.19 • Repair Costs for Specific Areas of the Home
- 16.20 • Importance of Hiring Professionals
- 16.21 • Preventive Measures
- 16.22 • Timeline for Water Damage Restoration
- 17 Cost Breakdown for Shower Repairs
- 18 The Impact of Water Damage Behind Shower Tiles
- 19 Importance of Regularly Inspecting Your Shower for Leakages
- 20 Causes of Black Mold in Bathtubs
- 20.1 • Possible Causes: Soap and Hard Water Scum
- 20.2 • Solution: Cleaning and Quality Bathtub Caulk
- 20.3 • Address the Root Cause: Water Infiltration
- 20.4 • Common Issue: Water Behind the Shower Panels
- 20.5 • The Role of Caulk in Mold Growth
- 20.6 • The Importance of Proper Preparation Before Recaulking
- 20.7 • Other Potential Entry Points for Water
- 20.8 • Divergent Opinions
- 20.9 • The Original Observation: Mold Seepage
- 20.10 • Cleaning Products: HG Mold Remover
- 21 Mold Testing: An Imperative Step for Every Property Manager
- 21.1 • Black Mold in Tub/Shower Enclosures: The Unwanted Resident
- 21.2 • Spotting Water Entry Points: The Key to Address Mold
- 21.3 • Dealing with Leak-Triggered Mold
- 21.4 • Eradicating Surface Mold: Bleach to the Rescue
- 21.5 • Reusing Enclosures: An Option Worth Considering
- 21.6 • Regular Inspection of Shower Wall and Floor Leakages
- 21.7 • Health Risks Linked to Mold and Bacteria Behind Plastic Shower Walls
- 21.8 • Repairing Water-Damaged Shower Walls
- 21.9 • Eliminating Mold Behind Plastic Shower Walls
- 21.10 • Leakage Behind Shower Tiles
- 21.11 • Detecting Water Leakage
- 21.12 • Revealing Water Damaged Shower Walls
- 21.13 • Finding Mold Behind Shower Tiles
- 21.14 • Preventive Measures for Mold Growth
- 21.15 • Importance of Bathroom Fan Installation
- 21.16 • Dealing with Water Seepage through Grout
- 21.17 • Challenges in Drying Shower Wall and Substrate
- 21.17.0.1 Mold Behind Bathtub Walls: How to Identify and Counter It
- 21.17.0.2 Toxic Attributes of Mold
- 21.17.0.3 Effects of Black Mold Exposure
- 21.17.0.4 Mold Growth Requirements
- 21.17.0.5 Mold Detection: The Challenges
- 21.17.0.6 First Steps Towards Mold Remediation
- 21.17.0.7 Incorporating a HEPA Filter
- 21.17.0.8 The Importance of Professional Assistance
- 21.17.0.9 The Cost of Mold Remediation
- 21.17.0.10 Future Mold Prevention Methods
- 21.17.0.11 Don’t Hesitate to Seek Expert Consultation
- 22 Mold Growth Within the Stone or Tile
- 22.1 • Shower Caulking and Mold Growth
- 22.2 • Grout as a Medium for Mold Growth
- 22.3 • The Dangers of Wall Cavity Moisture Penetration
- 22.4 • The Limitations of Moisture Meters
- 22.5 • Professional Help for Shower Mold Problems
- 22.6 • Health Implications of Mold Growth Behind Shower Surround
- 22.7 • Type of Shower Surround and Mold Growth
- 22.8 • Replacing a Shower Pan and Tile Removal
- 22.9 • Mold Stains in Shower Grout
- 22.10 • Preventing Future Mold Growth
- 22.11 • Importance of Addressing Shower Mold Growth
- 23 Importance of Regular Maintenance and Inspection of Shower Walls
- 23.1 • Potential Costs and Extent of Damage Caused by Water Damage Behind Shower Walls
- 23.2 • Sealing Shower Tiles to Prevent Water Penetration
- 23.3 • Choosing The Best Materials for Shower Surrounds
- 23.4 • Health Risks Associated with Mold in Shower Surrounds
- 23.5 • Preventive Measures to Minimize Water Damage
- 23.6 • Steps to Take if Mold is Detected Behind Shower Tiles
- 24 Signs of Water Leaking Behind Shower Tiles
- 24.1 • Detecting Water Damage in Shower Walls
- 24.2 • Identifying Mold Behind Shower Tiles
- 24.3 • Ways to Prevent Mold in the Bathroom
- 24.4 • Frequently Asked Questions
- 24.5 • The Challenge of Addressing Cracked Tile Issues
- 24.6 • The Offering of a Partial Solution
- 24.7 • Gathering the Essential Tools
- 24.8 • Preparing the Area
- 24.9 • The Demolition Process
- 24.10 • Cleaning After Demolition
- 24.11 • Checking for and Addressing Mold
- 24.12 • Allowing the Area to Dry
- 24.13 • Consulting Professionals for Structural Repairs
- 24.14 • Coordinating with the Handyman
- 24.15 • Addressing the Cracked Tile Problem
- 24.16 • Identifying Mold Behind Shower Tiles
- 24.17 • The Role of Professional Mold Remediation Companies
- 24.18 • Importance of Re-tiling After Mold Removal
- 24.19 • Preventing Future Mold Growth
- 24.20 • Dealing with Mold Issues Promptly
- 24.21 • Severe Mold Problems and Bathroom Renovations
- 24.22 • Further Reading
- 25 Impact of Mold on Drywall
Can You Detect Water Damage?
Apparent water damage signs such as water dripping through cracks on the tile grouts on the shower walls and floor are easy to spot. In other cases, a leak can show itself in ways that are more difficult to identify, such as:
- Musty odor
- Insects/termite infestation
- Cracks, discoloration, or uneven tile grout.
- Mold and mildew growth.
Remember that water damage beneath shower tiles sometimes occurs gradually and subtly. That means that before you even notice it, some of the damage has already been done. This is why I recommend regularly checking your shower walls and floor for leakages. If you suspect it is from a leak, dry your wall completely, and check again.
What happens if water gets under tile in the shower?
Ideally, grout controls seepage by securing tiles to the base. Grout is a combination of sand and water with cement or lime used to fill up the gaps between tiles attached to your bathroom floor and walls. If it gets loose, cracked, or damaged, then water and moisture can make their way underneath your tiled floors.
There can be considerable damage to your bathroom floor and walls when that happens. You will notice your shower tiles loosening from their subsurface. This is common when water finds its way underneath the bathroom tiles. The trapped moisture loosens the mortar that holds the tiles to the floor or wall and causes them to lift away.
Additionally, the excess water will cause the subflooring to swell, warp and push the bathroom floor tiles up.
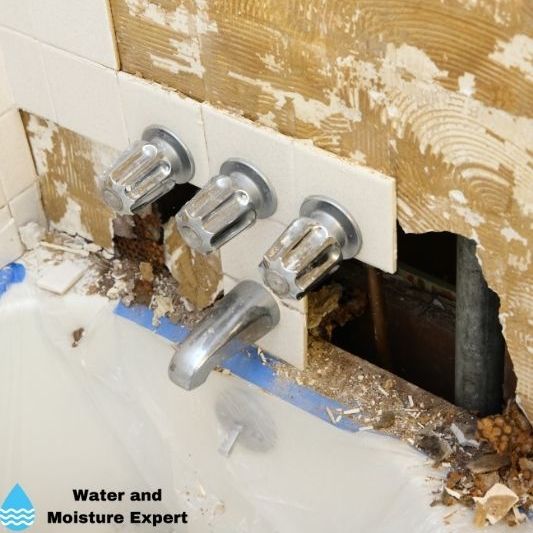
How do you fix water-damaged shower walls?
As soon as you notice water damage to your shower walls, you need to identify and repair the water source damaging your bathroom wall. If the source of the water damage is not fixed, fixing the wall does not make any sense.
The source of the leak can be a damaged pipe or coming from the roof. In many cases, it is challenging to find the culprit. Knowing where pipes are located can be a great help. You can use a metal wall scanner to check for this. If the wall with the damage is an outer wall, the water may come from outside. Similar if the ceiling is also the roof of the house, it can be a problem with the roof.
Always understand that water finds its way to the lowest point. This means that the leak itself may not be close to the point where you see the damage.
When the leak is fixed, you can use the following steps to repair tiled drywall:
- Step 1: Remove the damaged tiles
- Step 2: Remove the floor-to-ceiling molding to allow you to replace the trim
- Step 3: Look for the nearest closet stud, and using a straightedge, draw a vertical line from the center of the next closest stud to the top edge of the damaged drywall. Similarly, connect the top, bottom, and left and right sides of the damaged region.
- Step 4: Cut out the damaged drywall.
- Step 5: Replace any rotten studs
- Step 6: Replace the drywall that was removed
- Step 7: Screw holes and seams should be filled with caulk
- Step 8: Paint the drywall after applying drywall mud to the wall
- Step 9: Remove and replace the old tiles with new tiles
Mold behind plastic shower walls
If your shower has a plastic shower wall, it will generally not show any damage on the outside. But that does not mean there is a problem inside the plastic shower wall. Mold and bacteria thrive in a warm, moist environment poses a health risk to you and your family. Removing the mold between the plastic shower wall and the substrate can be highly challenging.
When the plastic shower wall is easy to remove, you can do this and clean the substrate and the inside of the plastic shower wall. You can use 1 part bleach and 3 parts water for removing mold or another mold cleaning solution.
If the substrate is challenging to reach, you can use bathroom disinfectants to get rid of mold behind the plastic shower walls. Try to spray it from the edges of the plastic shower wall. Commercial bathroom disinfectants can successfully kill all varieties of bathroom mold, but normal home bleach is just as efficient. If you do not know how to remove mold or the area is hard to reach, ask a professional for help.
Maintain a mold-free shower by applying a simple weekly treatment to the walls and surroundings. Clean the walls weekly by spraying them with an anti-mold solution. Mix of 1 part bleach to 2 parts water.
Water leaking behind tiles in shower
Water leaking behind tiles in your shower generally comes from a source inside or above the wall. Or from water from inside the shower area.
● Water leaking from inside the shower area
Water from inside the shower can leak through the tiles and find its way behind it. The most common reasons are:
- Grout: Missing or cracked grout. If the wall can flex a little bit, it can damage the grout over time.
- Silicon: Incomplete or broken silicon seal. This can find its reason in the wrong fitting of the shower tiles, or if the wall can flex a little bit. Also, the part where the wall meets the floor is a common location.
- Substrate: Using a non-waterproof substrate wall
● Water coming from the outside or above the shower area
The second reason for water leaking behind the tiles in your shower is water coming from a leak in the roof or wall or a cracked pipe. In many cases, the source of these leaks can be hard to find. The amount of water leaking is often small, and the source can be further away as water can travel some distance.
If you suspect the source is a leaking pipe, knowing where pipes are located can be a great help. Use a metal wall scanner to check for this. You can purchase them in most hardware stores.
If the wall with the damage is an outer wall, the water may come from outside. Similar if the ceiling is also the roof of the house, it can be a problem with the roof.
● Signs of water leaking behind tiles in a shower
If you suspect a leak behind the shower tiles, there are a few things to look for:
- Peeling paint: If the paint on the walls around your shower is peeling, it can be a sign that there might be a leak beneath the tiles.
- Loose or cracked tiles: Another signal of water leaking behind tiles in your shower is loose or peeling bathroom tiles. When the substrate becomes full of water, it can increase its volume and move the tiles. Or it becomes weaker, and the tiles can move a little bit and crack.
- Mold: If you notice mold, it is a sign of moisture. It does not always mean a leak, but it is a good reason the thoroughly inspect the shower area. If you do not find a leak, remove the mold, and ventilate.
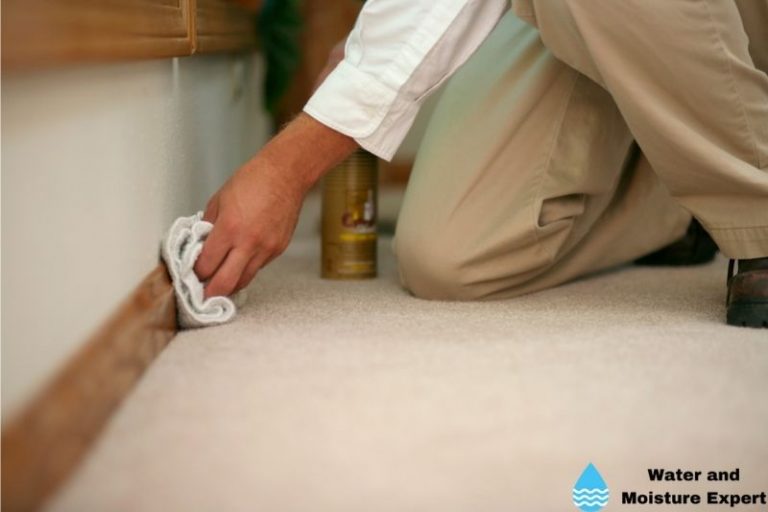
How can you tell if a shower wall is water damaged?
Water getting behind your shower tiles can damage your shower walls and substrate over time if the seepage or leakage is not fixed in time. You can tell your shower wall is damaged by water if:
- Missing or cracked grout: If you notice that the tile grout is cracking or even missing, swells, or shows a discoloration, it can be a sign that there is a water problem. Of course, grout cracking or missing can also be due to the flexing of the wall.
- Tiles out of line: You observe that single tiles are out of line with the current grid.
- Loose tiles: The tiles look to be separating from the shower wall. Often this starts first with grout issues.
- Caulk: You observe caulk peeling around the bottom tiles and the shower base.
- Odor: You clean the bathroom but notice the pervasive musty odors that don’t disappear.
How do you tell if there’s mold behind shower tiles?
Mold can grow in your shower in two main ways, on the surface or behind the shower tiles. Mold on the shower tiles is much easier to spot can clean. To know if there is mold behind the shower tiles is much more challenging to see, and you have to look for certain signs:
- Muddy spots on the tiles: It can be a sign of mold behind the tiles if you notice muddy spots on the shower tiles. The tiles can be slimy moist, indicating black mold forming underneath the shower tiles.
- Signs on the plaster: The plaster on your bathroom walls starts to show signs of damage, such as crumbled texture with walls discoloring and the paint coming off the walls.
- Cracked or loose tiles: You can also find cracked or loose tiles in your bathroom. This can indicate a water issue behind the tiles. This water issue can result in mold growth if the conditions are suitable.
- Odor: Presence of a continual musty smell in your bathroom despite cleaning your shower regularly. The odor is usually caused by the formation of black mold beneath the shower tiles. Black mold emits spores that cause items to decay and smell.
How to Prevent Mold in the Bathroom
You can use the following tips to prevent mold in your bathroom walls and floor:
- Tip 1. Dry your bathroom: Always dry your bathroom thoroughly after use. Dehumidifiers and exhaust fans are two options for managing humidity in the bathroom.
- Tip 2. Ventilation: Make sure you ventilate the bathroom well. This removes the moisture. If you have a fan, use it. Leave it running for some time after taking a shower. If you do not have an inbuilt fan, consider getting one.
- Tip 3. Remove wet items: Hang your wash rag, loofah, or sponge to dry. Avoid leaving wet your items sitting on shower surfaces as they’ll trap water and take longer to dry out.
- Tip 4. Clean regularly: After using the bathroom, make sure it is clean. Walls, floors, and other bathroom fixtures should regularly be cleaned with a bathroom cleaner. Wash your shower curtain and window curtain as well.
Frequently Asked Questions
1. Can a bathroom fan keep mold at bay?
Generally, a good bathroom fan will be a great solution to keep mold away, but I do recommend installing one properly. An exhaust fan inspection may aid in detecting correct temperature and moisture management.
This is because a wrongly installed bathroom exhaust vent might be the source of your moisture issue. Moisture is one of the key factors mold needs to flourish. Using a bathroom fan to remove excess moisture may help keep mold at bay.
2. Can water seep through the grout in my shower?
Water can seep through the grout in your shower. Broken or damaged grout is the most common cause of shower leaks. To avoid moisture under the tiles, check and fix the grout as soon as you notice a problem. Otherwise, the wetness may undermine your wall or floor and destroy tile adhesive.
3. Can I dry a shower wall and substrate?
You can dry your wall and substrate. But this is not something that will happen quickly. A shower wall is built to keep the water from the shower area away from the substrate and from behind the tiles.
This means that it is difficult for water to reach those areas. The other way around, removing water from behind the tiles and the substrate is really hard as well. It will take a long time.
Good ventilation is a good start for drying. Using a dehumidifier with a fan can speed up the process somewhat. But it will still take a really long time. If you have a serious problem, I recommend removing some tiles or using another method to reach the substrate.
Regular Checkup for Water Damage Behind Shower Walls
To maintain the integrity of your home and contribute to a healthy living environment, I strongly recommend performing regular inspections for water damage behind your shower wall.
Water damage can cause structural concerns if left unchecked, not to mention posing potential health risks due to mold growth. Moisture buildup behind the shower wall can easily lead to mold and mildew formation, and routine checks can help mitigate these potentially serious issues.
For more about the potential health hazards associated with water damage and mold, visit the Centers for Disease Control and Prevention website.
● Proper Sealing and Maintenance of Grout and Caulk
Properly sealing the grout and caulk between tiles is crucial in preventing water seepage. This action can halt the problem at its source by blocking off common areas where water tends to slip through.
If seals show signs of wear, re-caulking, and re-grouting should be performed immediately. Regular maintenance of these seals will go a long way toward preventing water infiltration.
● Optimal Ventilation for Bathrooms
A well-ventilated bathroom goes a long way toward reducing humidity and moisture buildup, which inadvertently promotes the growth of mold.
One way to ensure proper ventilation is through the installation of exhaust fans, which remove moist air from the bathroom. Adequate ventilation can significantly lower the chance of water damage behind the shower wall.
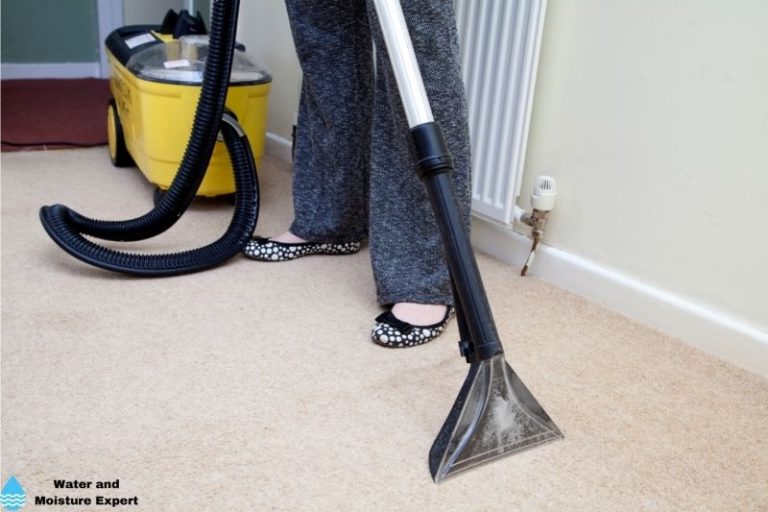
● Using Dehumidifiers or Fans
To further aid in drying out the shower wall and substrate, the use of household appliances such as fans or dehumidifiers can be beneficial. They expedite the drying process by reducing the overall humidity level in the bathroom, thus minimizing the chances of water damage or potential mold growth.
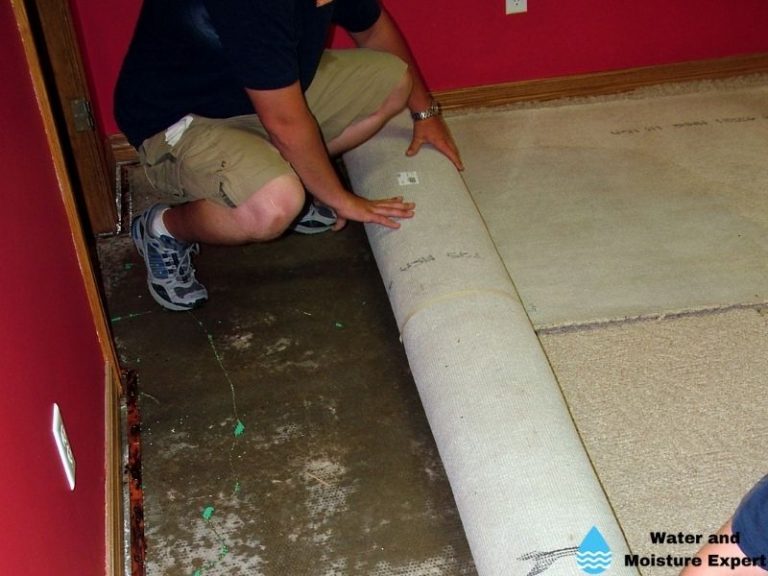
● Removal of Tiles or Alternative Methods in Severe Water Damage Cases
In situations where the water damage behind the shower wall is significant, serious measures might need to be taken. This can mean removing shower tiles to gain direct access to the substrate and collaborating with professionals for efficient drying or replacement.
● Seeking Professional Help for Extensive Water Damage or Mold growth
If the water damage is too severe or there is extensive mold growth behind the shower wall, calling in professionals is the safest and most effective option. A professional restoration company is equipped with the tools, techniques, and experience necessary to handle such daunting tasks.
● Regular Cleaning and Maintenance of the Shower Area
I strongly suggest regularly cleaning and maintaining the shower area as a simple yet effective measure against mold growth. A clean shower area not only makes the space more enjoyable to use but also prevents harmful organisms from flourishing.
● Applying Anti-Mold Solutions or Treatments
Consider employing anti-mold solutions or treatments for an added layer of protection against the growth of mold and mildew. Such solutions can add longevity to your walls by forming a protective barrier that resists the invasion of these unwanted organisms.
● Prevention Tips Against Bathroom Mold
Simple tips like drying wet items thoroughly before storing them, using bathroom cleaners regularly, and washing shower curtains regularly can significantly keep your bathroom mold-free.
Every small effort counts towards maintaining the cleanliness of your bathroom and promoting a healthy home environment.
● Installation of Proper Bathroom Fans
A properly installed and functioning bathroom fan can have immense benefits in terms of preventing mold growth. In fact, it is considered one of the most effective mold deterrents as it evacuates moist air, thus decreasing the likelihood of mold spores settling and reproducing.
● Repairing the Source of the Water Leak
Before proceeding to fix a water-damaged shower wall, ensure to repair the source of the water leak. This approach is vital as it prevents the recurrence of the same issue, saving both time and resources in the long run.
In conclusion, regular checks, proper sealing and maintenance of tiles, thorough cleaning, and effective drying methods can immensely reduce the chances of water damage and subsequent mold growth.
By proactively following these steps, you can preserve the integrity of your shower area and provide a healthier living environment in your home.
The Importance of High-Quality Epoxy Grout for Moisture Prone Areas
Choosing the right material when dealing with areas that are more susceptible to moisture is crucial. My experiences recommend using high-quality epoxy grout in such environments.
This is especially true when dealing with shower tiles, which are constantly exposed to water. Neglecting this aspect may result in water damage behind the tiles that, in severe cases, can require significant repairs.
According to the United States Environmental Protection Agency, persistent moisture can lead to health-hazardous mold and mildew formation. Therefore, it’s essential to select a substance such as epoxy grout, known for its superior sealing properties and its resistance to water permeation.
• The Significance of Periodic Grout Sealing for Porous Grout
Regular maintenance of your bathroom is a key factor in preventing possible issues down the line. One practice that should be invariably part of your upkeep routine is periodic grout sealing. This is especially valid in case you have porous grout installed.
Sealing grout notably augments its lifespan and helps maintain its appearance over time. It functions as a protective barrier against stains, spills, and corrosive substances. Thus, remember to periodically reapply the grout sealant to keep it in optimal condition.
• The Risk of Acidic Cleaners on Shower Tiles
While maintaining the cleanliness of your bathroom is indispensable, it’s equally critical to pay attention to the type of cleaning products used.
Acidic cleaners, which are often marketed for their powerful effectiveness, can actually be harmful to shower tiles. They can notably damage the grout, which might increase the likelihood of water intrusion.
From my experience, using pH-neutral cleaners constitutes a safer option that equally guarantees a great cleaning result without imperiling the grout’s integrity.
• Maintaining Dry Conditions to Prevent Water Damage
Keeping your bathroom dry is yet another measure to avoid unnecessary repairs and costs. Such a simple habit as wiping down the walls after every shower helps a lot in reducing overall moisture.
In addition, ensure your bathroom has proper ventilation. This doesn’t only support the drying process but also improves air quality and prevents bacterial and mold growth.
• Enlisting Expert Hard Surface Restoration Services
Various aspects of tile maintenance can be handled independently. However, some situations demand professional intervention undoubtedly. And that’s where hard surface restoration companies, like Sir Grout, come in.
As a hard surface restoration professional, I can assure you that these companies have the required expertise to diagnose issues correctly and propose the most effective solutions. They can also provide valuable advice to minimize the risk of future problems.
• Seeking Professional Intervention for Mold Removal
In case of mold presence behind the shower tiles, quick and efficient removal is essential. Here, I would like to stress the importance of employing professional technicians to handle this task.
Mastering safe and proper mold removal techniques, these professionals can also provide useful tips on how to maintain shower tiles to prevent the recurrence of mold and subsequent water damage.
• Free In-Home Evaluation for Possible Water Damage
If you suspect any water damage or leakage around the shower tiles, I strongly suggest contacting Sir Grout, or any other hard surface restoration company, and request a free in-home evaluation.
This non-committal assessment can help determine the extent and severity of the damage, allowing you to understand what the next steps are and how to proceed with potential repairs or replacements.
The Underlying Dangers of Hidden Shower Leaks
• The Unseen Damage: Mold and Mildew Growth
Hidden shower leaks are a silent assailant in many homes, with disastrous effects if not swiftly addressed. Chief among these dangers is the rapid buildup of mold and mildew, which can start growing within merely 24 hours of exposure to moisture (source).
Not only are these fungi unsightly and unhygienic, but they also pose health risks, including allergies, respiratory issues, and in some severe cases, even neurological problems.
• Structural Risks: Wood Rot and Pest Infestations
Adding to the harmful effects, moisture from wall leaks can instigate wood rot. This gradual decay weakens the structural integrity of the bathroom and invites unwelcome visitors.
Pests such as termites and roaches thrive in these moist, decaying environments and can instigate further damage to the structure of your bathroom.
• Early Repairs: Preventing Home Damage
To stave off these potential complications, early detection and timely repair of hidden wall leaks are crucial. A prompt response can save homeowners from larger, more expensive structural damage to their property.
In essence, a small problem caught early is easier and cheaper to mend than a large-scale issue that remains unchecked for an extended period.
• Troubleshooting: Be Sure It’s a Hidden Leak
Before leaping to the conclusion that there’s a leak behind the wall, it’s vital to rule out other potential causes. These could include faucet or showerhead leaks or grout failures.
Taking the time to exhaust all alternatives ensures that hidden shower leaks are indeed the root of the problem, propelling the corrective actions in the right direction.
• Finding the Leak: A Methodical Approach
To locate the source of a hidden wall leak, start with any visible damp patches on the wall. While a moisture meter can be handy, I recommend probing the damp spot to determine the location of underlying studs or pipes.
If the damage isn’t too severe, this simple, cost-effective method should give you a clue about the leak’s origin.
• Choosing the Right Method: Pipe Repair
Repairing a hidden shower leak isn’t a one process fits all scenario; it heavily depends on the type of piping involved.
Whether it’s PVC or copper, each requires a different method of repair (techniques and tools). Researching the necessary procedures for each type of pipe can help you choose the most effective repair strategy.
• The Trap of Temporary Solutions: Pipe Patches
It can be tempting to opt for a quick fix with pipe patches. However, using pipe patches is not a long-term solution, and it does not substitute for a proper repair or replacement.
Repeatedly using patches for issues requiring extensive repairs is like putting a band-aid on a deep cut. It may conceal the problem, but it doesn’t solve it.
• DIY Solutions: Calling in a Professional vs. Temporary Fixes
While some can tackle simple plumbing tasks, not all homeowners are comfortable with it. If you lack the expertise or confidence to embark on the repairs independently, it’s always best to call in a professional.
However, should circumstances prevent you from seeking professional assistance immediately, pipe patching materials can serve as temporary solutions to prevent further damage.
Although this article walks you through some of the challenges associated with hidden shower leaks, I recommend consulting resources like EPAs guide to mold, moisture, and your home for a deeper understanding and better decision-making.
Spotting Water Damage Indicators in Bathroom Showers
• Signs of Water Damage on Bathroom Walls
One of the most apparent indications of water damage is the discolored walls surrounding the shower. Water damage often manifests as stains or discoloration on the walls.
These stains may vary in color, from yellow to brown, depending on the severity and nature of the damage. Observing such signs should prompt a careful inspection, as ignoring them could lead to more severe issues, such as structural damage.
• Humidity and Dampness as Water Damage Signs
Another telltale sign is moisture or dampness around the shower area. Persistent and unexplainable dampness ignored over time can lead to water damage, causing the development of mold and mildew.
Moisture absorbed by walls and floor materials may be the culprit behind these signs. It’s, therefore, critical to ensure proper ventilation in the bathroom to enable evaporation of dampness.
• Detecting Water Damage through Smells
In some cases, the nose may be the first to detect an issue. A musty smell in the bathroom, particularly around the shower, is a clear sign there’s water damage.
Apart from being unpleasant, this musty odor is an indication of mold growth, which thrives in damp environments. Exposure to mold may have health implications like allergies and respiratory problems; hence it’s vital to address the root cause, which is often water damage.
• Loose Tiles as a Predictor of Water Damage
Loose tiles on the shower walls can also suggest water damage. The water may have penetrated behind the tiles, causing them to lose their adhesion to the wall.
Loose or falling-off tiles should be inspected further to ascertain whether they are an isolated occurrence or evidence of more extensive water damage.
• Hiring Professional Help for Water Damage Assessment
Since water damage can progressively worsen and possibly cause structural instability, it is important to take immediate action should it be suspected.
Engaging a professional to assess the situation is recommended. They will accurately identify the extent of damage, determine repair requirements and create a plan of action to address the problem.
• Reducing Air Moisture to Prevent Water Damage
Prevention of water damage involves reducing moisture levels in the bathroom. Often, these methods include using a ceiling fan, dehumidifier, and running the air conditioner. This helps in the evaporation of dampness, reducing the chances of water damage significantly.
• Enhancing Air Circulation in the Bathroom
Through regular airing, windows can play a crucial role in maintaining ideal humidity levels in the bathroom. Ventilation helps to promote air circulation, reducing the likelihood of dampness accumulation and consequential water damage.
• Upgrading to Quality Shower Systems
A longer-term preventive measure is upgrading to a high-quality shower system. This provides superior protection against water damage, aside from improving the overall functionality and appearance of the bathroom.
It’s well worth the investment considering the severe consequences of unattended water damage.
By applying proper care and undertaking preventive measures as per the United States Environmental Protection Agency recommendations, homeowners can avoid these issues, maintaining a healthy and inviting bathroom environment.
Regular inspection, addressing issues promptly, using moisture control techniques, and investing in high-quality fixtures are essential practices that will protect your bathroom from severe water damage.
The Necessity of Regular Inspection for Shower Leaks
Frequent monitoring for possible shower leaks behind walls is paramount. It allows us to identify these hidden issues early and prevent the compounding problems associated with prolonged water damage. Studies from the University of Illinois highlight the significance of regular home maintenance, including leak detection, in keeping our homes safe and functional.
• Understanding the Financial Implications of Water Damage Repair
Addressing water damage behind shower walls comes with several potential costs. This includes the actual repair costs, potential structural remediation, and even indirect costs such as increased utility bills due to water wastage.
The Environmental Protection Agency provides comprehensive insights on how to manage and reduce water utility costs.
• Preventing Water Damage in Shower Walls
Preventing water damage starts right from the initial installation of your shower. One significant step is using waterproofing materials that act as a barrier against seepage, effectively preventing moisture from reaching your walls.
• Health Risks Associated with Mold Growth
Water damage can lead to mold growth behind shower walls, presenting potential health risks. The Centers for Disease Control and Prevention emphasize that exposure to mold can cause respiratory issues, allergic reactions, and other health problems.
• Effective Cleaning and Removal of Mold
When tackling mold, it’s crucial to clean affected areas thoroughly and remove the existing colonies. Using specialized mold removal products is generally recommended, but homeowners should also consider professional services for a more comprehensive solution.
• Impacts on Bathroom Structural Integrity
The cumulative effect of water damage on shower walls can lead to more significant problems. These could include rotting wooden structures, crumbling drywall, and even foundational instability. Taking timely action can help prevent these structural issues.
• Role of Professional Assistance in Water Damage Repair
Professional assistance in rectifying water damage is crucial, especially when dealing with complex or extensive damage. Professionals come equipped with the right tools and expertise to handle these situations effectively and safely.
• Alternative Solutions for Water Damage Repair
There are alternative methods and products available for repairing water damage aside from standard services. These might involve using different materials, and techniques, or even incorporating smart technology for moisture detection and control.
• Impact of Water Damage on Home Resale Value
Water damage behind shower walls can also negatively affect the resale potential of your home. Prospective buyers are likely to negotiate lower prices or avoid purchasing a property altogether if they discover substantial water damage issues.
• Legal and Insurance Implications of Water Damage
Water damage from leaks can have potential legal or insurance repercussions. Homeowners may find themselves grappling with claim denials or premium increases. Additionally, they might confront legal issues if the water seepage affects neighboring properties.
• Long-term Consequences of Untreated Water Damage
Leaving water damage untreated could lead to dire long-term effects like chronic health issues, significant structural damage, and depreciation of property value. It’s imperative to address such issues promptly and avoid compromising the safety, functionality, and aesthetics of your home.
Tile and Grout Repair Costs
When it comes to tile and grout repairs, costs can vary significantly. In general, you can expect to pay anywhere from $10 to $50 per square foot for tile repair and $3 to $25 per square foot for grout repair.
Please note, however, many tile repair contractors maintain a minimum service fee, typically ranging between $100 to $300, covering even minor repairs.
• DIY Tile Repair Options
For small touch-up tasks, consider DIY tile repair kits. They are widely accessible and reasonably priced, generally falling in the $10 to $30 range. These kits often provide a cost-effective solution for minor fixes. However, for significant repairs, it is always better to hire professionals.
• Costs Based on Repair Type
Different types of repairs can greatly affect the overall cost. For instance, floor tile repairs typically range from $50 to $700, depending on which repair type and damage extent.
Tile reglazing is a budget-friendly restoration method, costing an average of $4 to $12 per square foot. For swollen tiles or tile tenting, expect costs to fall between $120 and $500 on average.
• Costs for New Tiles and Shower Repairs
When installing new tile flooring, anticipate average costs between $7 to $24 per square foot, including installation.
As for shower tile repairs, expenses can range from $100 up to $3,500, dependent on the repair’s type and size. If you are considering retiling a shower or the entire bathroom, costs can typically run from $9 to $37 per square foot.
• Refinishing and Water Damage Costs
Certain bathroom elements can affect the overall repair expense. Refinishing a tub and shower often ranges from $800 to $1,200. If you’re dealing with water damage behind your shower tiles, repair costs often hover between $1,500 to $2,000.
Further, if the drywall behind the tile has suffered water damage, it may need repairing, adding $200 to $500 to your bill.
• Cost of Repairing Different Tile Materials
Variations in tile materials can also influence repair costs. Ceramic tile, in comparison to other materials, proves the most cost-effective, with repair charges as low as $1 to $8 per square foot.
• Pool Tile Repair Costs
Fixing pool tiles might tip the scales regarding repair costs. Generally, it costs between $25 and $30 per square foot or $2,500 to $5,000 to retile an average-sized pool. On top of that, a professional acid wash for pool tiles averages from $150 to $300.
• Factors Affecting Tile and Grout Repair Costs
Numerous factors come into play when calculating tile and grout repair costs. Such elements include labor, repair type, tile type, grout type, project size, area accessibility, and materials.
• Hiring Tile and Grout Repair Contractors
I strongly recommend hiring licensed, bonded, and insured contractors with a minimum of five years of experience. Always obtain detailed estimates, contracts, and warranties before work begins.
Before hiring, consider asking potential contractors about their experience, if they are licensed and insured, the time taken to complete a project, and the total cost. Evaluate their answers to ensure you’re hiring the right professionals.
For further reading and research on this topic, visit the National Association of the Remodeling Industry an .org resource beneficial in understanding the intricacies of remodeling and repair work.
– Using High-Quality Epoxy Grout for Preventing Water Damage
Epoxy grout is an essential tool in the prevention of water damage behind shower tiles, particularly in high-moisture areas.
This type of grout is known for its exceptional waterproof qualities and its ability to hold tiles firmly in place. Utilizing high-quality epoxy grout will help to create a barrier, preventing water from seeping past the tiles and causing unseen damage.
– The Role of Professional Hard Surface Restoration Companies
Bringing in a professional hard surface restoration company like Sir Grout can provide several benefits. Their team of skilled technicians can accurately identify any water damage, initiate the appropriate repairs, and offer peace of mind to homeowners. When it comes to water damage, particularly in sensitive areas like showers, an expert’s assessment can make a significant difference.
– Importance of Regular Maintenance Routines
Regular maintenance of your shower helps to prevent water from infiltrating behind your tiles. This includes sealing porous grout, avoiding the use of acidic cleaners that can damage the grout, and ensuring your bathroom is kept dry as much as possible.
This combination of activities will help minimize the risks of water-related damage.
– Comprehensive Services Offered by Sir Grout
Sir Grout offers a variety of services that can help homeowners protect their tiled surfaces. Their offerings include identifying and repairing water damage, removing mold, and restoring the integrity of shower walls and tiles.
These services will not only resolve existing issues but also prolong the lifespan of your tiled areas.
– Skilled Technicians at Your Service
The technicians at Sir Grout are skilled practitioners trained to assess and repair water damage. Beyond simply fixing the problem, they will also provide solutions and educate homeowners on future preventative measures.
Their knowledge empowers you, the homeowner, to maintain your tiles effectively and stave off future issues.
– Availing of a Free In-Home Evaluation for Leakage
If you’re a homeowner who suspects leakage or water damage behind your shower tiles, Sir Grout can provide a free in-home evaluation of the problem. This assessment helps to identify any damage, allowing for proactive repair actions.
– Effective Addressing of Water Damage
Promptly and effectively addressing water damage is of utmost importance. If left unresolved, it can lead to potential health risks associated with mold and other water-related issues. Protecting your home and family begins with identifying and solving these problems as they arise.
If you’re interested in learning more about preventing water damage in general, Ready.gov is a phenomenal resource. They offer a comprehensive guide on how to prepare for flooding, mitigate water damage, and protect your home long-term.
In conclusion, proactively managing water damage behind shower tiles involves a combination of high-quality materials, regular maintenance, professional assessment, and repair services like those provided by Sir Grout.
Your home is an investment worth protecting, and preventing water damage should be a critical part of your home care routine.
Estimating Water Damage Restoration Costs
Understanding the expenses associated with water damage restoration can be a daunting task. The amount can range from as low as $1,305 and reach up to $5,707. The average national cost usually hovers around $3,455.
• Factors Influencing Water Damage Restoration Costs
Several factors come into play when determining the cost of water damage restoration. These include the category and class of water damage, the type of damage, the location and extent of the damage, the geographic location of the home, and labor costs.
• Category of the Damage
The category of damage refers to the level of contamination present in the water that has caused the damage. The cleanest or least contaminated category (category 1) is the cheapest to remove and dry, while the most contaminated (category 3) tends to be the most expensive.
• Class of the Damage
The level of severity of the damage, also known as the damage class, impacts the cost as well. Class 1 represents minimal damage and is usually the most affordable to repair. Class 4, on the other hand, reflects extensive damage and, naturally, attracts higher restoration costs.
• Types of Water Damage
Beyond contamination and severity, the actual type of damage caused by water can considerably affect restoration costs. These can range from merely cosmetic damage to heavier damage to personal items, electrical setups, structural components of the home, and even mold growth.
• Damage Location and Extent
Two significant aspects that can alter the cost of restoration are the location and the extent of the damage. If the area affected by the water damage is substantial or located in hard-to-reach parts of the home, it can result in a higher cost of restoration.
• Geographic Consideration
The geographic location of the house plays a surprisingly significant role in water damage restoration costs. Different areas have different average costs, with some being more expensive than others.
• Labor Costs
Labor costs for restoration can also significantly impact the total cost. Professionals may charge between $70 to $200 per hour, depending on their expertise and the complexity of the job.
• Additional Costs
Additional considerations, such as mold remediation and further repairs, add to the bill. It’s important not to overlook these as they can significantly affect the total cost.
• Insurance Coverage
In many cases, homeowners’ insurance or warranties might cover water damage restoration. It is prudent to have a thorough understanding of your coverage to prevent any surprise expenses.
• Should you Hire a Professional?
Hiring a professional restoration company is often advisable. Their experience, equipment, and expertise can ensure a more effective and economical cleaning process.
• Quick and Effective Measures
Swift action and enlisting professional help are crucial to minimize costs and prevent further damage. Regular maintenance and preventative measures are also known to help reduce the havoc caused by water damage.
• Choose a Reliable Restoration Company
When hiring a professional, be sure to ask about the company’s experience, certifications, insurance, and guarantees. All this information can give you a better understanding of the firm’s reliability and effectiveness.
For further information on professional water damage restoration, I recommend visiting the Institute of Inspection Cleaning and Restoration Certification’s website. This is an industry-certified non-profit organization that offers practical advice and guidelines for water damage restoration.
In conclusion, water damage restoration costs can vary greatly depending on multiple factors. It’s essential to understand these factors, act quickly, and hire knowledgeable professionals to restore your home most effectively.
• Typical Range for Water Damage Restoration Cost
A typical range of expenses one might expect to face when dealing with water damage restoration is estimated to fall between $1,306 and $5,741. The average price for this service, most often, swings around $3,485.
• Variable Factors Affecting Water Damage Restoration Cost
The actual cost of water damage restoration can fluctuate considerably. Variations in pricing largely hinge on the scale of the damage, the category or class of the water damage, and the specific location where the incident occurred.
Additional influences that can tip the overall expense include the necessity for mold remediation and other preventive care measures.
• Role of Insurance in Water Damage Restoration Cost
Insurance plans come to the rescue of qualifying homeowners, helping to absorb some of the potentially high costs associated with water damage restoration. However, the importance of meticulously documenting water damage for insurance claims cannot be overstated.
• Categorization and Classification of Water Damage
Water damage restoration professionals assign categories and classes to water damage based on several factors. The primary criteria include the level of cleanliness or contamination of the water in question and the degree to which it has come into contact with pollutants.
Implementing immediate action to deal with water damage is essential, as what initially might be categorized as lower-level damage can rapidly escalate to a higher category.
• Restoration Costs for Different Categories of Water Damage
Clean water damage, referred to as Category 1, is estimated to cost approximately $3 to $4 per square foot for restoration. Grey water damage, or Category 2, costs marginally higher, being priced around $4 to $6.50 per square foot.
The most severe, the black water damage (Category 3), hikes up the costs significantly, ranging between $7 to $7.50 per square foot. Additionally, at this level, the requirement for mold remediation is inevitable.
• Extent of Damage and its Impact on Cost
The classification based on damage extent also plays a vital role in determining the restoration cost. Class 1 expenditure would be the most budget-friendly, with relatively straightforward cleanup and restoration. However, water damage classified as Class 4 could exponentially inflate the restoration bill.
• Repair Costs for Specific Areas of the Home
The specific areas of a home damaged by water can significantly affect the cost of repairing them. Whether you’re dealing with a leaky faucet or repairing a water-damaged basement, the cost range varies considerably.
For instance, a burst pipe, a common household issue, typically costs between $1,000 and $4,000 to fix.
• Importance of Hiring Professionals
The importance of hiring professionals for water damage restoration cannot be emphasized enough. The job demands specialized equipment, safety norms, and professional expertise, which only trained individuals possess.
• Preventive Measures
As prevention is undoubtedly better than cure, homeowners are advised to inspect appliances and plumbing fixtures periodically.
Ensuring proper yard grading and drainage helps minimize the risk of water damage. It is also important to review your insurance coverage periodically to ensure adequate protection.
• Timeline for Water Damage Restoration
The timeframe required to dry a water-damaged home can differ vastly depending on the nature and extent of the damage. While the drying might be completed relatively swiftly, the full restoration process can extend over weeks or even months.
The Institute of Inspection, Cleaning, and Restoration Certification provides resources that can help understand water damage restoration processes more. Remember, timely action, preventive care, and proper professional help are the best line of defense against escalating costs and extensive damage.
Cost Breakdown for Shower Repairs
A variety of problems can afflict a shower unit, from clogged drains and faulty heads to malfunctioning valves. Repairing these problems can involve professional help, adding an economic factor to the situation. The national average repair cost falls between $100 and $700.
Most homeowners pay approximately $350 to address a leaky shower. However, the cost can be as low as $50 for cleaning rust stains off shower faucets or soar to $3,000 to retile a shower with decorative tiles.
• Shower Type Dictates Price
Different types of showers have varying repair costs. For example, the repair expenses for a square/rectangle enclosure vary from those of a wet room.
Similarly, neo-angle enclosures, tub-shower combos, walk-in showers, or curved enclosures also have distinct costs. Electric showers and steam showers follow the same pattern.
• Materialistics: A Factor in Repair Cost
The material of your shower also plays a vital role in the economic aspect of your repair. Acrylic shower units have different problems from their tile counterparts.
Additionally, porcelain slab showers, fiberglass showers, and those made from solid surfaces have unique issues. Stone slab and cultured marble showers, given their premium material, may have higher repair costs.
• Repair Type Matters
Another significant component that determines your repair bill is the type of repair required. Various parts of your shower may need attention, and each can trigger a different expense.
Grout, shower head, handle, faucet, tile, diverter valve, spout, hose, valve, curb, drain pipe, door, pan, and pipe repairs will each have an individual cost. In my experience, tile and valve repairs tend to be more expensive due to the complexity involved.
• Accounting for Labor and Additional Costs
Factoring labor costs into your budget is crucial. Most professionals charge between $50 to $200 per hour. Additionally, you may face other costs, such as call-out fees and minimum repair charges. Detailed planning and budgeting can help you get a handle on these expenses.
• The Replacement Option
Sometimes repairs are not feasible or practical, and replacing the shower is the better choice. The average cost of replacing a shower can range between $8,500 and $9,000. Weighing the costs of repairs against the price of a new unit can help you make an informed decision.
• Importance of Maintenance
Prevention, as always, is better than cure. Regular and careful maintenance can prevent many shower problems from ever developing. For example, regularly cleaning the shower drain can prevent clogs and the resulting repairs.
• Frequently Asked Questions
As professionals in the field, we are often asked about the cost of replacing parts like shower valves or how to unclog a shower drain. Such FAQs are worthwhile, and we always strive to provide valuable insights.
To help further, the University of Nebraska-Lincoln features a clear guide on how to unclog drains, shower included. My recommendation, borne from years of experience, is to prioritize maintenance. Attend to minor issues before they become significant headaches.
And in the face of considerable repairs, don’t hesitate to weigh the option of a new unit. Keep these aspects in mind, and you will be prepared to handle any shower-related issues that come your way.
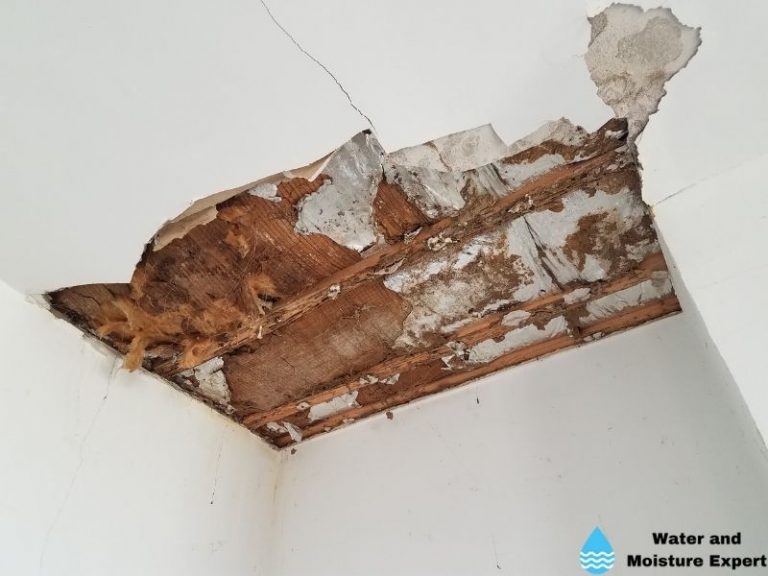
The Impact of Water Damage Behind Shower Tiles
Water damage lurking behind shower tiles is an often overlooked issue that can wreak havoc on your home. Severe consequences may arise, such as the compromise of drywall, the onset of rot, and tiles falling loose. More paramount, these conditions favor mold growth, a notorious health hazard.
It is, therefore, imperative to spot and rectify such problems swiftly. However, detecting the water damage behind tiles is a challenge, often only recognized when considerable damage is at hand.
• Borrowing From the Signs
There exist reliable indicators of water damage behind your tiles. For instance, consistent water accumulation around the shower or tub area may suggest water presence behind the tiles and damage.
Also, a persistent mildew smell, despite relentless attempts to eradicate it, could be a red flag for water damage. Look out, too, for cracks or gaps within the grout lines since such unsealed cement-based grouts can be an entry point for moisture, encouraging water buildup behind walls.
• Prevention Over Cure
Averting water damage behind shower tiles is desirable. I recommend using high-grade epoxy grout, particularly in moisture-rich areas. However, if the initial tile and grout installation wasn’t your doing, it might pose a struggle discerning the type of grout used and whether expert sealing happened.
Suppose you detect water-spoiled grout, engage a professional for remedy. For minor wear signs, replacement or repair of the affected areas, sealed properly and subject to consistent upkeep, can deter further damage.
• Water Damage Wall Repair: A Timely Necessity
Prompt fixing of water-damaged walls maintains the structure’s integrity and curbs mold spread.
Instituting a maintenance regimen including periodic grout sealing (for porous grouts), the avoidance of acidic cleaners, and ensuring dryness of the bathroom could lengthen your grout’s lifespan and hinder water seepage behind tiles.
• Employing Professional Help
If you cannot handle comprehensive damage repair, seek a professional hard surface restoration company’s help.
These experts can precisely diagnose the problem, execute necessary repairs, and assure no recurrence after the project ends. Their methods can effectively cleanse black mold, bringing peace of mind to your family’s safety.
• Sir Grout: A Solution Provider
Sir Grout stands out as a reliable hard surface restoration company experienced in tackling water damage behind shower tiles. their skilled technicians can gauge the damage depth, detect mold presence, and offer solutions to restore the integrity of shower walls and tiles.
Their services range from minor grout repairs and sealing to complete re-grouting. Sir Grout wields both the appropriate tools and knowledge to meet various restoration needs. Post-repairs, their guidance on tile maintenance can help stave off future dilemmas.
To learn more about mold and how to keep your indoor environment safe and healthy, visit the Centers for Disease Control and Prevention, a trusted .gov site.
Importance of Regularly Inspecting Your Shower for Leakages
As someone who has extensive experience in home maintenance, I cannot stress enough the importance of regularly inspecting your shower for leakages. Water damage can have severe consequences for a home’s structure and hygiene.
• Potential Damages from Water Leakage
One of the common problems that homeowners encounter is water seeping through broken or damaged grout in the shower.
This can lead to moisture and water damage Mold and Your Home that, if not addressed, can bring about persistent issues in your home. Be sure to check for erratic water patterns or leaks after using the shower. This could be indicative of a grout problem.
• Address the Source Before Repairing Shower Walls
Once you have identified the signs of a leak, it’s vital to pinpoint and fix the source of the water damage before attending to the shower walls. Failing to do so, you may end up having recurrent problems or causing further damage.
• Mold and Mildew: The Hidden Dangers
On a more serious note, there is a hidden danger lurking behind plastic shower walls mold and mildew. These fungi can thrive in moist areas and pose significant health risks Centers for Disease Control and Prevention.
Therefore, addressing a water leakage problem promptly isn’t just about structural integrity but also health implications.
• Difficulty in Mold Removal
Removing mold and mildew behind plastic shower walls is not an easy task. At times, professional help may be necessary. I highly recommend seeking professional help if the problem persists after multiple cleaning attempts to ensure all fungi are adequately removed and any further growth prevented.
• The Origin of Water Leakage
I’ve often noticed in my personal experience that water leaks behind shower tiles can originate from two primary sources – inside the shower area or from external factors.
These exterior factors include issues like roof leaks or cracked pipes. Never overlook such possibilities when identifying the source of the problem.
• Signs to Look Out for
Identifying water leaks behind shower tiles could be tricky. However, clear giveaways include peeling paint, loose or cracked tiles, and mold growth. These are signs that you should not ignore. Addressing water leaks early can save you from costly repairs and health risks in the future.
Regular maintenance and early detection of potential problems are keys to keeping a home structurally sound and healthy. Don’t underestimate the potential damage that can come from water leaks. Take the time to inspect your shower and address issues before they escalate into major problems.
Causes of Black Mold in Bathtubs
One common issue frequently discussed in homeowners’ forums is the emergence of black mold seeping out of the seam between the fiberglass tub and tub edge. This problem, although seemingly minor, can signify deeper underlying issues and can potentially cause health problems.
• Possible Causes: Soap and Hard Water Scum
Participants in such forums often indicate soap scum or hard water scum as a possible cause of black gunk accumulating in the seam. If soap or hard water residue is not regularly cleaned, it can become a breeding ground for mold over time due to its nutrient-rich consistency.
• Solution: Cleaning and Quality Bathtub Caulk
To circumvent the mold issue, it is highly recommended to clean the joint and use a good-quality bathtub caulk thoroughly. A quality caulk will form a strong bond that is resistant to both water and mold.
This approach will effectively seal any potential entry points for water into the seam, thereby reducing the chances of mold growth.
• Address the Root Cause: Water Infiltration
Fixing the root cause, which often involves finding and fixing the source of water getting behind the shower and leaking out of the seam, is essential. This issue is often a result of improper installation, faulty plumbing, or simply old age.
• Common Issue: Water Behind the Shower Panels
Water seeping behind the panels of the shower enclosure has been mentioned frequently. This problem is common and can often lead to mold growth if not addressed properly.
• The Role of Caulk in Mold Growth
If not applied correctly, caulk, sometimes used to seal the seam, can contribute to mold growth. This is often due to inadequate sealing or the use of low-quality caulk.
• The Importance of Proper Preparation Before Recaulking
Before resealing the seam with caulk, it’s important to remove the old caulk and thoroughly dry the joint. Blowing out the seam with a hairdryer is a practical and effective way to ensure that the area is fully dry before applying new caulk.
• Other Potential Entry Points for Water
Aside from the seam, other potential entry points for water include the shower door vertical channel and poorly fitted escutcheons and spouts. These areas are often overlooked but are just as susceptible to water leakage and infiltration.
• Divergent Opinions
It’s important to note that opinions on the cause of the mold and appropriate solutions can vary widely. This divergence in views often adds to homeowners’ confusion and can make it challenging to determine the best course of action.
• The Original Observation: Mold Seepage
The original report of this issue indicated that the mold was seeping out of the seam and running into the tub during showers. This is a clear sign of water penetration from behind the shower or bath panel, which causes mold formation.
• Cleaning Products: HG Mold Remover
Experts in these forums often suggest specific products that have worked for them in removing mold. Among these, HG mold remover has been recommended due to its efficiency in removing mold and preventing future growth.
For a deep dive into the science of molds, I recommend visiting the Centers for Disease Control and Prevention – a credible governmental website devoted to public health matters.
They provide a broad range of information about different types of molds and guidelines on how to treat mold problems at home.
In conclusion, managing and preventing mold growth in bathrooms involves identifying the root cause, applying effective solutions, and continuously monitoring for any signs of future mold development.
Mold Testing: An Imperative Step for Every Property Manager
As a property manager, encountering mold issues in your premises can be disconcerting. Testing the mold to determine its specific type is a crucial first step. Each mold species brings its unique health risks, demanding diverse remediation methods.
Not all molds are created equally. Some may affect human health severely, while others could be harmless. Testing helps identify the mold type, steering the mold remediation process in the right direction.
The U.S. Environmental Protection Agency’s (EPA) guide on mold remediation will give you more insights here.
• Black Mold in Tub/Shower Enclosures: The Unwanted Resident
A common area where mold haunts are the tub/shower enclosures. The presence of black mold may attribute to the lack of caulking, allowing soap scum to accumulate over months. Some manufacturers discourage caulking these areas, making them more susceptible to mold infestation.
A thorough inspection behind the tub/shower enclosure panel is required. Water leak signs and mold presence must be swiftly attended to, ensuring the area’s health and hygiene.
• Spotting Water Entry Points: The Key to Address Mold
Identifying water ingress, the main culprit behind mold growth is vital. As a property manager, you can utilize tools like a camera and a moisture meter to determine the water entry points accurately.
Spotting these points early can prevent the further spread of mold and also avert significant structural damage.
• Dealing with Leak-Triggered Mold
If the mold issue confines solely to the leakage at the bottom, it might be resolvable through simple cleanup and repair sessions.
However, the extent of damage and accessibility to the issue area intricately carve the cleanup process’s success. Swift action combined with effective problem-solving strategies can easily salvage the situation.
• Eradicating Surface Mold: Bleach to the Rescue
In case of surface mold occurrence, a mild bleach solution is your go-to remedy. The bleach not only kills the mold but also prevents its return. After applying the bleach solution, the mold should be scraped out and the area resealed.
Using bleach-soaked paper towels can restrict the bleach’s flow, minimizing the splash, hence keeping the surrounding areas bleach-free.
• Reusing Enclosures: An Option Worth Considering
Sometimes, in the course of solving the mold issue, removing and reusing the two-piece enclosure could present itself as a feasible option. This route might require permissions depending on the case and could vary in terms of outcome and cost.
This process could become viable based on the condition of the enclosure and the encompassing mold situation.
Remember, dealing with mold in any property requires careful and methodical tackling. Understanding the mold type and its root cause and choosing the correct remediation method is the key to mold-free premises.
Practical measures and swift interventions can serve to protect and preserve your property, contributing to healthier and safer living spaces.
• Regular Inspection of Shower Wall and Floor Leakages
One aspect of home maintenance that should never be overlooked involves inspecting your shower walls and floor for leaks. Regularly examining these areas would prevent water damage from occurring. Over time, unchecked leakages could lead to major problems that can turn into costly repairs.
• Health Risks Linked to Mold and Bacteria Behind Plastic Shower Walls
Mold and bacteria can flourish in damp areas such as your shower walls. Left unaddressed, the growth of these organisms could present potential health risks.
According to the Centers for Disease Control and Prevention, exposure to damp and moldy environments may cause respiratory issues, throat irritation, coughing, and skin irritation.
• Repairing Water-Damaged Shower Walls
In instances where water damage has occurred, several steps must be undertaken to effectively repair your shower walls. These include identifying and fixing the source of the water damage, removing damaged tiles, replacing rotten studs, and painting the drywall.
Taking these actions will restore the integrity and hygiene of your bathroom.
• Eliminating Mold Behind Plastic Shower Walls
Getting rid of mold lurking behind plastic shower walls can be quite challenging due to accessibility issues. One effective solution is the use of bleach or other mold-cleaning solutions.
Be sure to follow safety guidelines when handling bleach, as it may cause skin and eye irritations or respiratory difficulties.
• Leakage Behind Shower Tiles
Your bathroom may face the issue of water leaking behind shower tiles. This problem could arise due to issues with the grout, silicone seal, or substrate walls that are not waterproofed. This can cause the growth of mold, resulting in harmful health conditions.
• Detecting Water Leakage
Certain tell-tale signs can alert you to water leaking behind shower tiles. These signs can include peeling paint, loose or cracked tiles, and the presence of mold. Prompt action in tackling these signs can prevent potential deterioration and costly repairs.
• Revealing Water Damaged Shower Walls
Determining whether your shower wall is water-damaged includes observing signs such as missing or cracked grout, tiles out of line, loose tiles, and peeling caulk. If you spot any of these signs, it is recommended to act quickly to prevent further damage.
• Finding Mold Behind Shower Tiles
Signs of mold behind shower tiles can vary. Typically, indications include muddy spots on the tiles, plaster damage, cracked or loose tiles, or a musty odor. Ignoring these signs can lead to health issues and extensive wall damage.
• Preventive Measures for Mold Growth
To prevent mold growth in the bathroom, the environment must be kept as dry and clean with adequate ventilation. Remove wet items from surfaces and clean the bathroom regularly, in addition to drying the bathroom thoroughly after use. This can aid in maintaining a mold-free bathroom.
• Importance of Bathroom Fan Installation
Installing a bathroom fan can greatly help in preventing mold growth by improving air circulation. It eliminates moisture, thus creating an unfavorable environment for mold to proliferate.
Hence, the suitable installation of a high-quality bathroom fan can play a pivotal role in maintaining good bathroom hygiene.
• Dealing with Water Seepage through Grout
Water seeping through the grout in the shower is a serious issue that should quickly be addressed. Broken or damaged grout must be replaced promptly to prevent further water damage.
• Challenges in Drying Shower Wall and Substrate
Drying a shower wall and substrate can be a challenging and time-consuming procedure. In serious cases, alternative methods such as removing tiles or using industrial drying equipment might be necessary to access the substrate and ensure thorough drying.
By following these guidelines and undertaking regular inspections, you can maintain the hygiene and longevity of your bathroom.
Mold Behind Bathtub Walls: How to Identify and Counter It
Understanding the presence of mold behind bathtub walls is a crucial aspect of maintaining the cleanliness and safety of your residential or commercial spaces. It is a prevalent issue, given that these areas frequently come into direct contact with moisture.
Toxic Attributes of Mold
Aside from contributing to untidiness, mold carries potential health hazards to you and your family. Precisely, black mold, which is a common variety found in properties, is particularly dangerous.
More often than not, it becomes a source of detrimental effects on the structural integrity of a building and the health of its inhabitants.
Effects of Black Mold Exposure
Prolonged exposure to black mold can trigger various health issues, most prominently allergic reactions. These allergic manifestations range from mild to severe, including rashes, hives, sneezing, coughing, and itchy or watery eyes, invariably building up to shortness of breath.
Your pets aren’t immune, either. Like their human counterparts, they, too, are susceptible to black mold allergies.
Mold Growth Requirements
To thwart the growth of mold, it’s crucial to understand its lifecycle. Mold requires three simple elements to thrive: a source of moisture, mold spores in the air, and a food source, usually any organic matter.
Mold Detection: The Challenges
Detecting mold, especially in hidden areas like behind bathtub walls and surrounds, can be quite a feat. Its visibility on surfaces isn’t always a guarantee. Yet, science does offer us a solution.
Utilizing a mold testing kit can significantly aid in identifying the presence of mold spores, even when they aren’t visible to the naked eye.
First Steps Towards Mold Remediation
Upon sighting mold, the immediate measure should be to cease using the affected bathtub. This helps To prevent the worsening of the mold situation.
In conjunction, increasing the ventilation in your bathroom by opening doors and windows assists in reducing moisture levels, thereby limiting mold propagation.
Incorporating a HEPA Filter
Another effective intervention I recommend is the installation of a High-Efficiency Particulate Air (HEPA) filter in your bathroom. This not only enhances air quality but also aids in extracting mold spores from the air, inhibiting their ability to spread and grow.
The Importance of Professional Assistance
Due to the numerous dangers associated with mold, hiring a professional mold removal specialist is a wise choice. They possess the right knowledge, tools, and experience to deal with this issue competently.
I suggest obtaining quotations and assessments from at least two professional companies before zeroing in on your choice.
The Cost of Mold Remediation
Keep in mind mold remediation isn’t a fixed cost. It varies depending on the extent and nature of the infestation. However, it is a necessary expenditure in the battle to maintain a healthy living environment.
Future Mold Prevention Methods
To prevent any future occurrences of mold, take advantage of my previous advice on ensuring proper ventilation in the bathroom and actively curbing excess moisture buildup. I also recommend the continued use of a HEPA filter to improve the overall indoor air quality.
Don’t Hesitate to Seek Expert Consultation
Should you have additional questions or concerns about mold, do not hesitate to seek the advice of a mold remediation specialist.
They can provide insightful recommendations through a free consultation. For additional information on black mold and its effects, you can refer to the CDC’s page on Mold.
Mold Growth Within the Stone or Tile
If the stone or tile of your shower is not properly sealed, it can become a hotbed for mold growth. The stone or tile may look solid, but it can actually contain micropores where water can accumulate.
Over time, this moist environment can foster the growth of mold. Proper sealing of the stone or tile can establish a barrier against moisture, thus, inhibiting mold development.
• Shower Caulking and Mold Growth
Shower caulking is a common area vulnerable to mold growth. Due to constant exposure to water, it can easily become a breeding ground for mold spores. Durable, high-quality caulking that is resistant to moisture saturation is highly recommended.
The UCLA Health Systems article on mold prevention tips offers valuable advice on choosing the right materials, such as caulking, to prevent mold.
• Grout as a Medium for Mold Growth
Grout, the material used between tiles, is another susceptible area for mold growth. As it is porous, it can absorb enough moisture to facilitate mold development. Regular maintenance and the use of high-quality grout sealant can significantly help in mitigating this issue.
• The Dangers of Wall Cavity Moisture Penetration
When moisture penetrates the wall cavity behind the shower, it can impose structural damage. Leaky water supply lines cracked tile and grout, and even vapor drive could be the culprits behind this undesirable scenario.
• The Limitations of Moisture Meters
Moisture meters may not entirely diagnose hidden mold and rot behind shower surrounds because of the conductivity of tile and stone. A mold inspector may inspect the crawlspace or room below the shower and adjacent walls for possible water damage signs.
• Professional Help for Shower Mold Problems
For prominent mold problems, a certified mold professional should be consulted. They can set up containment, remove the shower surround, address any underlying plumbing problems, and execute appropriate cleaning procedures.
• Health Implications of Mold Growth Behind Shower Surround
Mold growth trapped within the shower wall cavity is unlikely to impose health issues, given it stays contained. However, eliminating mold without professional containment could compromise indoor air quality, thus potentially affecting health.
• Type of Shower Surround and Mold Growth
The type of shower surround could influence the degree of mold growth. Stone tile surrounds, for instance, have a relatively higher risk compared to others since mold can grow within the stone itself.
• Replacing a Shower Pan and Tile Removal
In case a shower pan needs replacement, there may not be a need to remove the tile unless water intrusion evidence exists. A detailed inspection prior to the replacement could help determine whether tile removal is necessary.
• Mold Stains in Shower Grout
Stains in the shower grout, especially those that resist scrubbing, are potential mold growth indicators. As long as the mold quantity is not substantial, it should not have significant effects on indoor air quality or health.
• Preventing Future Mold Growth
Running the bath fan for at least an hour after usage and applying a waterproofing sealant can play a huge role in preventing future mold growth. Proactive measures like these can equally contribute to maintaining a healthy indoor environment.
• Importance of Addressing Shower Mold Growth
Addressing shower mold growth promptly and in a proper way is crucial. Not only does this prevent potential structural damage, but it also helps to uphold a healthy indoor atmosphere.
By following these measures, you can keep your bathroom mold-free, safe, and healthy for everyone in your household.
Importance of Regular Maintenance and Inspection of Shower Walls
Regular maintenance and inspection of your shower walls are crucial to catching and preventing water damage early on. This involves both physical inspection and using tools to measure dampness levels, ensuring there are no water leaks that could potentially cause significant damage.
The U.S. Environmental Protection Agency offers a wealth of information on this topic, highlighting the importance of mitigating water damage at the earliest stages.
• Potential Costs and Extent of Damage Caused by Water Damage Behind Shower Walls
Water damage behind shower walls can lead to a series of complications. These problems range from structural instability in your home to severe mold growth.
The costs for rectifying water damage can be astronomical, depending on the severity of the situation. It’s essential to assess these potential dangers and take steps to prevent them early.
• Sealing Shower Tiles to Prevent Water Penetration
Sealing shower tiles play a massive role in water damage prevention. This process involves applying a sealant to the surface of the tiles, preventing water from entering through the gaps. I recommend doing this at least once every year, but more frequently if your shower sees heavy use.
• Choosing The Best Materials for Shower Surrounds
Choosing the right materials for your shower walls is another crucial step in preventing mold growth. Non-porous materials, such as glazed tile or glass, are excellent choices as they do not absorb water and thereby inhibit the growth of mold.
• Health Risks Associated with Mold in Shower Surrounds
Mold, particularly black mold, can pose significant health risks. Symptoms such as wheezing, stuffy nose, and mild skin irritation are common. More serious issues may include fever and difficulty breathing. Regular cleaning and maintenance can keep mold growth at bay and minimize these risks.
• Preventive Measures to Minimize Water Damage
Preventive measures are key to minimizing water damage and subsequent mold growth. Utilize a shower curtain or door seal to keep water inside the shower area.
Also, ensure regular cleaning and immediate drying of the different parts of the shower, including the walls, floor, and corners where water might accumulate.
• Steps to Take if Mold is Detected Behind Shower Tiles
If you find mold growth behind your shower tiles, it’s essential to act immediately. I recommend contacting a professional who specializes in mold remediation and containment. They will be equipped with the necessary tools and procedures to safely and effectively remove the mold.
With this expert advice, preventing and dealing with water damage and mold growth in your bathroom should be a task well within your reach. By taking these preventative measures and acting promptly if you find mold, you can ensure the long-term health and safety of both you and your home.
Signs of Water Leaking Behind Shower Tiles
To determine if water is leaking behind your shower tiles, watch out for signs such as loose or missing grout, discolored tiles, or water stains on the ceiling or wall adjacent to the shower. Other signs might include a musty smell, persistent mold, and a shower floor that remains wet long after use.
A moist environment can also lead to blistering paint or peeling wallpaper in the surrounding areas. Furthermore, if you observe warping or sagging ceilings below your shower, it may indicate a severe leak.
• Detecting Water Damage in Shower Walls
Identifying water damage in shower walls involves looking out for signs similar to those of a leak. Primarily, you may observe water stains and discoloration in the lower regions of the wall or along the baseboards. In some cases, there can be visible mold growth along the surfaces.
Water-damaged shower walls may show signs of warping and bulging as well. On top of this, a distinct dampness or musty odor in the bathroom is a common indicator of water damage.
• Identifying Mold Behind Shower Tiles
Mold behind shower tiles can be difficult to detect until it has significantly spread. Visible signs can include discolored grout lines, persistent musty smells, and dark or stained spots on the tile surface.
Mold often thrives in damp areas, so recurrent mold formation despite regular cleaning may indicate an internal water issue.
Look out for adverse health symptoms as well, like frequent allergic reactions or respiratory issues among household members. Often, these health issues can be linked to hidden mold sources such as those behind tiles.
For comprehensive information about mold, its effects, and remedies, refer to the guidelines provided by U.S. Environmental Protection Agency.
• Ways to Prevent Mold in the Bathroom
Keeping your bathroom dry and well-ventilated is a simple yet effective way to prevent mold growth. After showering, make sure to thoroughly dry all surfaces and leave the door or window open to ensure good airflow.
Routinely check your pipes and faucets for leakage and repair them promptly. Consider having a regular check by a professional plumber to avoid water issues that might contribute to mold growth.
In addition, avoid storing wet clothes or towels in the bathroom as they provide the perfect breeding ground for mold.
Applying waterproof paint or using water-resistant materials for your walls and floor can also help in preventing mold formation. Regular cleaning using a bathroom cleaner that is designed to kill mold is highly recommended.
• Frequently Asked Questions
– Can a Bathroom Fan Keep Mold at Bay?
Yes. An exhaust fan is a vital tool in preventing mold growth in your bathroom. It helps by reducing the humidity level, which in turn, dries out the potential mold breeding areas rapidly. The fan should run long enough to remove the damp air thoroughly after each shower.
– Can Water Seep Through the Grout in My Shower?
Yes, this is possible. Even though grout is a robust material, it’s also porous, meaning water can seep through, especially if it is not sealed properly. Over time, constant water exposure can deteriorate the grout, making it more susceptible to leakage.
– Can I Dry a Shower Wall and Substrate?
The short answer is yes, but it heavily depends on the extent of water exposure and the materials involved. If water has extensively infiltrated the shower wall and substrate, a simple drying won’t resolve the issue, and restoration work might be necessary.
This could involve replacing the substrate or re-tiling the entire shower unit. In severe cases, professional help is recommended.
• The Challenge of Addressing Cracked Tile Issues
As an experienced professional in the field, I have encountered situations where an individual experienced difficulties in finding assistance for their cracked tile issue.
Handymen and licensed contractors were either unable or unwilling to take on the job. It’s not uncommon for professionals to avoid complicated tasks that may involve challenges beyond their comfort zones.
• The Offering of a Partial Solution
Interestingly, one of the handymen offered a half-solution: he was willing to install a new tile surround if the individual managed the demolition and mold abatement themselves. Such instances remind us of the importance of self-reliance in situations where professional help is scarce or insufficient.
• Gathering the Essential Tools
Before you start the demolition process, gather the necessary tools. These include safety equipment, a pry bar, a hammer, a utility knife, a reciprocating saw, a crowbar, a scraper, and a vacuum cleaner with a HEPA filter for cleaning after the process.
Remember to also have trash bags and a mold-killing solution on hand for mold abatement.
• Preparing the Area
Before embarking on the task at hand, take time to adequately prepare the area. Shut off water supply lines and ensure all electricity is off for safety. Protect surrounding areas from dust and debris with plastic sheeting.
• The Demolition Process
Handle materials with utmost care during the demolition process to minimize the release of mold spores. Place all debris into sealed trash bags for disposal. The proper disposal of debris is a key factor in maintaining cleanliness and safety during the process.
• Cleaning After Demolition
After the demolition, thoroughly clean the area with a vacuum cleaner with a HEPA filter to remove residual dust and debris. A clean working space boosts productivity and lowers the risks of accidents.
• Checking for and Addressing Mold
After cleaning, inspect the surroundings for any signs of mold growth. If present, apply a mold-killing solution following the manufacturer’s instructions. We advise you to visit EPA’s website for detailed information on mold and how to deal with growth.
• Allowing the Area to Dry
Once the mold abatement process is completed successfully, let the area dry completely before proceeding with any necessary repairs or installations. This is crucial to prevent future mold growth and to ensure a successful installation.
• Consulting Professionals for Structural Repairs
To ensure the structural integrity of your dwelling, I’d recommend consulting professionals before repairing or replacing the wallboard and framing elements. This step ensures that your home stays safe and secure.
• Coordinating with the Handyman
Effective communication and coordination with the handyman are crucial, especially if you’re seeking assistance for the project. Clear communication avoids misunderstandings and ensures that tasks are completed to satisfaction.
• Addressing the Cracked Tile Problem
Keeping these steps in mind, an individual can address the cracked tile issue and prepare for the necessary repairs or installations in their residential shower. By being prepared and taking a methodical approach, cracked tile problems can be efficiently addressed.
• Identifying Mold Behind Shower Tiles
One common sign of mold growth in your bathroom is the presence of a dark, slimy substance behind your shower tiles. When contrasting with the cleaner areas of the wall, this mold is typically easy to spot. Its moist, shadowy region provides an ideal environment for it to grow and flourish.
In my professional capacity, I advise clients that contact with mold should be limited. This is due to the potential for mold to release harmful toxins into the air. The situation becomes more dangerous if the mold spores are left behind, giving them the opportunity to multiply and infest other areas.
• The Role of Professional Mold Remediation Companies
When a mold problem is present, contacting professional mold remediation companies becomes necessary. These are the experts who are well-equipped to handle the removal of mold.
They ensure the hazardous materials are completely removed, safeguarding your health and the ongoing cleanliness of your home.
Having dealt with them closely, I can testify that the members of these companies understand the risks posed by mold. Hence, they approach the removal process with great care. They also ensure they don’t leave behind harmful spores, which could lead to a resurgence of the problem.
• Importance of Re-tiling After Mold Removal
In my experience, one important aspect often overlooked following mold removal is the importance of correctly re-tiling the bathroom walls. This process protects your walls against future mold growth, reducing the likelihood of the problem recurring.
While dealing with past cases, I noticed that precise re-tiling is essential. It eliminates the spots and crevices mold frequently uses to grow. Getting this step right enhances the final outcome, making your bathroom easier to maintain.
• Preventing Future Mold Growth
There are simple steps you can take to minimize the chance of mold growth. After using the shower, wipe down the walls to remove excess moisture. This reduces the dampness that mold thrives on.
Similarly, leaving the bathroom door open after showering enhances ventilation, which is another key factor in preventing mold growth. Increased airflow facilitates faster drying, which is detrimental to mold.
Investing time in regular cleaning routines also keeps your bathroom mold-free. This includes cleaning and disinfecting all surfaces on a regular basis. As a practiced professional in mold remediation, these routine steps dramatically decrease the risk of mold resurgence.
• Dealing with Mold Issues Promptly
The rapid growth rate of mold is a major concern. Because of this, addressing mold issues promptly is of the utmost importance. Not only can mold spread quickly, but it can also lead to negative health effects, including respiratory issues and allergic reactions.
In my recommendatory capacity, I urge clients to act swiftly when they spot signs of mold. Delaying the remediation process only exacerbates the situation, increasing the risk of health hazards.
• Severe Mold Problems and Bathroom Renovations
The severity of a mold problem can sometimes necessitate complete bathroom renovations. I have seen many cases where mold infestation was so widespread that simply removing the mold wasn’t sufficient.
Substantial renovations offer an infallible solution, completely removing the infested materials and replacing them with new drywalls, tiles, and fixtures. Having this fresh start serves as the best guarantee against a repetition of the problem.
• Further Reading
For those who have experienced significant mold problems, there are a wealth of resources available to guide you through the remediation process.
A comprehensive guide to bathroom mold removal, for example, can be found on the Center for Disease Control and Prevention’s website. In-depth guidance such as this will prove invaluable for those tackling major mold issues.
In conclusion, mold in the bathroom is a common issue that should be treated with the seriousness it deserves due to the potential health risks it poses. Swift action matched with a comprehensive approach to mold removal and prevention is key to maintaining a safe and healthy home.
Impact of Mold on Drywall
In the realm of homeowner nightmares, mold on drywall makes a standing appearance. Mold not only compromises the structural integrity of your home but also poses severe health risks that should not be taken lightly.
It becomes pertinent to identify mold presence promptly and undertake necessary remedial actions.
• Identifying Mold through Visual Cues
One way to detect the presence of mold is through visual indicators. Dark spots appearing in grout lines or the mild occurrence of peeling paint can signal the harboring of mold microbes behind your drywall, warranting an immediate inspection.
Additionally, bulges emerging on the surface of the wall could hint at a mold infestation beneath. Odor is another effective giveaway of potential mold issues. If you notice a musty or damp scent lingering around your house, this could likely indicate the existence of mold.
• Role of Water Leakages in Mold Propagation
Walls, especially those near pipes and plumbing fixtures, are prone to moisture seepage. Persistent dampness encourages the growth of mold behind drywalls. Therefore, keeping track of water leakages and promptly managing any plumbing issues becomes essential in the fight against mold.
• Detecting Mold Behind Drywall
There are a few methods you can employ to check for mold if the visual and olfactory signs have been inconclusive. One of the most effective techniques is using a fiber-optic camera.
This device can provide you with a detailed view into hard-to-reach spaces behind the drywall, thereby enabling the detection of mold colonies.
Alternatively, homeowners can resort to home mold test kits that offer a simpler and cost-effective method to identify mold. These kits involve taking a sample that is later sent to be analyzed by a laboratory.
Being the primary conduit of air circulation in a house, the HVAC ductwork can become a breeding ground for mold. It is advisable to check these air pathway systems for signs of mold regularly.
When in doubt, hiring a professional mold inspector is often the best course of action. These experts possess the right tools and knowledge to accurately identify and analyze mold existence in your house.
Mold Resources is a helpful resource offered by the United States Environmental Protection Agency to get more detailed information regarding mold and its remediation.
• The Hidden Hazard – Invisible Mold Growth
It’s critical to note that mold isn’t always visible to the naked eye. Often, mold spores grow unseen within the pores of the drywall material. Given its invisible nature, the presence of this insidious fungus could be missed during a standard inspection, necessitating a more thorough approach to mold detection.
In light of these reasons, I would always recommend being proactive with mold inspection and taking any signs seriously. Early detection can save you trouble down the line and provide peace of mind, securing not only your house structure but also your well-being.
Remember, a mold-free wall is a healthy wall. Safeguard your home and prioritize your health by keeping the walls of your house safe from the sinister spread of mold.