Dry Wet Drywall. Tips From Professionals.
If you have drywall in your home, the last thing you want is to deal with water damage. Leaks, busted pipes, floods, and other weather conditions can lead to standing water and water damage. Drywall is particularly vulnerable to water damage because it is delicate and absorbent. If you notice standing water in your home or suspect a leak has damaged your drywall, keep some of these professional tips in mind.
Dry Wet Drywall:
Always start by ensuring the cause of the water has been fixed. Remove any access water you see, followed by removing furniture and other items from the room. Blot the wall. Use fans, ventilation, or a dehumidifier to dry the drywall as quickly as possible. The faster you manage to dry the drywall, the less severe the damage will be. Always check for mold.
In this blog post, I will explain the best way to dry the drywall. This involves more than actual drying. I will also answer some of the questions I get about wet drywall, but first I will start with how you can sport if your drywall has water damage.
Contents
- 1 How Can You Tell If Drywall Has Water Damage?
- 2 How Long Will Drywall Stay Wet?
- 3 Will A Dehumidifier Dry Drywall?
- 4 Will Drywall Dry Out After A Leak?
- 5 How Long Does It Take For Water To Damage Drywall?
- 6 How To Dry Wet Drywall Properly
- 7 The Impact of Moisture Buildup in Walls
- 7.1 • Detecting and Repairing Water Leaks
- 7.2 • Effective Drainage Techniques
- 7.3 • Dealing with Severely Damaged Walls
- 7.4 • Utilizing Drying Techniques
- 7.5 • Hiring Professionals for Major Water Damage
- 7.6 • Heating and Air Conditioning to Dry Walls
- 7.7 • Improving Airflow
- 7.8 • Preventing Future Dampness
- 7.9 • Understanding Water Damage
- 7.10 • Emphasizing Quick Drying
- 7.11 • Drywall and Water Interaction
- 7.12 • Steps to Dry Wet Walls
- 7.13 • The Waiting Game
- 7.14 • Role of Professionals
- 7.15 • Utilization of Specialized Drying Equipment
- 7.16 • Monitoring the Drying Process
- 7.17 • When to Call for Professional Help
- 7.18 • Effective Ways to Prevent Water Damage to Drywall
- 7.19 • Quick Actions to Minimize Water Damage
- 7.20 • Knowing When to Seek Professional Assistance
- 7.21 • Repairing or Replacing Water-Damaged Drywall
- 8 The Importance of Rapidly Drying Water-Damaged Walls
- 8.1 • Saving Walls Through Efficient Drying
- 8.2 • Preventing Mold Growth
- 8.3 • Professional Intervention For Extensive Water Damage
- 8.4 • Advanced Techniques and Equipment For Rapid Drying
- 8.5 • Catering To a Variety in Wall Coverings
- 8.6 • ServiceMaster EMT For Water Damage Restoration
- 8.7 • Post-Drying Procedures
- 8.8 • Importance of Protective Gear in Handling Water-Damaged Drywall
- 8.9 • Consulting a Professional in Case of Extensive Damage
- 8.10 • Addressing Underlying Issues
- 8.11 • When Structural Integrity is at Stake
- 8.12 • Importance of Ventilation During Drying
- 8.13 • Removing Baseboards and Trim for Effective Drying
- 8.14 • Considering Replacement of Damaged Drywall
- 8.15 • Cleaning and Sanitizing the Affected Area Post-Drying
- 8.16 • Monitoring for Recurring Water Damage
How Can You Tell If Drywall Has Water Damage?
There are many signs that tell you your drywall has water damage. Some are obvious and easy to see, and others take some time to show up. If you notice standing water near your drywall, there’s a good chance it has water damage. But also when you do not see any water present, the water can be behind the drywall, and not visible from the outside. Here are some other signs to look for.
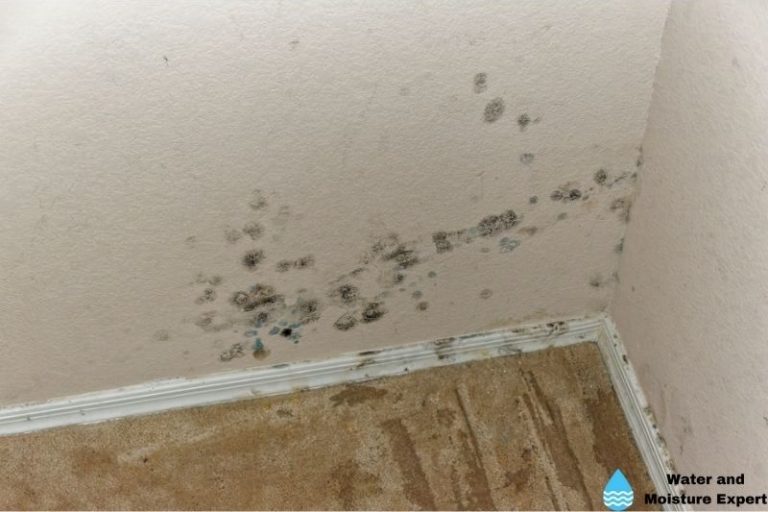
● Discoloration
One of the most apparent signs of drywall water damage is discoloration. It may appear as brown or yellow stripes down the wall, circular stains, or large sections can appear discolored. The longer the water sits and the more severe the damage, the darker the staining.
The best way I have found to cover this discoloration is with a good primer and some paint. I recommend always using a suitable primer. If not, the stains and dis-colorization will most likely return after a short while. Keep in mind that you will only be able to paint over the discoloration if you can dry and save the drywall.
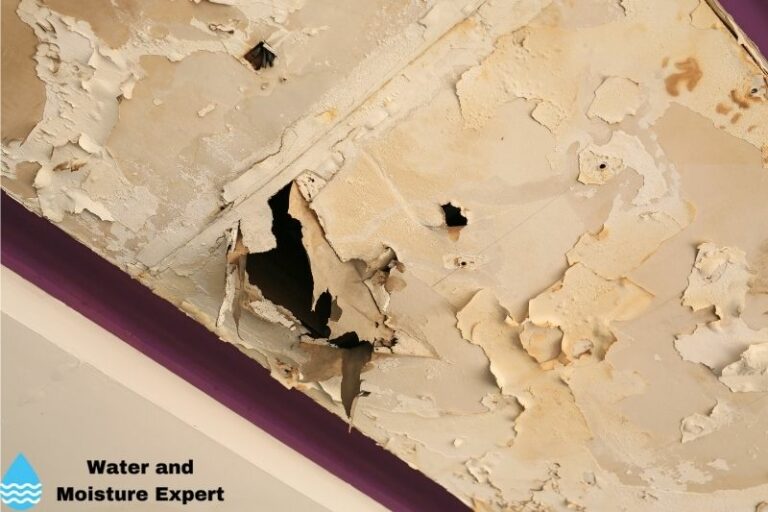
● Bubbling
Bubbling occurs when the water gets trapped between the drywall mud and the paper cover. The bubbles can be small or large. They may remain filled with water, or the water may be absorbed back into the drywall and just leave the paper pushed out. The bubbling should subside as you dry the drywall, but the paper may need to be replaced or repaired.
● Musty Smell
Sometimes you can smell water damage before you can see it. If you walk into a room and notice a musty smell, it could mean your drywall is wet, or there is a leak somewhere in the room. If you can smell this musty odor, it’s a good idea to check for a leak or standing water. You should also inspect your drywall to see if there are any minor signs of water damage that you may not have noticed.
● Peeling Paint
As the water causes the drywall to swell, it can cause the paint to peel from the wall. You may notice large sections starting to bubble or come free from the wall. You may also see small pieces peeling from the corners or the sides. If you do notice peeling paint, you may be able to sand down your walls and repaint after the drywall is dry, and you have determined that you can save it.
● Sagging
Sagging can be a sign of severe water damage. The drywall can fill with water due to its high absorbency rate. This makes it heavy and causes it to come loose from the frame. You will notice it starting to sag away from the top, or it may even sag and break off into large sections. This can be a problem because it can also pull on the drywall sheets nearby that may not have water damage. I find it easier to remove these sections rather than trying to repair them.
How Long Will Drywall Stay Wet?
Depending on how long the drywall was exposed to water, it can take up to three days for the drywall to completely dry out. This is because drywall is extremely absorbent.
The longer it is exposed to water and the more water it is exposed to, the more it can absorb. If you allow the drywall to air dry, it will take longer than if you use fans, a dehumidifier, and other things to dry it out. You should find the source of the leak or flood immediately and remove the water from the drywall.
Mold can start to grow on drywall within 48 hours. Using fans and dehumidifiers can help prevent mold growth and help the drywall dry out faster. Once mold starts to grow on the drywall, it may not be salvageable. You may want to call in a professional mold remediator to remove the mold and make sure your home is safe.
I don’t recommend trying to deal with a mold problem on your own or trying to save any drywall that shows signs of mold growth. If mold is not removed entirely and correctly, it can easily spread to other areas in the home and cause health problems.
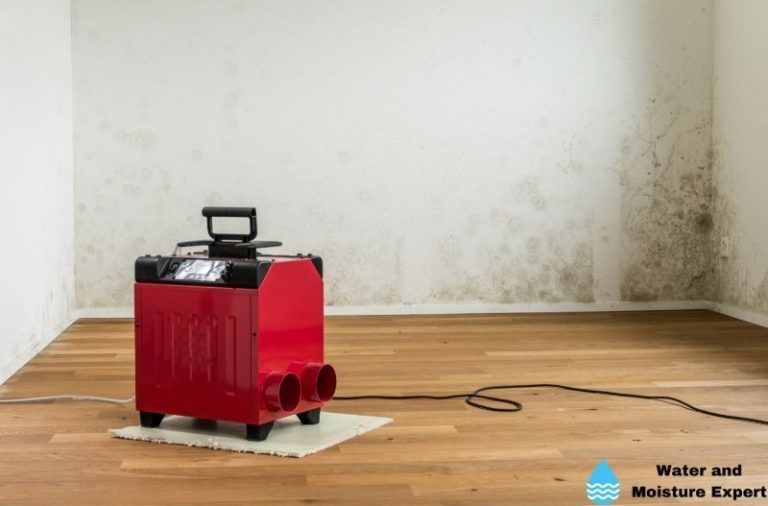
Will A Dehumidifier Dry Drywall?
A dehumidifier can dry drywall much faster than air drying alone. Moisture slows the drying process and allows mold to grow. If you remove the humidity from the space, the drywall can dry out more easily.
You can use a residential dehumidifier, but I always recommend renting commercial dehumidifiers from many tool stores and home improvement supply stores. They can remove a lot more water per hour compared to a residential dehumidifier.
A dehumidifier pulls in the moisture from the air and dries it out to release dry air back into the room. When used with a fan, this can be highly effective at drying out the drywall quickly.
Will Drywall Dry Out After A Leak?
Drywall will dry out after a leak, but the key is starting the drying process before the damage occurs or further spreads. The longer the drywall is exposed to water, the harder it will be to save it. You should start drying the drywall as soon as you see the standing water or leak.
Sometimes the drywall will dry out, but there will be streaks, stains, bubbling, and other damage apparent. If you notice any cosmetic damage already occurring, it may not be wise to save the drywall. You can still dry it out to make removal easier, but it may not be able to be repaired and reused.
How Long Does It Take For Water To Damage Drywall?
Water damage can occur as quickly as an hour after exposure. The drywall will begin to absorb the moisture and will continue to do so until it can no longer hold any more. The longer the drywall is exposed to the water, the more it will absorb and the longer it will take to dry it out.
How To Dry Wet Drywall Properly
If you notice your drywall has signs of water damage, you will need to dry it as soon as possible if you want to save it and prevent further damage to parts of your home. Use the following steps to dry the drywall quickly and thoroughly:
● Step 1: Find The Cause
Before you begin drying the room, you will need to find the cause of the water. It may be a leak, open window, or flood. If you don’t deal with the cause, the water could keep leaking into the room and making drying and repairs impossible. Check appliances, pipes, windows, and doors, and the rooms above and below the room with the water damage.
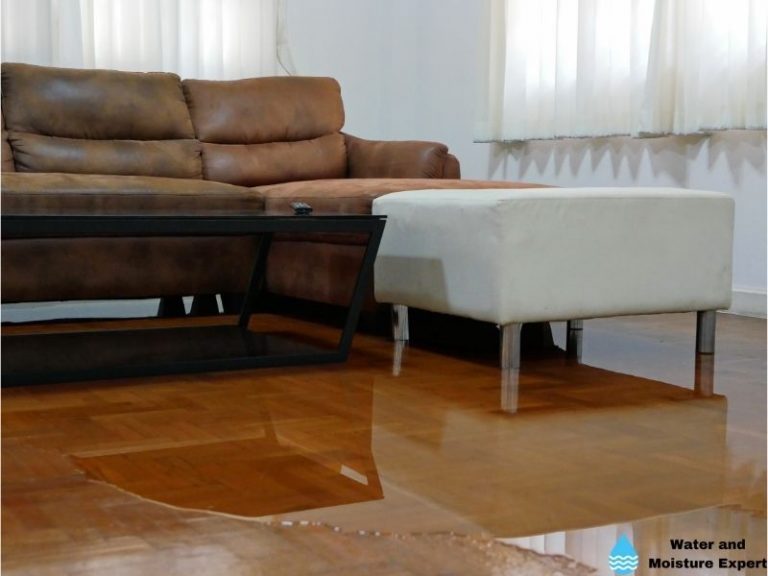
● Step 2: Remove The Water
It is essential to remove the water as soon as possible. If there is only a little water in the room, you may be able to remove it with a mop, towels, or even a broom. If the water is deep or if there is a lot of it, you might need to use a sump pump. If the water is coming from another room in the home, you will need to remove it as well.
● Step 3: Remove Furniture
Remove all the furniture and large items in a room so you can ventilate it more easily and dry it thoroughly. This will also give you a chance to check for damage on these pieces. Once all the furniture and large objects are out of the room, you will also be able to assess the damage to the room and be able to move around to work more easily.
● Step 4: Dry The Room
Once all the water is gone, you can start to dry out the room. Open all the windows in the room to improve ventilation and air movement. If you have fans, you can also angle them at the wettest areas of the room. If the room and walls are extremely wet, it may be necessary to rent commercial fans that are larger and can move the air around more quickly. Drying the room as fast as possible will reduce the severity of the water damage.
Use the following methods to dry the room:
– Blot The Wall
You can gently remove a good bit of water by using a towel or cloth to blot the wall dry. You will need to be extremely careful when doing this, as pushing too hard on a wet wall could cause the drywall to break and leave a hole. Do not rub, as this could also weaken the drywall and cause more damage. I recommend using old towels or rags, as they may need to be thrown away when you are finished.
– Use Fans
It’s essential to dry the drywall as quickly as possible, so it can be beneficial to bring in some fans. The fans will remove the moisture out of the room and help pull it out of the drywall. If it dries before too much of it is absorbed, the drywall is less likely to be damaged. I often rent commercial fans from my local home improvement store. They are larger and run faster, so they can direct more air towards the wet areas and get the entire room dry must faster than regular house fans.
– Using the air conditioner
If have an air conditioner in the room, you can use it to remove moisture as well. Set it to the lowest humidity setting if possible.
– Use a dehumidifier
Using a dehumidifier can help to remove excess water from the room quickly. I recommend renting a professional dehumidifier instead of using a residential one. They are capable of removing a lot more water per hour. If the amount of water is significant, it can still take quite some time, several days to remove it.
– Open Windows
Proper ventilation is also crucial for drying out the drywall and removing the moisture from the air. This can help prevent the water from soaking deep into the drywall and also prevent mold from growing on the walls or any other area the water may have touched. Only if you live in a really humid area, be careful. You do not want to bring in additional moisture in the room.
● Step 5: Assess The Damage
Once the room has dried completely, you will need to go over it and check for damage. If you notice that there are still areas that seem soft or damp, you will want to continue the drying process. You may need to check and continue to dry several times over the next few days until you notice that the room seems completely dry.
Once you figure out what the damage is like when the drywall is dry, you can decide if you want to make the repairs or would rather just replace it. You can also decide if you want to attempt the repairs yourself or you want to hire a professional to do the job.
● Step 6: Check For Mold
Mold grows very quickly and much faster than most people realize. Even if the water has only been standing for a short amount of time or if the drywall is just damp, it could still be a place for mold to grow. You will want to inspect the drywall carefully to see if there are any signs of mold growth. If you do see mold on the drywall, do not use it. You can have a mold remediation expert treat your home before you continue with the repairs.
The Impact of Moisture Buildup in Walls
Moisture buildup is a common but unaddressed issue in many homes. Left unchecked, this can lead to significant problems, including the growth of harmful molds such as black mold. Moisture also poses a risk to your home’s structural integrity, as it can weaken the walls.
• Detecting and Repairing Water Leaks
An essential step in addressing moisture buildup is identifying water leaks. Leaks near your walls can contribute heavily to moisture accumulation.
Therefore, it’s crucial to regularly inspect your walls for visible leaks or damp spots. Once identified, these leaks should be fixed promptly. Regular checks on your plumbing system can also help spot potential issues early on.
• Effective Drainage Techniques
In some instances, standing water may have seeped into your walls. This could be due to leaks, heavy rain, or flood. A good solution is to drain the water by drilling holes at the bottom of the walls. This allows water to escape and initiates the drying process.
Remember that proper handling of power tools is necessary; I cannot stress it enough. Visit the OSHAs website for tips on safe practices when using power tools.
• Dealing with Severely Damaged Walls
When the moisture damage is severe, some sections of the wall may need to be removed. Please be aware this is a significant task and best handled by professionals.
If molds have invaded the walls, remediation is necessary to prevent further spores from spreading, which can pose health risks. After the infected parts are removed, treat the remaining area with an antimicrobial solution to inhibit mold re-growth.
• Utilizing Drying Techniques
Drying your walls is no small task, and it often involves multiple techniques to facilitate the process. Common drying solutions include fans, dehumidifiers, and absorbent materials.
These speed up the moisture evaporation process. It’s worth noting the choice of specific drying methods would depend on the wall type and the extent of the damage.
• Hiring Professionals for Major Water Damage
Any massive water damage within the home usually requires professional intervention. They have the necessary training and equipment to handle these situations effectively and safely.
If you are in doubt about the severity of the water damage, consult a professional. I recommend reaching out to companies certified by the Institute of Inspection, Cleaning, and Restoration Certification for reliable and trusted services.
• Heating and Air Conditioning to Dry Walls
Increasing the heat in your home can speed up the drying process. Increased temperature accelerates the evaporation process of water. Air conditioning units can also help dry the walls by reducing the overall humidity level of the home.
• Improving Airflow
Proper ventilation is crucial in drying your walls. Opening windows and ensuring clear vents promote better airflow, reducing the humidity within your home. Moreover, removing any coverings on wall vents and opening cupboard doors can facilitate quicker drying.
• Preventing Future Dampness
Lastly, prevention is the best cure when it comes to moisture buildup in your walls. Here are some preventive measures; Installing vapor barriers, use of water-repellent paint, and regular roof and plumbing maintenance.
I will advise visiting The U.S. Department of Energy’s website for more tips on preventing moisture in your home.
Remember, a moisture-free home is healthier and safer for you and your family. Regular checks and prompt maintenance can save you significant costs in the long run.
• Understanding Water Damage
Water damage poses a significant risk to floors and walls inside a home. This silent destroyer can compromise your beautiful designs, comfort, and even the structural integrity of your house. With walls being the primary pillars supporting the house, understanding how water interacts with them is essential.
• Emphasizing Quick Drying
When water leaks occur, swift drying is crucial to mitigate further risks. Leaving your walls or floors wet for extended periods can exacerbate the damage, causing structural weakening and potentially promoting harmful mold growth.
According to the University of Georgia’s College of Agricultural and Environmental Sciences Link, moisture provides a favorable environment for mold growth. To prevent this, expedient drying becomes a priority.
• Drywall and Water Interaction
Specific to walls in your home, drywall acts as a sponge, easily absorbing water when it comes into contact. Surprisingly, drywall can wick water up to 30 inches. Consequently, even what appears as a small stain or wet spot on your wall might indicate a more significant problem hidden within.
• Steps to Dry Wet Walls
It’s crucial to follow a systematic process when drying your wet walls:
- Turn off the water source: Stop any continuous flow of water to prevent further damage.
- Ventilate the affected areas: Open all windows and doors to promote more substantial air circulation.
- Use fans and dehumidifiers: These appliances speed up the drying process by removing excess moisture.
- Remove molding, baseboards, and wallpaper: If contaminated by water, it’s advisable to remove these elements. This action reduces the chances of mold growth and can hasten the drying process.
• The Waiting Game
Patience is a virtue when drying wet walls. The process requires a considerable amount of time and shouldn’t be rushed before refinishing. This patience prevents any underlying moisture from causing subsequent problems after you’ve already restored the surface.
• Role of Professionals
Engaging the services of a professional restoration company can be a helpful choice in managing water damage.
Experts come with advanced moisture detection tools such as moisture meters and infrared imaging cameras. Such equipment helps in identifying the extent of water infiltration, enabling precise and effective drying solutions.
• Utilization of Specialized Drying Equipment
Professionals don’t just bring expertise; they also come equipped with advanced drying apparatus. High-capacity air movers and dehumidifiers are commonly used in water damage restoration to help ensure full-wall drying.
• Monitoring the Drying Process
Consistent assessment and monitoring of the drying setup are vital to achieving satisfactory results. Recovery professionals take routine moisture measurements to ascertain the levels of dryness, ensuring the process is effective and on track.
The drying process is considered complete when the dryness levels are equal to unaffected areas. Regular moisture measure is the key to determining this.
• When to Call for Professional Help
While taking initial steps towards dealing with water-damaged walls is commendable, the services of a professional restoration company may be necessary for extensive damages. Situations involving drywall water damage, in particular, often require professional attention.
By calling in the professionals, you can save time, reduce potential complications, and ensure comprehensive and effective restoration of your home. It is always better to be safe than sorry when it comes to reinstating your home to its former glory.
• Effective Ways to Prevent Water Damage to Drywall
As an experienced home improvement expert, I cannot stress enough how crucial it is to inspect your home for leaks regularly. You might come across small drops of water in unexpected corners. But every drop counts in the long run.
Therefore, don’t overlook them and fix them promptly. Here is a useful resource from the US Environmental Protection Agency about ways to fix common house leaks.
Sometimes, simple precautions can save you from significant repairs and hence costs. An example of this is the installation of a robust drainage system. When designed appropriately, a drainage system will redirect water away from your home, preventing any possible damage.
Your house’s guttering system also plays a vital role in protecting your home, particularly the drywall areas. To ensure proper functioning, regularly check, clean, and maintain the gutters and downspouts.
In some parts of your home, such as the bathroom, kitchen, or basement, walls are frequently exposed to water. On such surfaces, I recommend using waterproofing materials and paints. This way, even if the water hits your walls, it won’t be able to permeate and damage the drywall.
While the waterproof paints give an additional layer of protection, you should consider installing moisture barriers or waterproof membranes behind the drywall if you live in an area known for excessive rainfall.
• Quick Actions to Minimize Water Damage
Should water damage occur, an immediate reaction can prevent further issues. Start by removing the standing water and drying the drywall as quickly as possible.
To remove excess water from the wall, use absorbent materials like towels or rags. Then, enhance the drying process using fans, ventilation, or a dehumidifier. Another way to expedite drying is to improve air circulation. Open windows and doors throughout your home.
I also advise removing furniture and other items from the respective room. This helps facilitate the drying and prevents them from taking further water damage.
While doing this, always keep an eye on mold growth. Mold sometimes appears soon after water damage. If unnoticed or untreated, it will spread across the area, leading to further complications.
• Knowing When to Seek Professional Assistance
There are certain conditions where a DIY might not work and you need to call professionals in the field. For instance, if the drywall has been wet for more than 48 hours or if mold has already manifested, professional help is indispensable.
Also, you might need experts if the water damage is large-scale or involves contaminated water that poses a health risk. Another critical reason is when the structural integrity of your home is compromised due to water damage.
Last but definitely not least, if you are unsure about the extent of the damage or how to handle it appropriately, seek professional assistance immediately.
• Repairing or Replacing Water-Damaged Drywall
Before you start repairing, assess the damage to understand whether the drywall can be repaired or needs to be replaced. After assessing, you might want professional advice on the repair. There are many services that provide free consultations and estimates. Don’t hesitate to consult them.
For large-scale damage, consider making flood cuts, creating weep holes or staggering cuts in firewalls. This will improve air circulation and drainage significantly.
In line with speeding the drying process, use professional-grade equipment like air movers and dehumidifiers. These can effectively dry the drywall.
During this process, keep checking the moisture levels and track the progress using a moisture meter. Once the drywall is completely dry, fix any holes or damage, and repaint the drywall.
Finally, when everything is in place and dry, bring back your possessions that you had removed. I hope these tips can assist you in preventing and managing water damage to your drywall.
The Importance of Rapidly Drying Water-Damaged Walls
Dealing with water damage requires fastidious attention, particularly when it comes to your walls. Swift and effective drying is essential to prevent further damage and reduce repair costs. It can also inhibit the growth of harmful mold and mildew that can undermine the structural integrity of your home.
• Saving Walls Through Efficient Drying
More often than not, we tend to think that if a wall has undergone water damage, it inevitably has to be replaced.
Fortunately, water-damaged walls, particularly those made of drywall, can often be restored instead of replaced. This not only reduces the repair costs significantly but also minimizes the disruption in your home and routine.
• Preventing Mold Growth
In many cases, it doesn’t take long for water-damaged areas to become breeding grounds for mold. Swift drying methods hinder the growth and colonization of mold.
It’s important not only for your wall’s health but also for yours. Mold can affect indoor air quality and possibly trigger allergen responses in sensitive individuals.
• Professional Intervention For Extensive Water Damage
At times, the extent of the water damage is too great to handle without professional intervention. In such cases, the services of experienced water damage restoration teams are invaluable.
These professionals not only have the necessary expertise but also access to the latest technological tools to facilitate quick drying.
• Advanced Techniques and Equipment For Rapid Drying
One of the significant advantages of hiring professionals for drying your water-damaged walls is their advanced equipment. These include moisture meters, dehumidifiers, and fans that help dry walls swiftly and efficiently.
Another potent tool that these professionals employ is an inner wall drying system. This innovative system forces air into the wall cavity, resulting in an impressively rapid drying process.
• Catering To a Variety in Wall Coverings
Every home is unique and so are the walls. Professionals understand this and have the know-how to effectively dry walls with various paints or vinyl wall coverings.
They ensure that the drying won’t damage or change the color of your wall decor, maintaining its original appearance and durability.
• ServiceMaster EMT For Water Damage Restoration
With the multitude of restoration services available, finding one you can trust is crucial. ServiceMaster EMT is a reliable water damage restoration company that offers emergency services for businesses and residential homeowners in Southern California and Nevada.
Their qualified technicians respond quickly and use reliable equipment to prevent the spread of water damage and accelerate the drying process.
• Post-Drying Procedures
The job doesn’t end once the walls are dry. After ensuring the walls are thoroughly dried, these professionals monitor the premises to ensure the effectiveness of their work.
They then safely remove their equipment without causing any further disruption in your space. This thorough approach ensures your home gets back to its regular rhythm as quickly and seamlessly as possible.
For more information on the subject, you may want to check out FEMAs guidelines (.gov) on dealing with water-damaged buildings, which discuss in detail the necessary steps for remediation and possible health hazards.
We all wish to keep our homes in the best possible condition, and dealing rapidly and effectively with water damage is critical to achieving that goal. Given its importance, entrusting this task to qualified professionals can ensure optimal results and peace of mind.
• Importance of Protective Gear in Handling Water-Damaged Drywall
To effectively manage issues with water-damaged drywall, protective gear is essential. Wearing gloves and a mask safeguards you from potential health hazards posed by mold or bacteria.
• Consulting a Professional in Case of Extensive Damage
Water damage can be extensive, stretching beyond what a layman’s eyes might perceive. In such cases, or when there is uncertainty about the extent of damage, enlisting a professional contractor or a water damage restoration expert is advisable.
A University of Florida research publication suggests the same, underscoring the importance of professional input.
• Addressing Underlying Issues
Addressing underlying issues that caused the water damage is imperative to prevent repeated issues. Fixing plumbing leaks or repairing faulty fixtures should be a priority.
• When Structural Integrity is at Stake
If severe water damage has compromised the structural integrity of the drywall, consulting with a professional contractor or engineer becomes necessary. They can gauge the extent of the damage and chart the best course of action.
• Importance of Ventilation During Drying
Proper ventilation during the drying process is imperative. It helps prevent the buildup of excessive humidity and promotes faster drying.
• Removing Baseboards and Trim for Effective Drying
The removal of baseboards and trim can facilitate more effective drying. It allows air to circulate behind the drywall and prevents moisture from being trapped.
• Considering Replacement of Damaged Drywall
In some situations, it may be necessary to remove and replace the damaged drywall entirely. If the drywall is extensively warped, cracked, or contaminated with mold, replacement is the best solution.
• Cleaning and Sanitizing the Affected Area Post-Drying
After drying the drywall, thorough cleaning and sanitizing of the affected area are important. This measure forecloses any chance for mold or bacteria to sprout and multiply.
• Monitoring for Recurring Water Damage
Continuous monitoring of the area for any signs of recurring water damage is crucial. Look out for discoloration, musty odors, or peeling paint. If any of these signs are present, address the issue promptly. Preventive measures can save you a lot of time, money, and stress in the long run.
Remember, water damage may seem like a minor issue initially, but left unchecked; it can become a major problem. Adopting a systematic and effective method of dealing with it can prevent long-term damage to property and health.