Water-Damage Bathroom Floor. Tips from professionals
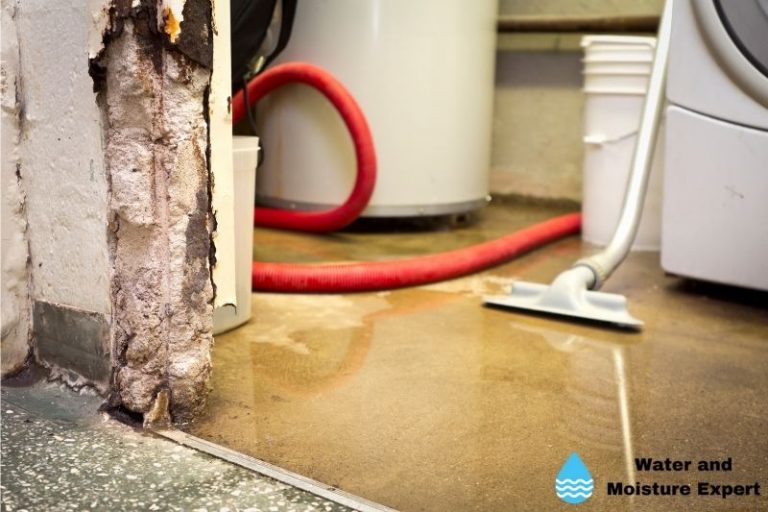
When it comes to property damage, water is one of the worst types. Even in a bathroom built to cope with water, it can do a lot of damage when water finds its way under the floor. If not dealt with in time, it can lead to mold. And worse case, it can damage the floor’s structural integrity, subfloor, and electrical wiring that runs through the floor or substructure.
Water-Damaged Bathroom Floor
A musty stench, mildew, damaged floors, baseboards, and walls are all bathroom floor water damage signs. If you notice any signs, the first step is to find the leak. The source can be inside the bathroom or outside the bathroom. Even the smallest amounts of water can cause irrevocable damage and dangerous mold growth if left for extended periods. Depending on the scale of the damage and the used flooring material, you will need to replace part of the floor.

This article will provide you with tips and tricks to help you deal with water damage on your bathroom floor and ceiling. How can you detect water damage to your bathroom floor and prevent it.
Contents
- 1 How to Spot Water Damage to Your Bathroom Floor
- 2 Categories of Water Damage to Your Bathroom
- 3 How to fix a water-damaged bathroom floor
- 4 Water on Bathroom Floor but No Leak
- 5 Water Damage Bathroom Ceiling
- 6 Bathroom Floor Repair around Toilet
- 7 How to Replace a Rotted Bathroom Floor
- 8 How Do I Get Water Out from Under My Tile Floor?
- 9 How To Prevent Water Damage in Your Bathroom
- 9.1 ● Inspect your plumbing regularly:
- 9.2 ● Toilet and sink clog:
- 9.3 ● Keep it clean and well ventilated:
- 9.4 ● Repair damage as soon as you notice it:
- 9.5 Frequently Asked Questions:
- 9.6 ● Can steamy showers damage my bathroom floor and walls?
- 9.7 ● How much does it cost to replace or repair a water-damaged floor?
- 10 Benefits of Remodeling Bathrooms With Water Damage
- 11 Regular Maintenance and Inspections: Your Defense Against Bathroom Water Damage
- 11.1 • Improving Bathroom Ventilation: A Moisture Fighting Strategy
- 11.2 • Health Risks: Mold and Mildew Aren’t Just Unsightly
- 11.3 • Practical Tips on How to Prevent Bathroom Water Damage
- 11.4 • Prompt Attention to Plumbing Issues is Essential
- 11.5 • Sealing and Waterproofing: Your Bathroom Floor’s Best Friends
- 11.6 • Grouting and Caulking: Unsung Heroes of Water Damage Prevention
- 11.7 • Hard Water: How to Tackle this Silent Threat
- 11.8 • The Financial Burden of Repairing Water-Damaged Bathroom Floors
- 11.9 • The Importance of Professional Help
- 11.9.1 – Comprehensive Mold Inspection
- 11.9.2 – Rely on Water Damage Experts
- 11.9.3 – Immediate Measures for Water Leakage
- 11.9.4 – Preparing for Repairs
- 11.9.5 – Certified Contractors for Structural Integrity
- 11.9.6 – Addressing Minor Damages to the Drywall
- 11.9.7 – Flooring: Leave it to the Professionals
- 11.9.8 – Installation of New Fixtures
- 11.9.9 – Tending to Tiles
- 11.9.10 – Regular Checks
- 11.9.11 – Pipe Leaks
- 11.9.12 – Roll Call for Rot
- 11.9.13 – Preventive Tools: Drain Covers
- 11.9.14 – Importance of Ventilation
- 11.9.15 – Regular Inspections
- 11.9.16 – Professionals in Bathroom Restoration: NYKB
- 12 The Far-Reaching Impact of Bathroom Water Damage
- 12.1 • Long-Term Expenses and Inconveniences
- 12.2 • The Silent Culprit: Insufficient Ventilation
- 12.3 • Cracks and Gaps in the Floor
- 12.4 • Hidden Leaks: A Major Threat
- 12.5 • Addressing Water Damage Promptly
- 12.6 • Practice Regular Maintenance for Prevention
- 12.7 • Causes of Water Damage to Flooring
- 12.8 • Identifying Water Damage on Floors
- 12.9 • Detecting Water Damage Under the Floor
- 12.10 • Decision-Making: Repairing or Replacing Water-Damaged Floors
- 12.11 • Options for Severely Damaged Floors
- 12.12 • Longer Exposure and Presence of Contaminants
- 12.13 • Treatment for Different Types of Floors
- 12.14 • Insurance Matters
- 12.15 • Considerations for Different Rooms in The House
- 12.16 • Assess, Consider, Act
- 13 Discovering Water Damage During Bathroom Remodeling
- 13.1 • Identifying Water Damage
- 13.2 • Tools Needed for Repair
- 13.3 • Preparing for Floor Repairs
- 13.4 • Inspecting and Marking the Area
- 13.5 • Removing the Damaged Flooring
- 13.6 • Drying and Reinforcing the Area
- 13.7 • Applying Floor Compound and Treating Mold
- 13.8 • When to Consult a Professional
- 13.9 • Quick Responses are Key
- 14 pFOkUS Products for Cleaning Grout and Addressing Water Damage
- 15 Mold Inspection and Extent of Damage
- 15.1 • Engaging with Water Damage Experts
- 15.2 • Turning Off the Main Water Valve
- 15.3 • Furniture and Items Removal
- 15.4 • Seeking Certified Contractors for Structural Repair
- 15.5 • Drywall Repair
- 15.6 • Joining and Painting Drywall Patches
- 15.7 • Clearing of Debris and Damaged Flooring
- 15.8 • Floor Replacement by Professionals
- 15.9 • Installation of New Fixtures
- 15.10 • Bathroom Customization
- 15.11 • Regular Inspections for Damages
- 15.12 • Management of Excess Water
- 15.13 • Checking for Leaks and Decay
- 15.14 • Ensuring Proper Ventilation and Drain Covers
- 16 The Impact of Water Damage in the Bathroom
- 17 Different Types of Flooring Materials and Water Damage
- 17.1 • Recognizing Water Damage Beneath Floors
- 17.2 • Deciding Whether to Repair or Replace Water-Damaged Floors
- 17.3 • When to Replace Water-Damaged Floors
- 17.4 • Opting for Repairs in Certain Scenarios
- 17.5 • Specific Repairs per Flooring Type
- 17.6 • Cost Considerations in Repairing or Replacing Water-Damaged Floors
- 17.7 • Final Thoughts
- 18 The Impact of Water Damage in the Bathroom
- 19 Ventilation’s Critical Role in Bathroom Water Damage
- 19.1 • Water Damage from Cracks and Gaps in Bathroom Flooring
- 19.2 • Stealthy Bathroom Water Leaks
- 19.3 • Role of Professionals in the Repair of Water Damage
- 19.4 • Flooring HQ and Its Expertise
- 19.5 • Importance of Regular Plumbing Inspection and Maintenance
- 19.6 • Deep-penetrative Cleaning for Tiles and Grout
- 19.7 • Use of Efflorescence Removers
- 19.8 • Addressing Cracks with Adhesives
- 19.9 • Replacing Worn-out Caulk
- 19.10 • Importance of Sealing Grout and Shower Tiles
- 19.11 • Fixing Shower Door Leaks
- 19.12 • Shower Floor Inclination
- 19.13 • Regular Mopping and Ventilation
- 19.14 • Choosing the Right Products
- 20 Quick Response to Spills is Essential for Tile Preservation
- 20.1 • Regular Inspection: A Preventative Measure
- 20.2 • Fix Leaks for Damage Control
- 20.3 • Hire Professionals for Quality Tile Repair
- 20.4 • Proactive Measure: Routine Cleanups
- 20.5 • Grout Lines: Do They Need Sealing?
- 20.6 • Choosing the Right Type of Tile
- 20.7 • Perks of Regular Tile Care
- 20.8 • Seeking Professional Help for Tile Restoration or Repair
- 20.9 • Extent of Water Damage in Bathrooms & Its Consequences on Structure
- 20.10 • Mold Growth, Water Damage & Health Risks
- 20.11 • Identifying Signs Of Water Damage
- 20.12 • Hidden Water Damage
- 20.13 • Importance of Mold Inspection
- 20.14 • Water Damage RepairDIY or Professionals
- 20.15 • Preventing Further Water Damage
- 20.16 • More Preventive Measures
- 21 The Importance of Proper Protective Gear
- 21.1 • Necessary Tools and Materials
- 21.2 • Prepping Area for Demolition
- 21.3 • Inspection: Understanding the Extent of Damage
- 21.4 • Mold Treatment: A Pre-Requisite to Repairs
- 21.5 • React Promptly to Water Damage
- 21.6 • Replacing Damaged Plywood
- 21.7 • Rebuilding and Leveling the Floor
- 21.8 • Finishing Touches
- 22 Water Damage in Bathroom Floors and Walls
- 22.1 • Bathroom Grout and Caulk Maintenance
- 22.2 • Using Waterproofing Products for Bathroom Floors
- 22.3 • Unseen Water Leaks in Your Bathroom
- 22.4 • How Our Water Usage Exacerbates Leaks
- 22.5 • Dangers of Cracks and Gaps in Bathroom Flooring
- 22.6 • The Threat of Mold and Mildew
- 22.7 • Damages to Subfloor
- 22.8 • Securing Your Bathroom from Water Damage
- 22.9 • Conducting a Thorough Mold Inspection
- 22.10 • Pre-repair Steps for the Bathroom
- 22.11 • Minor Drywall Repairs
- 22.12 • Major Drywall Damage
- 22.13 • Dealing with Debris on the Bathroom Floor
- 22.14 • Installing New Fixtures
- 22.15 • Managing Damaged Tiles
- 22.16 • Regular Bathroom Inspections
- 22.17 • Watch Out for Rot and Decay
- 22.18 • Consider Drain Covers
- 22.19 • Importance of Ventilation
- 23 Commonly Utilized Bathroom Flooring
How to Spot Water Damage to Your Bathroom Floor
It’s easy to miss water damage to your bathroom floor primarily because of how the flooring is built. A bathroom floor is such that it can cope with water spillage. But when water finds its way under the floor, certain signs can show this. Of course, every situation is different, and it greatly depends on things like the substrate and floor type:
- Bulging tiles or floor: If you notice loose or bulging tiles, it can mean that there is a problem with the substrate. Water damage is a common reason for this.
- Spongy floor: You can notice this when you walk on it.
- Damaged grout and caulk: Damaged or missing grout can lead to water finding its way under the tiles.
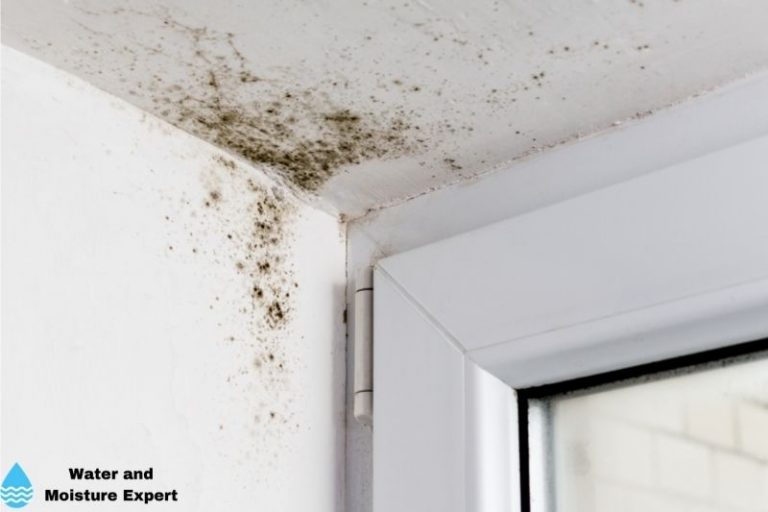
- Mold and mildew: When there is moisture under the floor, it can lead to mold and mildew that continuously returns. Mold can also start with poor ventilation, so it does not always mean that there is water damage.
- Tile discoloration: Discoloration of your bathroom floor tiles
Categories of Water Damage to Your Bathroom
While dealing with water damage to your bathroom floor, it is good to know that water damage can be divided into three categories, based on the degree of contamination. These categorizations are:
● Category 1: Clean water
Category 1 is clean, well-maintained water sources like an overflowing sink that are far easier to deal with quickly without the risk of adverse effects on your health.
– What to Do:
Dry water puddles on your bathroom floor and fix the source of the leak before identifying the extent of the damage.
● Category 2: Dirty water
Category 2 includes a toilet with pee (no human waste), sump pump backup water, and hydrostatic pressure seepage such as water leaking through the slabs or damaged floor tile grouts. While coming into touch with this water category may not be very dangerous, removing any contaminated items and sanitizing them entirely is necessary.
– What to Do:
If you decide to get rid of the puddles yourself, make sure to wear gloves, boots, goggles, protective clothing, and a respirator to avoid getting into direct contact with contaminated water.
● Category 3: Dirty water with human waste
Category 3 includes water damage from toilet water with excrement, water with microbiological growth, usually soaking through sheetrock of drywall, and eventually dripping to the bathroom floor. This category damages your bathroom floor and can also cause severe sickness or even death.
– What to Do:
Wear protective gear, and ensure proper ventilation. If there is a lot of water damage, I recommend asking a professional for help.
How to fix a water-damaged bathroom floor
Over time, undetected leaks, increased humidity, and seeping may cause even the most resilient and waterproof flooring to fail. Fixing a water-damaged bathroom floor depends on the type of flooring. Here’s how to fix different bathroom floor materials:
● Water damaged Vinyl Flooring
While vinyl floors are resilient, buckling on your bathroom vinyl floor might be a sign of water damage. Before repairing the damaged area, make sure to clean the surface first.
Cut out the damaged vinyl using a sharp knife before prying it off the floor. Finally, dry out the floor before replacing it with some spare vinyl or reusing it.
● Water damaged Tile Flooring
Tile flooring is a popular bathroom choice in most homes. The tiles can either be ceramic or porcelain. When water gets underneath tiles, it causes them to detach from the subflooring. This means that cracks on the ceramic or loose tiles can identify water-damaged bathroom floors.
If you have ceramic tiles, lift the loose tiles, pry them up from the floor, and clean them up. Dry up the subfloor before resetting the tiles if they are not broken. If damaged, replace with new tiles and apply matching grout to secure them to the bathroom floor. A similar process applies to porcelain tiles. I recommend using waterproof tile adhesive.
● Water damaged Cork Flooring
The first signs of water damage to cork flooring would include stains on your bathroom floor. Water can also loosen the glue between the cork and the substrate, loosening the cork. This, in turn, often will damage your floor, and it will cause the floor to appear warped or as if it’s lifting from the floor.
If the damaged area contains some small holes, you can try to patch it using some spare cork or wood filler. If the damage is widespread, you may have to replace whole cork planks. Start by carving out the cork plank from the floor using a hammer or chisel. If the adhesive is still strong, you will need to damage the plank to remove it. Next, put the new cork tiles with a new adhesive and paint over the repaired area with a layer of a protective finisher.
Water on Bathroom Floor but No Leak
If you notice water on your bathroom floor but no apparent leaks, it probably means the water is coming from a source outside of the bathroom, or there is a problem with condensation. It may be a plumbing leak inside a bathroom appliance, a damaged pipe, a roof-wall junction flashing failure, or a roof or siding leakage. In case of condensation, it will probably be one of the bathroom appliances.
● Invisible leak
The best approach to finding an invisible leak is to determine when the leak is getting worse. This process will take some time because you have to wait until the results are visible. If the leak is large, it is easy to find and not invisible.
If you notice more water after you flush the toilet having a shower, it is probably a problem with the appliance. It will probably be a leak in the roof or wall if it worsens during or soon after rain. Turn off the mains, and see what happens. It may be a pipe issue if you notice it is getting better.
● Condensation
It is also possible that not a leak but condensation is the reason. Differences in temperature in the toilet tank can result in condensation on the tank’s surface. The condensed water may drip down the tank’s exterior and settle on your bathroom floor around the toilet. Use toilet tank liners or anti-sweat toilet tank valves to deal with toilet tank condensation.
● Hydrostatic leakage
There might also be a hydrostatic leakage in your home, causing water to wind up your bathroom floor through the tile grout joints. If you suspect this is the case, reach out to an expert for a plumbing system inspection.
Water Damage Bathroom Ceiling
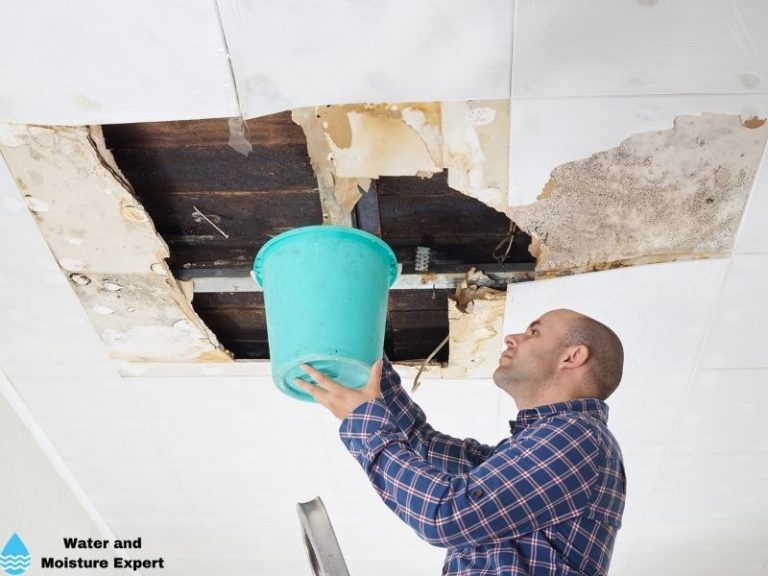
Water damage on your bathroom ceiling often results in water drips coming in through cracks in the ceiling onto your floor. Other signs include discolored growths, bulging drywall, a sagging ceiling, and visible discolorations.
Due to the temperatures in your bathroom, and the fact that it is an area prone to water damage, most of these water damages on the ceiling are long-standing rather than one-time incidents. If you have drywall or plaster ceiling, water damage can result from rainwater leaking through the roof of your home.
It can also result from a leaking pipe that runs through an upper floor or the attic. To remedy the situation, start by removing the damaged ceiling materials and drying them. Or try to access the area from the floor above.
Check if you see any evidence of mold. I recommend wearing safety goggles and a dust mask until you are sure there is no danger. If the ceiling is made from drywall and is entirely wet, you can easily tear out the affected area. But if it is only stained, cut out the damaged portion and replace it with a new piece of drywall. Remove and replace any damp insulation if the leaks are from the roof or attic.
Bathroom Floor Repair around Toilet
The toilet must be removed before installing new flooring in the bathroom. You can do so using the following steps:
● Step 1: Turn off the water supply
To begin, turn off the water supply to the tank. Then flush the tank to remove any remaining waste. Sponge-squeeze the remaining water from the tank into a pail.
● Step 2: Remove the toilet
Remove the bolts on either side of the bowl base. After that, straddle and hoist the toilet. If needed, remove the bolts connecting the tank and bowl.
Scrape the wax ring off the mounting flange with a utility knife. And remember to stuff the drain with old rags to keep out sewer gases and debris.
● Step 3: Check the floor
Strip a piece of the flooring to examine how far the damaged floor spreads. For this process, you’ll need a putty knife for vinyl a tile removal equipment for porcelain and ceramic tiles.
Remove the flooring a few inches past the rotting spot. To test the rotting subflooring, use a screwdriver or claw hammer. If bad, pry it out and use a jigsaw or a hand saw to out the damaged parts. Finally, replace them.
● Step 4: Remove the substrate
Cut a square in the damaged substrate around the water-damaged area around the toilet. Next, assess the gap and ensure the cut sides are over the center point of a joist. Doing so will allow you to cut and install a plywood repair.
Cut plywood pieces long enough to accommodate under the cuts and floor joists, preferably 2”x 6″. You can use a power screwdriver and add exterior-grade screws to attach the pieces to the floor joists.
Proceed to cut plywood portions to fit the aperture and cut it along the flange’s midline. Make a split circle at every plywood half big enough for the flange. After that, bolt the exterior-grade screws fasten the plywood to the floor joists as you ensure the screws are about 4 inches asunder.
● Step 5: Reattach the toilet
First, smoothen the floor where the toilet will sit. Use wood filler if needed. You should cover subfloor gaps to prevent them from showing up in the final flooring. Return the toilet correctly back to its original location on the new subfloor. Check that all the pipes fit correctly and are tight. If needed, replace seals that you suspect are the reason for the original leakage.
How to Replace a Rotted Bathroom Floor
Signs of a rotting bathroom floor and subfloor can be squishy flooring. You will also notice a dump, musty smell coming off from rotting wood. A rotting floor is a sign that the water problem has been there for some time.
Before you start replacing your rotting bathroom floor yourself, ensure that you have fixed the water problem. Use the following steps to replace a rotted bathroom floor:
● Step 1: Remove Bathroom Fixtures
Remove any bathroom fixtures, such as toilets, sinks, cabinetry, or the shower that may be in the way. What you have to remove will depend on the scale of the floor damage. But I recommend removing more than what looks damaged on the top. You want to ensure that there is no damage at the bottom.
● Step 2: Get rid of the floor and the underlayment
When removing the rotten bathroom floor, begin at the wall and work your way in. Remove the molding along the wall first. Then continue removing the main area. If applicable, remove the underlayment.
● Step 3: Inspect the Subfloor
If the subfloor is also damaged or rotting, you may detach the nails or screws for the subfloor using a hammer or screwdriver and then pull the plywood panels off the joists with a pry bar.
● Step 4: Replace Rotten Flooring and Joists
You can also inspect the plumbing underneath your bathroom floor with an exposed subfloor and fix all leakages. Then, use a circular saw to cut out the damaged parts of the subfloor and replace them with new floorboards or plywood. Ensure that the floor joists are fine, else they need to be replaced first.
How Do I Get Water Out from Under My Tile Floor?
Follow the following steps to get water out from under your tile floor.
● Step 1: Get rid of excess moisture on the tile’s surface
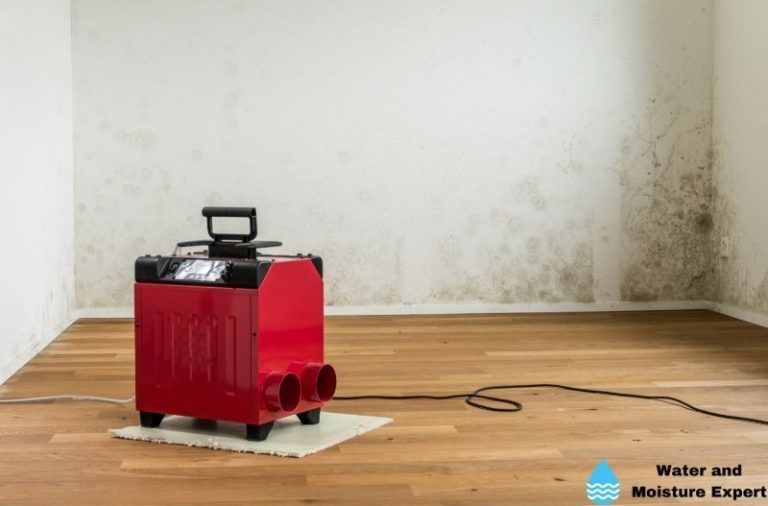
Dry the tiles. Some mold and mildew may grow under the tile, so consider using a fan or dehumidifier to help get rid of excess moisture.
● Step 2: Dry underneath the tiles
Remove the grout from between the tiles with a chisel and rubber mallet. Water under the tiles can now find its way out. Expect this process to take a while. You can use a fan and dehumidifier to speed up the process. If you manage to remove the water, clean the tiles and continue with step 5.
If this does not help remove the water from under the tiles, you have to remove them. Carefully cut them loose. This is a delicate process if you do not want to break them.
● Step 3: Thoroughly clean the floor
After removing all the moisture, clean the area with bleach to prevent mold from growing once you reset the tiles. Remember to wear gloves to protect your hands when using bleach.
● Step 4: Apply Tile Adhesive
Chip away at any previous tile adhesive before applying new adhesive, setting up new tiles, or resetting the old ones if they are not damaged. Ensure the surface is as smooth as possible before using the new adhesive and placing the tiles on the floor.
● Step 5: Apply tile grout
Wait overnight for the adhesive set before filling the spaces between the tiles with pre-mixed grout to hold the tiles in place. Then, smooth the grout lines with a damp cloth to remove excess grout and let the floor dry overnight.
How To Prevent Water Damage in Your Bathroom
Your bathroom and the kitchen are the areas where most water will be used. It means that those areas are also the ones that have the highest chance of water damage. The following tips can help prevent water damage in your bathroom:
● Inspect your plumbing regularly:
Check beneath the sink, behind the toilet, and in other parts of your bathroom for any evidence of leaks or damp build-up. Often leaks start small.
● Toilet and sink clog:
Unclog the drain if you notice that it starts to clog. I always recommend first trying to remove the blockage manually. But if that does not help, you can use a chemical drain cleaner. Be sure to follow the manufacturer’s instructions.
● Keep it clean and well ventilated:
Keep the bathroom clean and well ventilated to give mold less chance. Open your bathroom windows after a shower or bath. You can also use a fan or dehumidifier for a bathroom without a window or good ventilation.
● Repair damage as soon as you notice it:
There is a risk of water seeping into the walls and floors if the bathroom tiles are cracked, fractured, or missing. It is essential to get the tiles repaired or replaced as soon as possible. Caulking around sinks, showers, tubs, and damaged grout should also be repaired.
Frequently Asked Questions:
● Can steamy showers damage my bathroom floor and walls?
Even though steamy showers might be relaxing, the fog can penetrate your walls and cause mold. If mold starts to grow, it can swiftly spread throughout the neighboring areas. When you have a steam shower, ensure you have good ventilation. If needed, install a fan to remove excess moisture in your bathroom.
● How much does it cost to replace or repair a water-damaged floor?
Expect fixing a water-damaged floor to start at $500 to $1000. The cost will vary depending on the extent of damage and the used materials. If the damage is severe enough, the surface may need to be removed and reconstructed, raising the entire cost significantly. On the other hand, a small portion of flooring can cost as little as $500 to $700, whereas restoring floor joists in a room can cost anywhere from $2,000 to $10,000.
Benefits of Remodeling Bathrooms With Water Damage
The aftermath of water damage to a bathroom isn’t always dread and despair. It can also present a unique opportunity to transform the space.
Whether you’ve lived in a property for years or recently moved in, a significant remodel is the perfect moment to adjust the layout, decorate, and introduce new features that suit your personal style and needs.
Upgrading the amenities, changing the color scheme, and installing new fixtures can be combined with necessary repairs to deliver a refurbished and inspiring space.
– Recognizing Signs of Water Damage
Spotting the signs of water damage early on goes a long way in saving both time and expenses tied to extensive renovations.
One of the most common signs is a musty smell, indicating the presence of excess moisture. Increasing amounts of mold or mildew, particularly in corners or hard-to-reach places, are also red flags.
Physical alterations in the construction material, such as gaps appearing in the caulk, tile, or tub, warped walls, and spongy floors, are all indicators of progressing water damage.
Dealing with these promptly can avoid the cost and inconvenience of major repairs down the line. More detailed information on the signs of water damage can be found on websites such as EPA’s guide on mold.
– Necessary Tools to Combat Water Damage
Arming yourself with a good set of tools proves vital when dealing with water-damaged floors. Starting with safety equipment like leather gloves, eye protection, and a dust mask, make sure you are ready for the task.
For the actual repairs, tools like a pry bar, carpenter’s square, repair ring or plate for toilet, cats paw, drill, handsaws, etc. will come in handy.
Galvanized nails, construction adhesive, 2-inch wood screws, 5/8-inch plywood, and floor leveling compound are among the materials needed, while a tape measure will help ensure precision cutting and fitting. A good belt sander will prove indispensable during the refinishing stages.
– Steps to Fix Water-Damaged Floors
The process of fixing water-damaged floors consists of a series of practical steps. Start by turning off the water and clearing up the bathroom of all items. This will give you a clear area to work with. The next steps involve removing any protruding nails and baseboards.
After that, it is necessary to inspect your floor joists and identify damaged areas. The toilet flange should also be checked for any signs of corrosion. The area that has been damaged by water needs to be extensively removed to avoid the spread of damage or mold.
It’s crucial to allow the joists to dry thoroughly before adding new wood to reinforce the structures. The damaged area can then be covered with plywood or OSB, leaving a 1/8-inch gap around the edges.
A floor-leveling compound can be used to fill the gap, followed by sanding to create a uniform and smooth surface.
– Extra Tips and Recommendations
Before starting your repair project, it’s beneficial to treat any traces of mold. Given the health risks associated with prolonged exposure to mold, this is not a step to be skipped.
A homemade solution of equal parts white vinegar and water can be used, as well as bleach or a combination of borax and water. Always remember that proper ventilation is necessary when using these substances.
In extreme cases where water damage is significant, it is recommended to recruit the help of professionals. This will ensure the repair work is conducted in a thorough and structurally sound manner.
Well-trained teams can also help identify any potential causes and implement preventative measures, reducing the chance of reoccurring issues.
Regular Maintenance and Inspections: Your Defense Against Bathroom Water Damage
Regular maintenance and inspections are a strong line of defense against water damage in your bathroom. At a minimum, you should conduct a thorough check of your bathroom every six months. Look for any evidence of water leaks, rust, mold, or mildew.
Taking the time to inspect your bathroom regularly could save you from expensive repairs down the road.
• Improving Bathroom Ventilation: A Moisture Fighting Strategy
A critical factor in bathroom water damage prevention is understanding how to maintain proper humidity levels. Bathrooms with poor ventilation can trap moisture, providing the ideal environment for mold and mildew to flourish.
Installing a bathroom fan or opening a window when showering are practical methods to improve airflow and help reduce moisture.
Find tips on choosing a suitable bathroom fan here.
• Health Risks: Mold and Mildew Aren’t Just Unsightly
Mold and mildew in the bathroom are more than harbingers of water damage. They also pose potential health risks.
According to the Centers for Disease Control and Prevention (CDC), exposure to molds can lead to respiratory illnesses, especially in individuals with asthma, allergies, or other breathing conditions.
Regularly cleaning your bathroom with mold-killing products can help in mitigating these health risks.
• Practical Tips on How to Prevent Bathroom Water Damage
Adding bath mats or rugs in your bathroom is a simple yet effective step to reduce damage from excess water. They help absorb moisture and prevent the formation of puddles.
Additionally, addressing spilled water immediately can prevent it from seeping into flooring or behind baseboards, where it can cause serious damage.
• Prompt Attention to Plumbing Issues is Essential
Some homeowners tend to overlook minor plumbing issues until they become major problems. Leaky faucets or dysfunctional pipes need to be addressed promptly to prevent dramatic water damage.
By addressing plumbing issues quickly, you can better safeguard your bathroom from water damage.
• Sealing and Waterproofing: Your Bathroom Floor’s Best Friends
Properly sealing and waterproofing bathroom floors are critical to preventing water damage. Whether you’re installing a new floor or maintaining an existing one, consistent waterproofing helps impede water from seeping into the subflooring and causing damage.
Consult with a professional for advice tailored to your specific flooring material.
• Grouting and Caulking: Unsung Heroes of Water Damage Prevention
Proper grouting and caulking prevent water from seeping into areas it doesn’t belong. Poorly applied or deteriorating grout and caulk can allow water to penetrate beneath tiles causing significant damage. Regularly inspect these areas and ensure they’re maintained properly.
• Hard Water: How to Tackle this Silent Threat
Hard water can cause buildup, corrosion, and rust, affecting the bathroom’s overall lifespan. Installing water softeners or regularly cleaning fixtures with vinegar can help mitigate hard water damage. Little efforts can go a long way in preserving your bathroom’s integrity.
• The Financial Burden of Repairing Water-Damaged Bathroom Floors
Unaddressed water damage can prove costly over time. The estimator tool here from Federal Emergency Management Agency (FEMA) can help provide insight into the potential costs associated with water-damaged bathroom floors.
• The Importance of Professional Help
For extensive water damage or if you’re uncertain of the extent of the damage or necessary repairs, seeking professional help is strongly recommended. A professional inspection can also provide a clearer picture of hidden damage and the risks it may pose to your safety and home’s integrity.
Routinely involving professional help in the maintenance process ensures continued protection against water damage in your bathroom.
– Comprehensive Mold Inspection
Carrying out a thorough mold inspection is of crucial importance in assessing the damage extent. Mold can cause several health problems and deteriorate the structural integrity of your bathroom. A dedicated mold inspection team can identify potential mold issues and outline a plan to eradicate them.
– Rely on Water Damage Experts
Considering the implications, it’s advisable to seek help from qualified water damage experts for a comprehensive inspection and handling of damaged items. These experts offer solutions that minimize future harm and help in restoring the bathroom.
– Immediate Measures for Water Leakage
In case of severe water leakage, it’s pivotal to shut off the main water valve. This preventive measure would deter further water damage. This article from Emma Willard School Living Wisely, Living Well can further help you on how to act in these scenarios.
– Preparing for Repairs
Before the repairs commence, ensure to clear the bathroom of furniture and portable items. This eases the restoration process and prevents these items from water damage.
– Certified Contractors for Structural Integrity
If the water damage has affected the structural integrity of the bathroom, promptly contact certified contractors. These professionals ascertain the severity of damage and conduct requisite structural repairs.
– Addressing Minor Damages to the Drywall
Minor damages to the drywall can be attended to with a keyhole saw and hammer. Post repair, new drywall pieces need to be secured with a joint compound and tape, then sanded and painted to match the surrounding area.
– Flooring: Leave it to the Professionals
The removal and replacement of damaged flooring should preferably be left to professionals. Unskilled handling can lead to more damage.
– Installation of New Fixtures
Once the damage has been rectified and the flooring replaced, it’s time to install new fixtures. Replacing damaged and old fixtures gives the bathroom a fresh, new look.
– Tending to Tiles
Tiles having cracks, missing parts, or broken should immediately be repaired or replaced. Neglected tiles can lead to future water damage.
– Regular Checks
Inspect the bathroom floor regularly for excess water and use a bathmat to absorb it. Always be watchful for signs of leakage and immediately fix such issues. Regular inspection of grout and sealant for damage should also be part of your checklist.
– Pipe Leaks
An examination of pipes and spouts for leaks should be performed frequently; addressing them promptly reduces the possibility of significant water damage.
– Roll Call for Rot
Rot and decay are unpleasant guests that can stealthily occupy your bathroom. Look out for these signs regularly and ensure immediate rectification.
– Preventive Tools: Drain Covers
Installing drain covers in your bathroom can help prevent blockages. These are easy to install and provide a simple preventive solution to clogs.
– Importance of Ventilation
Good ventilation in the bathroom is often overlooked. Using an exhaust fan and keeping the window slightly open ensures airflow and reduces excess moisture.
– Regular Inspections
Scheduling regular inspections helps in nipping potential issues in the bud, enabling the creation of a maintenance strategy that promises the longevity of your bathroom.
– Professionals in Bathroom Restoration: NYKB
Working with bathroom restoration experts like NYKB can transform a modest bathroom space into your dream sanctuary. They provide high-quality, comprehensive services, from repairs to a complete bathroom makeover.
Having been through the trials and tribulations of bathroom restoration, my experience suggests that seeking professional help offers assurance and quality, essential for a space as important as your bathroom.
The process might seem tedious, but with careful planning and regular maintenance, you can prevent future water damage and make your bathroom a haven of relaxation.
The Far-Reaching Impact of Bathroom Water Damage
• Long-Term Expenses and Inconveniences
The consequences of water damage in your bathroom can be harsh, leading to costly and time-consuming repairs. Persistent dampness can cause structural damage, requiring substantial renovations.
Leaky pipes could leave you paying to double your water bills. It’s a colossal headache that many homeowners would want to avoid. Hence, every homeowner must acknowledge the importance of maintaining their bathroom properly to prevent water damage.
• The Silent Culprit: Insufficient Ventilation
One key factor that often goes unnoticed is the role of proper ventilation. A lack of it can drastically increase humidity levels in your bathroom, upping the risk of water damage. This results in the perfect breeding ground for harmful microorganisms such as mold and mildew.
Mold and mildew are notorious for their ability to thrive in moist, warm conditions, typical of an inadequately ventilated bathroom.
Their growth can not only tamper with the aesthetics of your bathroom but also affect the occupants’ health, causing allergies and respiratory issues.
Educational resource: For further reading on the harmful effects of mold and mildew, you may explore the Centers for Disease Control and Prevention (CDC).
• Cracks and Gaps in the Floor
Moving on, let’s talk about cracks and gaps in the bathroom flooring – an issue that seems innocuous but spells big trouble. These cracks may allow water to seep through, pervading the wood. Over time, this could lead to structural damage, creating a safety hazard for residents.
Even the smallest crevices in your floor tiles should not be dismissed lightly, as they could be a gateway for moisture to reach your subfloor. The result? Rotten wood, structural instability, and eventually, a hefty repair bill.
• Hidden Leaks: A Major Threat
Hidden water leaks are a homeowner’s biggest dread. These can occur behind walls, under floors, or even below the bathtub. They can go unnoticed for extended periods, their track record of low visibility trumping all other types of water damage.
Over time, these hidden leaks can lead to extensive damage, such as rotting of the drywall and framing, peeling paint, and in worst-case scenarios, failure of structural components.
Therefore, it’s crucial to regularly check for signs of hidden leaks like damp spots on walls, peeling wallpaper, or unexplained increases in your water bill.
• Addressing Water Damage Promptly
The quicker you respond to bathroom water damage, the higher the chances of preventing further issues. Remember, water damage has a domino-effect triggering condition that can ravage your entire house.
Dealing with the aftermath might require not just money but also time, which most homeowners cannot afford to lose.
By promptly addressing water damage at first sight, you save on repair costs, prevent property devaluation, and, most importantly, ensure the well-being of your home’s occupants.
• Practice Regular Maintenance for Prevention
I, as an experienced homeowner, recommend consistent maintenance as the most reliable way to keep water damage at bay. Regular inspections, proper cleaning, and immediate repairs of evident issues will go a long way in preventing potential troubles.
Taking the time to maintain your bathroom today could save you from dealing with costly and time-consuming repairs in the future.
Remember, the eternal principle around homes is “Prevention is better than cure.” If you notice any sign of water damage, no matter how minor it might be, act on it immediately. Your home and wallet will thank you in the long run.
• Causes of Water Damage to Flooring
Water damage to flooring can be traced back to a wide variety of causes. Faulty appliances, pipe leaks, sewer backflows, flash floods, or even natural disasters such as hurricanes can all spell disaster for your floors.
• Identifying Water Damage on Floors
Early detection of water damage is crucial to minimize the extent of the damage. Signs to look out for include buckling, whereby the floorboards warp and lift up from the subfloor, and cupping or crowning, which refer to the warping of individual boards.
Changes in color or dark spots are another telltale sign. Besides these visible changes, an unusual odor often indicates the presence of mold or mildew, the result of water damage.
• Detecting Water Damage Under the Floor
While some damage is immediately visible, water damage can also occur underneath the floors, out of immediate sight. An unusually high water bill might indicate hidden leaks. A rising water meter when the home’s water is not in use suggests a hidden leak.
• Decision-Making: Repairing or Replacing Water-Damaged Floors
To repair or to replace? This decision will hinge on several factors. First, the extent of the damage. Are you dealing with a few warped boards, or has water seeped into the subfloor?
Secondly, the category of water is crucial. Clean water from a burst pipe poses less risk than sewer backflow or floodwater, which contain contaminants that can lead to mold growth.
Other factors to consider are your skill level for DIY repairs versus hiring a professional, the available time, and the level of urgency to restore the floor to its normal state.
• Options for Severely Damaged Floors
Severe water damage or floors infested with mold will typically require replacement. Minor water damage, on the other hand, can often be repaired. If the subfloor is heavily damaged, replacement might be the most fitting option.
I recommend consulting with a professional before making the final decision, as there are many factors to consider.
• Longer Exposure and Presence of Contaminants
The length of water exposure and the presence of contaminants can determine whether your floor can be salvaged or not. Clean water damage can usually be repaired if attended to swiftly.
However, floors exposed to water for more than 48 hours or have been in contact with contaminated water need to be replaced to prevent health risks.
• Treatment for Different Types of Floors
Treatment varies depending on the type of floor. Hardwood floors, being fairly durable and easy to work with, can often be repaired or refinished. Conversely, water-damaged laminate, carpet, vinyl, and tile floors typically require replacement of damaged areas.
• Insurance Matters
Insurance coverage for water-damaged floors depends on the insurer and your policy. Generally, damage from sudden incidents like pipe bursts is covered, while damage due to neglect or lack of maintenance is not. Be sure to review your insurance policy and consult with your insurer.
• Considerations for Different Rooms in The House
Not all rooms are created equal when it comes to water-resistant flooring. For basements, especially due to their unique conditions, it’s crucial to choose appropriate water-resistant flooring.
• Assess, Consider, Act
In conclusion, when dealing with water damage, assess the extent of the damage, consider your options for repair or replacement, and make an informed decision based on factors such as cost, time, and personal preference.
Look for signs of damage, weigh factors like the extent of damage, type of water, feasibility of DIY repair as opposed to professional help, your time availability, and the emergence of your situation when deciding to repair or replace.
For more guidance, I recommend the tips offered by the Environmental Protection Agency (.gov) when dealing with water damage.
Discovering Water Damage During Bathroom Remodeling
When you embark on a bathroom remodeling project, you may uncover hidden issues that need urgent attention. One of the most significant of these is water damage. The harmful effects of water damage are often concealed, causing more deterioration the longer it goes unnoticed.
• Identifying Water Damage
Water damage can present itself in many forms. A musky smell frequently indicates the presence of dampness and rot. Interestingly, recurring mold and mildew are a testament to an excessively damp environment.
Concerning structural signs, warped walls, spongy floors, and gaps in the caulk, tile, or tub all point towards water damage. Thus, they should be promptly addressed to prevent further damage and ensure a safe and healthy environment.
• Tools Needed for Repair
To undertake repairs for water-damaged floors, you need specific tools. This includes a pry bar, a circular saw to remove the damaged flooring, and a hammer and nails to install new plywood or OSB. You may also need additional tools depending on the extent of the damage.
• Preparing for Floor Repairs
Before commencing floor repairs, it’s paramount to shut off the water supply by closing the main valve. This precautionary step is imperative to prevent any water mishaps during the repair process.
An integral part of the repair process involves preparing the damaged area. Remove any furniture or fixtures on the water-damaged floor to access the area needing repairs entirely.
• Inspecting and Marking the Area
After clearing the area, it’s crucial to inspect the floor meticulously. Identify the floor joists on either side of the damaged spot, which will help you define the outline of the area that needs repairing.
Draw a clear, distinct rectangular mark around the damaged area, extending it to the middle of the floor joists. This visual guide will assist you in accurately cutting out the damaged flooring.
• Removing the Damaged Flooring
Using the appropriate tools, remove the damaged flooring along the marked outline. Be careful not to harm the underlying joists as you cut through the damaged boards.
• Drying and Reinforcing the Area
Before moving to repairs, it’s advisable to let the entire area dry thoroughly. Drying will prevent any existing moisture from damaging your repair work.
Once dry, reinforce the joists with new pieces of wood. Next, cover the exposed gap with a piece of plywood or OSB securely nailed down. This step will provide your floor with renewed strength and stability.
• Applying Floor Compound and Treating Mold
For a smooth and even result, you should fill any remaining gaps with floor compound. This compound will also level out any undue roughness, helping you achieve a seamless finish.
After fixing the floor, it’s time to address any mold or mildew issues. A mix of white vinegar and water can tackle mold effectively. For stubborn infestations, you may resort to a stronger solution, such as bleach or borax. Remember always to wear protective ware while handling chemicals.
• When to Consult a Professional
Though minor water damage can be dealt with DIY measures, more intense cases can often require professional expertise. Don’t hesitate to consult a professional if the water damage is widespread, affecting multiple areas, including walls and flooring.
• Quick Responses are Key
The key to minimizing the toll of water damage lies in quick responses. Water damage can magnify substantially if not immediately addressed, morphing into more severe issues such as structural deterioration and mold proliferation.
Acting swiftly can protect your home and your health in the long run.
Please refer to this in-depth guide on how to handle water damage from the Federal Emergency Management Agency. This guide offers more detailed steps and safety measures for dealing with water damage.
Remember, preventive care is always preferable to repair. Regular checks and maintenance can go a long way in preventing water damage and ensuring the longevity of your remodeling project.
pFOkUS Products for Cleaning Grout and Addressing Water Damage
• pFOkUS Grout and Tile Cleaner: Imperia Deep Clean
Among the range of pFOkUS products recommended for cleaning grout is the Imperia Deep Clean solution. This product is an incredibly effective cleaner for both tile and grout. It deeply penetrates into the porous grout lines, eliminating dirt, mold, and mildew that could be lurking within.
The product comes ready to use, eliminating the need for dilution or complex application methods. For small areas, a grout brush is recommended for the application process. For larger areas, using a pressurized spray bottle will ensure an even spread.
• pFOkUS Grout and Tile Sealer: Caponi
Once your grout is deeply cleaned using Imperia Deep Clean, the next step is sealing it effectively. The best product for sealing your grout lines is the Caponi grout sealer. This two-part solvent-based titanium-pigmented product is engineered to seal grout in a single coat.
Unlike traditional sealers, Caponi creates a waterproof barrier over the grout lines to prevent further damage. It is also resistant to mold and mildew, ensuring a perfect result every time.
• pFOkUS Stone Sealer: Celine
For addressing the issue of water damage, one of the best pFOkUS products to use is the Celine stone sealer. It serves as an efficient natural stone sealer and enhances the look of the stone or tile surfaces.
Also, it provides a clear protective barrier against water absorption and soil intrusion. This single-component clear topical solvent-based sealer is perfect for maintaining the finish of your tiles, giving them lasting shine and protection.
• pFOkUS Product Cost and Availability
– Price Range
The price of pFOkUS products usually varies depending on the size and specific solution you’re interested in. The Imperia Deep Clean, known for its grout-cleaning prowess, typically ranges from around $30 to $40 per quart.
On the other hand, the Caponi grout sealer ranges from $35 for 8 ounces to roughly $240 for a gallon. The Celine stone sealer is a premium product whose price hovers about the $40 mark for a 16 ounces container.
– Where to Buy pFOkUS Products
pFOkUS products are widely available on the company’s official website. Besides they are also sold on various online marketplaces like Amazon and eBay.
Ordering directly from the company’s website is highly recommended, as this ensures you get the original product and can take advantage of any available discounts or promotions.
pFOkUS also has a robust customer service department that can assist with inquiries or issues relating to their products. They can be reached through email or via their toll-free number.
• Additional Resources
For more information on best practices for tile and grout cleaning, grout sealing, and addressing water damage, the University of Florida provides educational resources on various maintenance techniques.
Whether you are a beginning DIY-er or an experienced professional, their guidelines can enhance your understanding and effectiveness in this field.
Mold Inspection and Extent of Damage
Taking on the role of a seasoned professional, the first critical step is to conduct a thorough mold inspection. This vital process determines the extent of water damage in your home’s bathroom.
The Environmental Protection Agency provides great resources for tackling mold and moisture in homes here.
• Engaging with Water Damage Experts
As an expert, I recommend that you work with certified water damage experts. These professionals are trained to conduct safe mold inspections and repairs. This will ensure that water damage within your home is handled with the utmost efficiency and expertise.
• Turning Off the Main Water Valve
It is crucial to shut off the main water valve to stem the flow of water. Doing this promptly prevents further aggravating the existing damage. This measure eliminates the risk of water leakage continuing even as repairs are being conducted.
• Furniture and Items Removal
I advise you to remove all furniture and portable items from your bathroom. Clearing the bathroom space ensures no other fixtures are harmed during the repair process, minimizing losses.
• Seeking Certified Contractors for Structural Repair
For structural integrity, it’s best to seek the help of certified contractors. They are proficient in implementing necessary repairs that maintain the overall structure of your home.
• Drywall Repair
Following structural repair, remove damaged portions of drywall. I suggest you cut these out and patch them with good-quality joint compound and tape. This will ensure a neat and professional-looking repair job.
• Joining and Painting Drywall Patches
It’s vital to blend your repairs seamlessly with the existing structure. I recommend you sand and then paint drywall patches to match the surrounding area.
• Clearing of Debris and Damaged Flooring
Ensure to clear all debris and replace damaged tiles, vinyl, or other types of flooring. This forms a crucial step in restoring the aesthetics of your bathroom.
• Floor Replacement by Professionals
For optimal results, I counsel homeowners to let experienced professionals handle floor replacement. These pros guarantee a top-notch job in a shorter time span, with minimal disruption to your daily routine.
• Installation of New Fixtures
Freshen up the look of your bathroom by installing new fixtures like toilets, sinks, and shower heads. These changes can create a more modern and stylish aesthetic.
• Bathroom Customization
To add a personal touch, customize your bathroom with unique lighting arrangements or smart devices. With these, your bathroom can evolve from just practical to an expression of your personal style.
• Regular Inspections for Damages
I strongly recommend that you make regular inspections of your bathroom. Check for missing or damaged tiles and replace them, keeping your bathroom in pristine condition.
• Management of Excess Water
Always check the floor for excess water and use a bathmat to absorb it. This is a simple and efficient way to combat water build-up and potential damage.
• Checking for Leaks and Decay
Stay alert for early signs of water damage. Regularly inspect grout and sealant for any signs of degradation or leaks. Prevention is always better than cure.
• Ensuring Proper Ventilation and Drain Covers
Finally, to facilitate the cycle of moisture and dryness in your bathroom, install drain covers and ensure proper ventilation. The Centers for Disease Control and Prevention offer comprehensive guidelines here on controlling household molds.
The Impact of Water Damage in the Bathroom
• A Breeding Ground for Mold and Mildew
When water invades the secluded spaces in your bathroom, be prepared for an unwelcome side effect of mold and mildew growth. These microscopic fungi thrive in a moist environment and once they get a foothold, they can quickly proliferate, causing a musty smell that is hard to ignore.
More concerning than the unpleasant odor, however, is that these organisms pose potential health hazards. For instance, the Centers for Disease Control and Prevention CDC outlines that exposure to molds can lead to symptoms like sneezing, red eyes, and even skin rash.
• Cracks and Gaps in the Flooring: A Hazard in Disguise
Apart from promoting fungal growth, water damage can compromise the structural integrity of the bathroom flooring. It can lead to the formation of cracks and gaps, which, needless to say, can create an uneven and dangerous surface.
This becomes a significant hazard, especially in a room that is likely to have wet floors, leading to slips and falls even without the additional peril of an unstable surface.
• Silent Leaks: Creators of Stealth Damage
Often, the most potent threats are those that are not visible. Water leaks from the plumbing system often fall into this category. Silent yet continuously eroding, these leaks can cause significant damage to the bathroom floor and induce a chain reaction of issues within the structure of the home.
This can subsequently escalate to a point where extensive repairs or even replacement might be necessary.
• Importance of a Proactive Approach
Given how the smallest of water drips can culminate into major problems, it cannot be emphasized enough how crucial it is to take a proactive approach when dealing with water leaks and drips in your bathroom.
It is certainly better to fix a small drip early on rather than wait for it to develop into a significant leak. This not only saves you from potentially expensive repairs but also from the inconvenience and health concerns associated with water damage.
• Professional Help: The Best Bet Against Water Damage
When dealing with water damage in the bathroom, I recommend getting professional help. Though initial inspection and minor fixes can be done by the homeowner, it is often best to have a professional analyze the situation for a comprehensive understanding of the severity and extent of the damage.
Most importantly, professionals have the required knowledge, experience, and tools to handle water damage efficiently. They can provide effective solutions and give you an estimate for repairs or replacement, thereby helping you make an informed decision.
Look for professionals who offer a free estimate for new flooring; this would be beneficial in understanding your budgetary requirements.
• Vital Steps in Addressing Water Damage
– Regular Inspection
Carry out regular inspections for leaks to detect them early on. This pertains particularly to areas that are prone to leaks, such as faucets, under-sinks, pipes, and toilets.
– Swift Action
If you notice any leaks, you must act swiftly. Mitigate the situation temporarily and then call in professionals. Any delay might lead to the spread of damage.
– Sourcing the Right Professionals
As mentioned earlier, it’s wise to hire professionals to manage water damage. Use trusted sources or referrals to find the right people for the task.
– Final Note
Water damage may start small, but it certainly doesn’t end that way if neglected. So always stay vigilant, proactive and be ready to call the pros when required. It’s a small price to pay, considering the alternative. Remember, the health and safety of your home and family are paramount.
Different Types of Flooring Materials and Water Damage
The popularity of flooring materials often depends on personal preferences. However, it’s crucial to note that different flooring materials exhibit different characteristics when subjected to water damage.
Traditional hardwood flooring, for instance, is incredibly appealing, but it’s also highly susceptible to water damage. Without the right care and maintenance, your hardwood floors could easily warp or crack, leading to costly repairs.
For more detailed insights, the University of Florida Extension provides comprehensive guides on home maintenance, including floor types and their respective vulnerabilities.
• Recognizing Water Damage Beneath Floors
Generally, signs of water damage under floors are akin to those of other water damage types. Common symptoms include bubbling, buckling, discoloration, or a musty smell.
However, sometimes the signs might not be overtly visible. This is where you should pay attention to unusually high water bills, as they may hint at concealed leaks beneath the flooring.
• Deciding Whether to Repair or Replace Water-Damaged Floors
The decision to repair or replace water-damaged floors typically hinges on several key factors. These include the extent of the damage, the type of water (clean, grey, or black water), your DIY repair skills, your time availability, and the urgency of the situation.
• When to Replace Water-Damaged Floors
If the water damage is extensive or if the subfloor is severely damaged or infested with mold, replacement may be your best bet. Living with a moldy subfloor is not only unhealthy but can also lead to longer-term structural issues in your home.
• Opting for Repairs in Certain Scenarios
On the other side, if the damage is localized and the subfloor is unaffected, repairs might be a viable option. The caveat is that the drying process needs to be completed within 24 to 48 hours to prevent mold growth.
• Specific Repairs per Flooring Type
It’s important to realize that repairs will differ based on the flooring material. Each material, be it hardwood, laminate, carpet, vinyl, or tile, requires a different repair process.
• Cost Considerations in Repairing or Replacing Water-Damaged Floors
The cost of repair versus replacement can significantly influence homeowners’ decisions. If the cost of repairs is comparable to or even higher than replacement, the latter may be the more cost-effective option.
Also, homeowners should review their insurance policies to determine if water damage is covered. The U.S. Government’s official guide to homeowners insurance can be a helpful resource to understand different coverages.
In my experience, it is generally advisable to consider both the short-term and long-term costs before deciding. While repairing might seem cheaper initially, subsequent damages could potentially hike up the expenses in the long run.
• Final Thoughts
Ultimately, the decision to repair or replace a water-damaged floor should be guided by a thorough assessment of the situation.
Be sure to consider the type and extent of the damage, and don’t forget to factor in the costs. If in doubt, consult a professional – their expert advice could save you from further trouble down the line.
The Impact of Water Damage in the Bathroom
Water damage in the bathroom is an issue that shouldn’t be taken lightly. Regardless of the source, whether it’s a faulty pipe, a minor leak, or a major flood, the damage can become severe.
Often, homeowners overlook small leaks only to find later that their floorboards have rotted and the bathroom requires a complete remodel.
Through my years of experience, I’ve found that responding quickly is key. If left untreated, water damage can lead to costly repairs or even loss of property value. It’s best to tackle water damage immediately to minimize future expenses.
• Required Tools for Water-Damaged Bathroom Floors
To remedy water damage effectively, it’s important to have the right tools on hand. Standard tools for fixing water-damaged bathroom floors typically include a sledgehammer, pry bar, circular saw, drill, nails, and screws.
For safety, use gloves, knee pads, dust mask, and safety glasses. Remember, you should only attempt to fix the damage yourself if you are confident in your abilities.
• Fixing Your Damaged Floors: Step-by-Step Process
Fixing water-damaged floors starts with a thorough inspection. First, you need to stop any water flow. Turn off the water source, whether it’s a leaking pipe or faucet.
The second step is prepping the area. This involves moving any furniture or items out of the room. The bathroom should be completely clear so that the entire floor is visible and accessible.
Next, carefully remove any damaged flooring using your tools. It’s crucial to inspect floor joists for any signs of mold or further water damage. If there’s evidence of further damage, you’ll need to reinforce the area with new wood.
In the process, if you encounter mold, it’s vital to treat it right away. The Environmental Protection Agency recommends killing mold by using a mixture of detergent and water before drying the area thoroughly^1.
Once reinforcement is done, fill any gaps with a floor-leveling compound to create a smooth and even surface.
• Essentials for Bathroom Remodeling
The materials you use during the process can significantly impact the quality of your remodel. High-quality materials not only enhance the appearance of your bathroom but also ensure longevity.
In my experience, Modern Bathroom offers a diverse range of premium products for all bathroom remodeling needs.
You can browse through their collection to find everything from functional items like faucets and sinks to decorative elements like mirrors and lights. I recommend investing in their products for a remodel that is aesthetically pleasing as well as long-lasting.
• Conclusion
Ultimately, maintaining a vigilant eye against water damage in your bathroom can save you a lot of time, money, and stress. Regular checks for leaks and prompt actions against water damage will ensure that your bathroom stays in top condition for years to come.
Ventilation’s Critical Role in Bathroom Water Damage
A common cause of water damage in the bathroom is the lack of appropriate ventilation. When there’s inadequate ventilation, it gives room for steam and moisture to accumulate.
This excess moisture and steam, over time, can permeate through to the bathroom’s subfloor and trigger the growth of mold and rot. A study from the University of Florida reveals that frequent occurrences of high humidity levels in bathrooms can lead to structural deterioration in homes.
Certain signs may indicate that your bathroom ventilation is lacking. These signs could be fogged mirrors after a hot shower or noticeable mold or mildew on bathroom walls or ceilings. Once these signs are evident, it’s critical to address the ventilation issue promptly to prevent severe water damage.
• Water Damage from Cracks and Gaps in Bathroom Flooring
Cracks and gaps in a bathroom’s flooring can often go overlooked, but they serve as potential conduits for water penetration, causing water damage over time.
When water penetrates these cracks and gaps, it can lead to flooring warping and unevenness. The insidious nature of water trickling through the flooring means that by the time the damage becomes evident, extensive work may be required to resolve the issue.
Using waterproof grouting and sealant helps protect your bathroom flooring from water seepage and its consequent damage. Regularly checking your bathroom flooring for cracks or gaps and promptly filling them can save much cost in the long run.
• Stealthy Bathroom Water Leaks
Water leaks, especially those not easily seen, can cause significant water damage over time. Dripping faucets, running toilets, and leaking showerheads or pipes often contribute to this problem.
These leaks might not seem dangerous initially, but the gradual accumulation of water can lead to substantial damage. Indicators such as increased water bills, damp patches or stains on walls, or a persistent smell of dampness might mean you have a hidden water leak problem.
• Role of Professionals in the Repair of Water Damage
Once you notice water damage signs in your bathroom, it’s essential to call in professionals. Experts can provide a free estimate and assess the extent of the water damage.
The visible damage is often just the tip of the iceberg, and consultation with a professional can help you understand the real extent of needed repairs.
Reaching out to professionals not only offers an in-depth evaluation and understanding of your bathroom water damage but also provides a robust and lasting solution.
• Flooring HQ and Its Expertise
Flooring HQ is a company specializing in flooring solutions to issues ranging from water leaks to flooring warping and other related problems.
They provide a comprehensive range of services that cover leak detection, water damage repair, and flooring installation. By prioritizing customer service, professionalism, and quality in their work, Flooring HQ has earned a reputation as a trusted flooring solution provider.
With years of experience and a team of highly trained professionals, Flooring HQ can handle diverse flooring issues. Contacting Flooring HQ might be your wisest course of action in mitigating bathroom water damage, thus ensuring your bathroom maintains its beauty and functionality for the long term.
• Importance of Regular Plumbing Inspection and Maintenance
Home maintenance, particularly in the bathroom, needs a proactive approach. Each fixture contributes to a functional bathroom and, therefore, requires regular care.
Plumbing fixtures should be your highest priority, as they manage water supply and waste. I recommend regular checks on your plumbing fixtures to ensure early detection of potential leaks, drips, or blockages.
Ohio State University Extension is a great resource for homeowners looking to learn more about maintaining home plumbing systems.
• Deep-penetrative Cleaning for Tiles and Grout
Mold, mildew, and stains can affect the aesthetics and hygiene of your bathroom. Utilizing detailed, intensive tile and grout cleaners can rejuvenate your tiles’ shine and eliminate these unsightly patches.
From my experience, deep-penetrative cleaning solutions live up to their promise of a thorough cleansing.
• Use of Efflorescence Removers
Mineral deposit issues also come up over time, noticeable as a white, powdery substance on your tiles. They are efflorescence deposits formed by soluble salts. Here, I recommend using specialized efflorescence removers, which are formulated to deal with this specific issue.
• Addressing Cracks with Adhesives
While cleaning addresses surface issues, structural problems like cracks in tiles or grout should not be ignored. Adhesives are perfect fixes and I advocate their use as they effectively fill these cracks, preventing water from seeping into walls and floors.
• Replacing Worn-out Caulk
With regular wear and tear, the caulk in your bathroom can wear off. Letting such issues linger can lead to water accumulation in undesirable places. To counter this, consider replacing worn-out caulk with superior adhesive versions like epoxy or resin. These newer kinds of adhesives offer better durability.
• Importance of Sealing Grout and Shower Tiles
Preventing water absorption is key to maintaining a bathroom’s appearance and function. Both grout and shower tiles can absorb moisture, which may lead to mold growth. My advice would be to seal these areas. Sealing acts as an extra layer of protection against water, enhancing their longevity.
• Fixing Shower Door Leaks
Leaks from shower doors are common complaints, often causing an unwanted mess. The solution is using sweeps, seals, or thresholds to address these leaks. From personal experience, these diminutive changes prevent possible water damage due to leakages significantly.
• Shower Floor Inclination
A slight oversight during bathroom construction or remodeling is the shower floor inclination. It’s vital to ensure the shower floor inclines towards the drain, preventing water accumulation. If the problem persists, it would be wise to seek professional help to adjust the inclination.
• Regular Mopping and Ventilation
Basic but essential, regular mopping and good ventilation can make a huge difference. Mopping removes standing water, decreasing the risk of water damage, while ventilation ensures a dry environment, preventing mold or mildew growth.
• Choosing the Right Products
The restoration and maintenance products you use in your bathroom should come from a respected manufacturing company. Products from reputable sources will ensure the best results when fixing any water damage on your bathroom floor.
In conclusion, preserving a healthy bathroom environment is a consistent commitment. It requires regular inspection, appropriate cleaners, proper sealing, an inclined bathroom floor, and efficient products.
With these measures in place, you can ensure a well-maintained, functional bathroom that will last for many years.
Quick Response to Spills is Essential for Tile Preservation
Any spill left unattended has the potential to cause severe water damage to your tiles. For this, you need to react promptly. Wipe up spills or messes on tiles as soon as they occur. Remember, excessive moisture exposure can cause tiles to become loose, stained or even lead to the growth of mold underneath.
• Regular Inspection: A Preventative Measure
In order to maintain the aesthetic and functional qualities of your tile flooring, it’s best to inspect its condition regularly. Check for signs of water damage or loose tiles. By addressing such issues early, you save yourself from major repair costs down the line.
### Dealing with Loose Tiles
When you discover loose tiles during your inspection, it is essential to remove them so you can assess the underlying damage. This includes checking for any issues with the subfloor. Ignoring this could potentially escalate the problem and increase repair expenses.
• Fix Leaks for Damage Control
Before you replace damaged tiles, it is crucial to rectify any plumbing issues causing water leaks. Excess moisture from such leaks could lead to further tile damage. In fact, solving leaks ought to be a priority as they can damage not just the tiles but other building assemblies.
• Hire Professionals for Quality Tile Repair
Based on the complexity of the tile repair needed, hiring a professional could be highly beneficial. Professionals ensure a strong and water-resistant finish, as part of their expertise lies in waterproofing solutions. This ensures you a durable, high-quality repair job.
• Proactive Measure: Routine Cleanups
Proactively dealing with spills or leaks helps you avoid long-term damage to your tiles. Regular mop-ups and fixing water leaks in a timely manner is real care for your tiles. Remember, prevention is easier than cure.
• Grout Lines: Do They Need Sealing?
Yes, grout lines between tiles need to be sealed. This adds an extra layer of protection against water damage, hence extending the lifespan of your tiles.
• Choosing the Right Type of Tile
Choosing the right type of tile suitable to your specific circumstances is key. Non-vitreous, semi-vitreous, vitreous, and impervious are the most common types.
Your choice should be based on the location and the level of moisture exposure. For instance, showers would require a different type of tile compared to kitchen floors or bedroom floors.
• Perks of Regular Tile Care
With regular tile care and maintenance, one can avoid major repair work and enhance the longevity of tile flooring. Consistent care yields better results than sporadic, major cleanups.
• Seeking Professional Help for Tile Restoration or Repair
Repairing or restoring tiles is not a DIY-friendly task. It requires skill and experience to achieve an impeccable finish. Therefore, don’t hesitate to seek professional help. Experts have the knowledge and training to deal with a wide range of issues and would thus be able to provide the best possible results.
I recommend visiting the National Tile Contractors Association’s NTCA Reference Manual for further clarification. As a non-commercial site, it provides plenty of valuable information on best practices for tile repair and maintenance.
• Extent of Water Damage in Bathrooms & Its Consequences on Structure
Water damage occurring in bathrooms can majorly disrupt the structural integrity of the property. Structural damages are often in the form of distorted frames and flooring, cracks appearing in tiles and sealants, and ceilings/walls experiencing softening.
It’s essential to understand the damage caused by water as its impact tends to be much broader and more intense than one can imagine.
• Mold Growth, Water Damage & Health Risks
Water damage doesn’t limit its adverse effects on the property structures; it also serves as fertile ground for mold growth. Given their nature, bathrooms tend to have damp conditions, ideal for molds to thrive.
Besides aggravating structural damage, it also poses significant health risks. It is imperative to maintain clean and dry bathrooms to avoid mold growth and its consequent damage.
• Identifying Signs Of Water Damage
Identifying water damage may not always be clear-cut; it does often show some signs. One can associate a soft or sponge-like texture of the floor, moldy or musty odors, stubborn growth of molds or fungi, and damaged paint, dry walls, or tiles with water damage in bathrooms.
These signs guide towards the existence of water damage, which doesn’t make its presence obvious all the time.
• Hidden Water Damage
The damage caused by water is not always visible. Situations arise when water damage is present behind the walls and under the floors, away from our sight.
Hence, it’s crucial not to underestimate its impact based on its visibility. A proactive approach towards identifying and managing it can save significant trouble.
• Importance of Mold Inspection
Given the sneaky nature of water damage, it’s crucial to conduct a comprehensive mold inspection. Such inspections help assess the extent of damage and appropriately address it. Professional mold specialists can often show a clear picture of the damage, aiding in designing effective intervention strategies.
• Water Damage RepairDIY or Professionals
When it comes to repairing water damage in the bathroom, one might consider fixing drywalls or repairing floors. For minor damages, a Do-It-Yourself approach can work if the person is handy and has the necessary knowledge.
However, for more extensive damages, it’s recommendable to contact certified contractors who are equipped with the necessary skills and tools.
• Preventing Further Water Damage
Prevention always outpaces repair when it comes to managing water damage. It’s crucial to fix or replace missing, cracked, or broken tiles promptly, regularly inspect the floor for excess water, and check for leakage signs.
Regular inspection of the grout and sealant can save from costly repairs and extensive damage.
• More Preventive Measures
Further preventative measures include inspecting for leaking pipes or spouts, and signs of rot and decay, along with ensuring proper installation of drain covers. Good ventilation is a must to maintain dry conditions and mitigate the risk of mold growth.
According to the Centers for Disease Control and Prevention, proper ventilation can prevent mold growth, thus safeguarding the bathroom from potential water damage.
Remember, timely and effective actions can reduce the aftermath of water damage, making maintenance easy and hassle-free. Keep an eye on the vulnerable areas, maintain a repair schedule, and ensure proper ventilation for a fresh and dry bathroom free of water damage.
The Importance of Proper Protective Gear
Safety should always come first when undertaking vigorous tasks like repairing water-damaged bathroom flooring. When engaging in this task, protective gear is not negotiable. Leather gloves should be worn to protect your hands from sharp objects, abrasive materials, and chemical exposure.
Eye protection, too, is necessary to shield your eyes from tiny particles that might fly off during the demolition. A dust mask is also essential to prevent inhalation of harmful particles or molds that might be present.
• Necessary Tools and Materials
The right tool for the job will make all the difference. For this particular task, you will require a pry bar for booting up the old floor, a pencil and straightedge for marking, and a carpenter’s square for precise measurements.
Toilet repair materials, a drill, jigsaw, circular saw, hand saw, and paintbrush will also come in handy. Don’t forget your nails, wood joists, a tape measure, and construction adhesive.
Sharp tools will be needed to cut your plywood into size, and a belt sander will ensure smooth surfaces. Here is a trustworthy site to acquire some of these materials.
• Prepping Area for Demolition
Before demolition starts, the area should be clear of all removable items. This includes furniture, cabinets, and, significantly, the toilet. This helps to prevent unnecessary damage to items and ensures enough space for efficient work.
• Inspection: Understanding the Extent of Damage
A preliminary inspection is crucial to determining the severity of water damage. Such an exploration involves examining the toilet flange and inspecting the floor joists.
The presence of soft spots, discoloration, or sagging is an indicator of water damage. Aim to understand the extent of the devastation to plan your repair strategy effectively.
• Mold Treatment: A Pre-Requisite to Repairs
In most cases, water damage is likely to foster the growth of mold due to damp conditions. If these signs are visible, it’s mandatory to treat the mold before proceeding with the repairs.
Prolonged mold exposure poses significant health risks. If the mold infestation seems significant, I recommend seeking professional help. The EPA’s Mold Remediation Guide can offer useful information on this subject.
• React Promptly to Water Damage
One of the crucial aspects of dealing with water damage is response time. If water damage is noticeable, it’s imperative to take action immediately.
Leaving damaged sections unattended to will only exacerbate the problem over time, leading to further damage. The result is often more severe, costly repairs. Early intervention not only reduces repair costs but also limits the extent of water damage.
• Replacing Damaged Plywood
Damaged plywood will need to be cut out using a circular saw or jigsaw. To ensure a neat, fitting replacement, mark out the amputated area’s exact measurements on your new plywood before cutting it out. This process should be done carefully to avoid unnecessary waste or ill-fitting replacements.
• Rebuilding and Leveling the Floor
Once the damaged sections have been removed, its time to install new joists and plywood. Remember to use construction adhesive for better grip, and ensure the new joists align with the old ones. After laying down the plywood, make sure the surface is smooth and level by applying a floor-leveling compound.
• Finishing Touches
Once the floor is level, allow the leveling compound to dry before adding the final touches. This may include painting, varnishing, or sealing, depending on the flooring type. For better results, give the floor enough time to dry before restoring the cabinets and the toilet back into position.
When properly enacted, these steps will provide a reliable, long-term solution to water-damaged bathroom floors. Remember to regularly inspect the area for any signs of recurring damage.
Regular maintenance and immediate action, when required, will keep your bathroom floor solid and water damage-free for years to come.
Water Damage in Bathroom Floors and Walls
Water damage in your bathroom should never be underestimated. It’s not just about the visible issues you see on your bathroom floors; internal plumbing leaks lurking within walls or beneath the floor pose a risk too. Spotting the issue ahead of time is essential to prevent huge expenses later on.
– Detecting Water Damage in Bathroom Walls
Detecting water damage in bathroom walls may not always be straightforward. Evidence of water damage includes the presence of mold growth, peeling paint or wallpaper, and discoloration. If any of these symptoms are apparent, immediate action needs to be taken to rectify the situation.
– Regular Maintenance is Key
Maintaining your bath space regularly can go a long way in preventing potential water damage. Regular checks for leaks drips, or condensation around fixtures and pipes will help keep your bathroom in good condition.
Performing a timely inspection isn’t just essential for aesthetic purposes; it can save you from costly repairs as well.
• Bathroom Grout and Caulk Maintenance
One thing we often overlook is the importance of the grout and caulk in our bathrooms. Regular cleanings and checks for any breakage in the grout lines or caulk can save us from leaks and further damage. That’s why I recommend homeowners include this in their maintenance routines.
• Using Waterproofing Products for Bathroom Floors
Consider applying waterproofing products or coatings to your bathroom floors to shield them from potential water damage. These products work efficiently in preventing water penetration and are worth including in your bathroom maintenance arsenal.
– Importance of Proper Ventilation
Ventilation plays a vital role in maintaining good bathroom conditions. A well-ventilated bathroom can significantly reduce moisture levels, thereby preventing the growth of mold. So, make sure your bathroom contains a suitable vent or exhaust fan.
– Installation of Shower Pan Liners and Waterproof Membranes
Consider installing a shower pan liner or waterproof membrane beneath your tile floors. This seemingly insignificant upgrade can serve as a protective barrier against water leaks, safeguarding your bathroom from potential damage.
– Addressing Water Damage Promptly
Addressing water damage or leaks immediately is crucial to mitigate the risk of further damage. In addition, expeditious action will prevent the spread of mold or mildew, and uninvited guests that bring health risks along with them.
– Seeking Professional Help
Fixing minor leaks or cracks might seem manageable, but when it comes to more extensive water damage, don’t hesitate to call in the professionals. If you’re unsure of how to identify or handle the damage, having a professional contractor or plumber examine your bathroom is a safe bet.
– Common Questions about Water Damage
Water damage can surely lead to several questions, such as the potential for structural damage or health concerns related to the growth of mold. Homeowners should understand that neglected water damage can turn into structural harm over time, while exposure to mold can lead to various health issues.
– Useful Resources for Water Damage Control
For more detailed information and professional services available, the U.S. Environmental Protection Agency’s resources on indoor air quality and moisture control can be helpful. You can access those resources here.
• Unseen Water Leaks in Your Bathroom
One of the most insidious troublemakers in your bathroom is the water leak that goes unnoticed. Unfortunately, these leaks usually occur due to our bathroom piping being hidden behind walls or tucked away under the floor.
This ‘out of sight, out of mind issue is especially problematic given the volume of water that we put through our bathroom systems.
• How Our Water Usage Exacerbates Leaks
The Environmental Protection Agency (EPA) asserts that the average person consumes approximately 80 gallons of water per day in the bathroom.
Even a small leak within this large amount of water could have disastrous effects in the long run. A minor drip can quietly cause significant structural damage, as this report emphasizes.
• Dangers of Cracks and Gaps in Bathroom Flooring
One way in which this damage expresses itself is through the cracks or gaps in your bathroom flooring. The sealant meant to act as a water barrier can deteriorate over time. Once this happens, water is free to seep into these newly formed spaces, causing your wood to expand and warp.
• The Threat of Mold and Mildew
Another harmful consequence of bathroom water damage is the growth of mold and mildew. This type of fungus can thrive in damp and humid environments such as a leaky bathroom.
However, surface cleaning the visible mold won’t be enough. Mold spores can nest deep within your bathroom walls or flooring, so professional help may be required to fully eradicate the problem.
• Damages to Subfloor
One of the worst-case scenarios in bathroom water damage results when water invades your subfloor. This situation necessitates the removal and replacement of the damaged wood, a costly and labor-intensive task.
• Securing Your Bathroom from Water Damage
Based on the insights I’ve gathered over the years, I recommend regular maintenance and frequent checks on your bathroom area.
Thus, it’s better to consult professionally with a plumber if you suspect a leak, even a minor one, to avoid exacerbating the situation. Immediate attention to cracks or gaps in your flooring is also crucial.
In the case of mold and mildew, if you ever spot these uninvited guests in your bathroom, it’s time to call for professional help.
An expert can test your bathroom for mold and then remove it, ensuring it doesn’t return. Furthermore, if there is any suspected damage to your subfloor, immediate action should be taken.
In conclusion, prevention is always better than cure when it comes to water damage in your bathroom. Regular checks and maintenance can save you the headache of costly repairs and health risks associated with water damage.
Enlisting the help of a professional when needed can ensure the longevity of your bathroom and your peace of mind.
• Conducting a Thorough Mold Inspection
When facing a mold problem, the initial step is to conduct a thorough mold inspection. The severity of the mold damage varies; hence identifying the extent of the damage is crucial.
Additionally, it’s important to learn the proper ways of mold removal to be safe. I would recommend referring to the Environmental Protection Agency’s guide.
• Pre-repair Steps for the Bathroom
Before proceeding with any repairs, you have to prepare the bathroom. Start off by shutting off the main water valve to prevent any water mishaps during the repair. It’s also essential to move furniture and portable items out of the bathroom to ensure a hassle-free repair job.
• Minor Drywall Repairs
Equipment like a keyhole saw and a hammer comes in handy for repairing minor drywall damages. Utilizing these tools accurately and with patience can restore your wall without much hassle.
• Major Drywall Damage
However, if the drywall damage is major, it’s best to seek professional help. Certified contractors have the required expertise and equipment to handle significant repair work. They will ensure that your bathroom wall is restored perfectly and safely.
• Dealing with Debris on the Bathroom Floor
It’s vital to have a clear working space when undertaking repairs. Remove all debris from the bathroom floor before repairing or replacing your flooring.
• Installing New Fixtures
Once your walls and floor are in shape, it’s time to install new fixtures. Items like toilets, cabinetry, sinks, and shower heads give your bathroom an updated look and superior functionality.
• Managing Damaged Tiles
Any damaged tile, be it missing, cracked, or broken, can potentially lead to future water damage. Therefore, repairing or replacing such tiles promptly is highly recommended.
• Regular Bathroom Inspections
Regular bathroom inspections are the key to maintaining its condition. Check for signs of leaks, damaged grout, sealant, as well as leaking pipes or spouts. This will help you identify any problem early on, saving you from hefty future repairs.
• Watch Out for Rot and Decay
In addition to your regular cleaning routine, look out for signs of rot and decay. Often, these signs are subtle, but if left neglected, they can lead to serious structural issues.
• Consider Drain Covers
Installing drain covers is an excellent measure to avoid possible blockages. These covers help catch debris that might otherwise clog your drain and cause unnecessary damage and repair costs.
• Importance of Ventilation
Ventilation plays a crucial role in maintaining a bathroom’s condition. Proper ventilation reduces moisture and humidity, which are key factors in creating an ideal environment for mold growth. Therefore, ensuring good ventilation is essential.
Keeping your bathroom in optimum condition requires diligence and regular maintenance. And while this guide provides useful advice, always remember that seeking professional help when needed will never go amiss.
Commonly Utilized Bathroom Flooring
There exists a wide range of flooring materials typically employed in bathrooms. Among the most predominant ones are ceramic tiles, porcelain tiles, vinyl flooring, and cork flooring. Each of these selections provides different benefits.
Ceramic and porcelain tiles, for instance, are renowned for their durability and water resistance, a crucial characteristic for bathroom settings that are often wet.
Vinyl flooring, on the other hand, is recognized for its affordability and diverse range of available designs. Cork flooring has gained popularity because it’s eco-friendly and comfortable underfoot.
• Bathroom Water Damage Repair Costs
Costs associated with water damage repairs or replacements can vary considerably. This discrepancy is due largely to factors such as the extent of the damage, the type of flooring installed, and whether or not professional assistance is required.
For instance, fixing a minor leakage on vinyl flooring may be less costly than replacing severely water-damaged cork flooring. It underscores the importance of soliciting professional advice to fully understand the financial scope of fixing water damage.
• Preventing Water Damage
The good news is water damage in the bathroom can often be mitigated by regular upkeep and inspections of plumbing fixtures.
Addressing tiny leaks and clogs promptly can also go a long way in forestalling significant water damage. It’s all about staying proactive rather than reactive when it comes to bathroom maintenance. This regular upkeep can save homeowners from costly repairs down the line.
• Dealing with Moisture Build-up
Bathrooms are naturally humid due to activities such as showering. This constant moisture build-up – if not properly ventilated – can lead to water damage over time. To prevent this, homeowners can install proper ventilation systems or dehumidifiers in their bathrooms.
These installations, when used consistently, can significantly help manage the level of humidity, subsequently preventing potential water damage and costly repairs.
• Health Risks and Safety Precautions
Water damage in the bathroom has potential health risks associated with it, such as the growth of mold and mildew. Mold, for example, has been linked to respiratory problems, headaches, and other health risks (Centers for Disease Control and Prevention).
Therefore, it is important to take necessary precautions to ensure that your bathroom remains dry and safe. Regular cleaning, the use of mold-resistant products, and ensuring good ventilation can significantly help in mitigating these health risks.
• Insurance Coverage for Water Damage
To deal with the financial implications of water damage repairs, homeowners often resort to their insurance coverage.
It’s, however, important to note that policies vary dramatically across different insurance carriers. Therefore, homeowners should regularly review their policies to understand the extent of their coverage.
• Addressing Subfloor Damage
In extreme water damage situations, it may not be enough to just remove and replace the bathroom’s surface flooring.
Sometimes, if the subfloor has been compromised, it will also need to be removed and replaced to ensure the long-term stability of the newly installed flooring and to prevent future water damage. It’s better to seek professional advice on the condition of subflooring following severe water damage.
• Regular Checkups for Plumbing Fixtures
It’s recommended to punctually inspect your plumbing fixtures. A simple step such as this, if carried out routinely, could alert homeowners to possible leaks or clogs in the system.
This allows for timely resolution of such issues before they escalate into major water damage. The Environmental Protection Agency’s WaterSense program has more information on efficient water use, which may help extend the life of your bathroom fixtures.
Throughout homeownership, proper attention to plumbing fixtures, flooring, and proper ventilation can prolong the life of a bathroom and decrease the likelihood of water damage.
By being proactive and getting professional advice, homeowners can save significant amounts of money on repairs and replacements and continue to have a safe and comfortable bathroom environment.