Water Damage Plaster Wall. Tips from Professionals
Have you noticed any strange stains, bubbling or flaking on your plaster walls? Following a flood or a busted pipe, water damage is a regular issue that causes the paint on your plaster walls to chip, crack, and discolor. While it may appear to be innocuous at first, it is critical to address the issue before the problem elevates. Ignoring water damage on your plaster wall can result in costly repairs and even structural damage.
Water Damage Plaster Wall
Before repairing the damaged plaster wall, first fix the cause of the leak, clean the affected surface and ensure it is completely dry. If the area is larger, replacing the old damaged plaster with a fresh layer makes sense. Prime and seal the surface to block the bleeding stains. When fully dry, you can paint the plaster.
In this blog post, I will explain how to fix a water-damaged plaster wall or ceiling in more detail. Including how to know if your ceiling has water damage and how to fix a water-damaged cement wall.
Contents
- 1 Can you repair water damage plaster wall?
- 2 How do you know if your ceiling has water damage?
- 3 How do you treat water-damaged plaster?
- 4 How to Repair Water Damaged Plaster?
- 5 How do you fix a water-damaged ceiling?
- 6 Does water-damaged plaster need replacing?
- 7 Do plaster walls hold moisture?
- 8 Bubbling plaster walls
- 9 How to repair water damaged cement wall
- 10 The Impact of Water Damage on Plaster Walls
- 10.1 • Identifying and Fixing the Cause
- 10.2 • The Importance of Drying the Affected Area
- 10.3 • The Need for Plaster Removal and Replacement
- 10.4 • The Role of Primer-Sealer
- 10.5 • Uncovering the Causes of Water Damage on Ceilings
- 10.6 • Signs of Water Damage on Ceilings
- 10.7 • The Process of Repairing Damaged Ceilings
- 10.8 • Mold Growth on Water-Damaged Plaster Walls
- 10.9 • Controlling Moisture on Plaster Walls
- 10.10 • Bubbling Plaster Walls as a Sign of Water Damage
- 10.11 • Approaching Water-Damaged Cement Walls
- 10.12 • Techniques to Restore Cement Walls
- 10.13 • When Replacement of Plaster is Necessary
- 10.14 • The Moisture Retention of Plaster Walls
- 10.15 • Importance of Regular Maintenance
- 10.16 • Understanding Plaster Walls
- 10.17 • Key Signs of Water Damage on Plaster Walls
- 10.18 • Efflorescence as a Warning Sign
- 10.19 • Mold Infestation on Plaster Walls
- 10.20 • Professional Treatment for Damaged Plaster Walls
- 10.21 • Responding to Damaged Plaster Walls
- 10.22 • Assessing the Water Damage
- 10.23 • Removing Damaged Plaster
- 10.24 • Preparing the Area
- 10.25 • Priming the Area
- 10.26 • Repairing the Plaster
- 10.27 • Cleaning, Priming, and Painting
- 10.28 • Seeking Professional Assistance
- 10.28.1 – Health Implications of Water Damage on Plaster Surfaces
- 10.28.2 – Detecting Water Damage: The Unmistakable Signs
- 10.28.3 – The Dangers of Mold and Micro-organism Proliferation on Plaster
- 10.28.4 – The Importance of Addressing the Underlying Cause of Water Damage
- 10.28.5 – Recommendation: John Canning & Co for Plaster Restoration and Repair
- 11 The Dangers of Water Damage to Plaster Boards
- 12 Assessing Water Damage
- 13 Visual Inspection of Water Damage
- 13.0.1 – Removing Damaged Plaster
- 13.0.2 – Brushing off Loose Particles
- 13.0.3 – Cleaning the Surrounding Area
- 13.0.4 – Application of Primer-Sealer
- 13.0.5 – Repairing the Area with Joint Compound
- 13.0.6 – Sanding for a Smooth Finish
- 13.0.7 – Priming and Painting the Wall
- 13.0.8 – When to Contact Professionals
- 13.1 • Safety in Water Damage Repair
- 13.2 • Final Thoughts
- 13.3 • Effective Drying Techniques For Water-Damaged Plaster Walls
- 13.4 • A Reliable Plaster Restoration/Repair Contact
- 14 A Comprehensive Guide to Repairing Water-Damaged Plaster
- 14.1 • The Destructive Effects of Water on Plaster
- 14.2 • The Hidden Menace Beneath the Surface
- 14.3 • The Process of Repairing Water-Damaged Plaster
- 14.4 • When is the Complete Removal of the Damaged Wall Necessary?
- 14.5 • The Importance of Addressing Water Leaks Early
- 14.6 • The Need for Timely and Professional Repair
- 14.7 • Conclusion
- 15 The Importance of Identifying the Source of Water Damage
- 16 Addressing Existing Water Damage
- 17 Water Damage to Plaster Walls
- 17.1 • Addressing the Source of the Leak
- 17.2 • Repairing or Replacing Damaged Plaster
- 17.3 • Priming and Sealing the Surface
- 17.4 • Remedying Persistent Water Stains
- 17.5 • Importance of Drying Before Painting
- 17.6 • Evaluating the extent of Water Damage
- 17.7 • The Effect of Humidity on Plaster Walls
- 17.8 • Indicators of a Larger Underlying Problem
- 17.9 • Repairing Water-Damaged Cement Walls
- 17.10 • Applying a Finish
- 18 Addressing the Cause of the Leak
- 18.1 • Importance of Ventilation
- 18.2 • Removing Cracked Plaster
- 18.3 • Use of Primer
- 18.4 • Cleaning and Drying Prior to Applying Patching Compound
- 18.5 • Addressing the Source of Water Damage
- 18.6 • Additional Tips on Repairing Water-Damaged Plaster
- 18.6.1 – Essential Tools for Plasterboard Repair
- 18.6.2 – Perfect Finishing For Plasterboard Repair
- 18.6.3 – Replacing Drywall Section – An Alternative Approach
- 18.6.4 – Check for Potential Mold Infestation
- 18.6.5 – Moisture Management – The Essential Precaution
- 18.6.6 – Proper Drainage For Wet Walls Prevention
- 18.6.7 – Damaged House Drainage – A Potential Threat
- 18.6.8 – Addressing Leaks in Walls Efficiently
- 18.6.9 – Providing a Smooth Finish to Cement Wall
- 19 Identifying and repairing water damage on plaster walls
- 20 Assessing Water Damage on Plaster Walls
- 21 Assessing Water Damage on Plaster Walls
- 21.1 • Removing Damaged Plaster
- 21.2 • Cleaning the Affected Area
- 21.3 • Accelerating the Drying Process
- 21.4 • Preparing the Wall for Repairs
- 21.5 • Repairing Damaged Plaster
- 21.6 • Sanding and Drying
- 21.7 • Repeating the Process for Lasting Repairs
- 21.8 • Painting Repaired Plaster Walls
- 21.9 • When to Seek Professional Help
- 21.10 • Recognizing Water Damage in Plaster Walls
- 21.11 • The Alarm Bell: Efflorescence
- 21.12 • Loose or Flaking Paint: Another Indicator
- 21.13 • Mold Infestation: A Serious Concern
- 21.14 • Facing The Consequences of Water Damage
- 21.15 • Diagnosing the Cause Before Repairing Damaged Plaster
- 21.16 • Hiring Professional Services for Water Damage Restoration
- 21.17 • Impact of Storm Season on Plaster Board
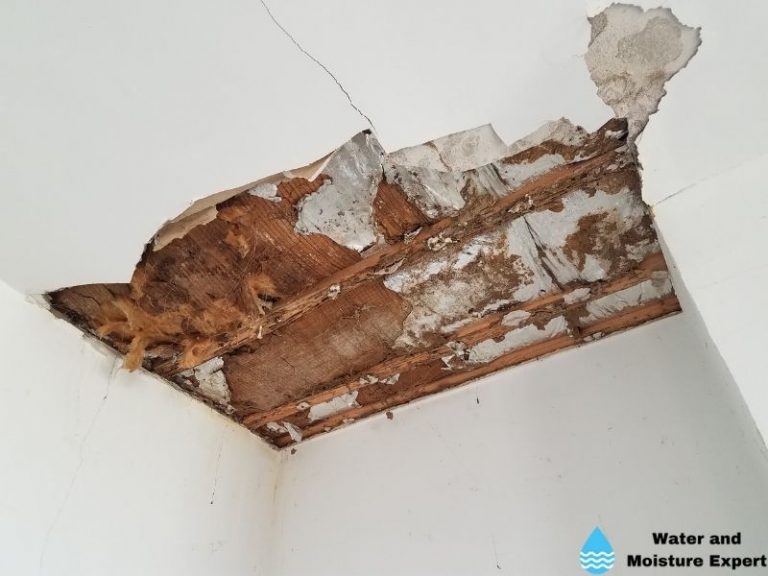
- 21.18 • How Water Damages Plaster Board
- 21.19 • Damage to the Wooden Structure
- 21.20 • Plaster Repairs: The Beginning
- 21.21 • Removal of Damaged Plaster Board
- 21.22 • Priming and Sealing
- 21.23 • Applying a New Coating of Plaster
- 21.24 • Importance of Color Matching
- 21.25 • Smoothing Down the Surface
- 21.26 • Handling Severe Plaster Damage
- 21.27 • Importance of Prompt Action
- 21.28 • Professional Services for Plaster Repairs
- 21.29 • Professional Help for Proper Property Restoration
Can you repair water damage plaster wall?
A water-damaged plaster wall can be fixed by following a few simple steps. First, ensure that there are no leaks. Attempting to repair the plaster if water is still (now or later) coming through the wall or ceiling will result in failure and more damage. If the damage is small, you can let the plaster wall dry. If needed, you can fix small areas with some fresh plaster and sand them to get a flat end result. If the damage covers a larger area, I recommend removing the plaster and adding a fresh layer.
Make sure that the plaster wall has dried entirely. Painting over a damp plaster wall will leave unsightly streaks when the water evaporates. To speed up the drying process, you can use a fan together with proper ventilation. Using a dehumidifier is also an excellent option, but I recommend using a professional one. You can rent those in many hardware stores.
When the wall is dry, remove any cracked plaster and replace it with a new layer. If the plaster wall still shows water stains, I recommend using a suitable primer. This primer will form a barrier between the plaster, the old paint, and the new paint. It ensures that the water stain does not show on the new paint.
How do you know if your ceiling has water damage?
Damage on your ceiling can be easy to spot in case of apparent signs such as drips of water through cracks in the ceiling. In other cases, a ceiling leak can also show itself in ways that are more difficult to identify, such as musty odor or insect infestations.
Other common signs of water damage on your ceiling are:
- Discolored spots, which can be copper, yellow, or brown
- A bulging drywall
- Peeling, cracking, or bubbling on your wall surfaces
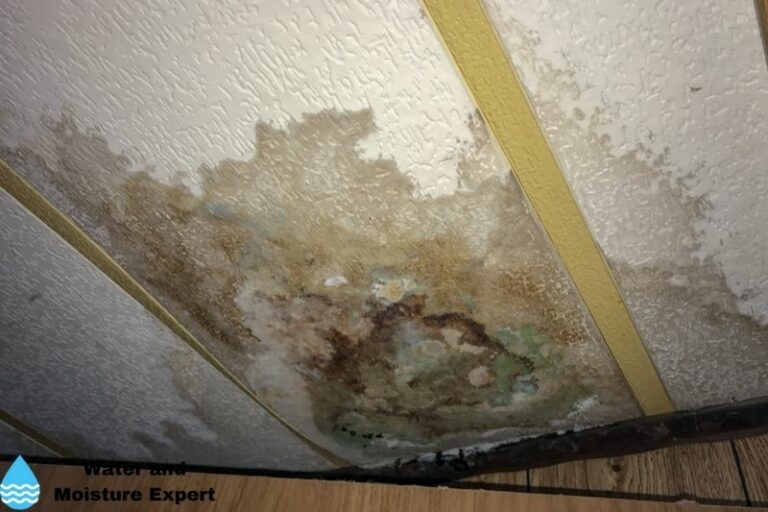
- Discolored growths
- Water stains on your ceiling
- A sagging ceiling
- Mold
Most of these ceiling water damages are chronic rather than one-time or isolated incidents. The leak indeed passes through the ceiling, but it is also possible that it will continue to leak and drop down to the walls. Ensure that you find the reason for the leak and fix it. If a leak stops by itself, it can restart by itself later.
How do you treat water-damaged plaster?
The best way to treat water-damaged plaster is first to clean and dry the wall or ceiling. After drying, coat the area with a quick-dry primer-sealer. This will form a layer that blocks any residual contamination and prevent water stains from bleeding through the new paint.
If you fail to use a primer, the freshly applied paint may peel off quite soon since the area absorbs it pretty fast. Applying a good primer will seal your damaged plaster effectively as you work on it.
How to Repair Water Damaged Plaster?
Water damage to plaster is common, especially in older homes. The material is susceptible to moisture, and any unrepaired leaks can be problematic. If the water damage is local and small in size, you could try to let it dry. Patch places that are damaged. If the area is larger, it will be better to remove it and plaster it again.
If you paint over a water-damaged surface, the stains will resurface once the paint has dried. This is because moisture evaporates considerably slower than oil-based paints, and the droplets are confined inside the paint coat and cannot escape.
Before applying new paint or wallpaper, you must first remove any residual moisture. Otherwise, it will be a temporary remedy until the water leaks and causes similar damage again.
● Fix Leakages before further work
It is imperative to note that if the dampness on your ceiling is left to dry, the stain will resurface after some time. This is why you must first ensure that the water source problem on the ceiling has been appropriately resolved. Otherwise, it will simply be a time-consuming delaying tactic until the water starts leaking again.
● Costs of Replacement
While plaster restoration is useful, it is also time-consuming and costly, and not everyone has the needed skills. Repairing a broken area of plasterboard is a fairly straightforward and inexpensive procedure if you have free access to the ceiling hollow. If you can’t get to the damaged part of the ceiling, the second option is to replace a whole section of drywall.
● Check for Moisture
Plaster walls are quite durable and should last for many years. But if the wall becomes moist, the plaster may begin to disintegrate. It can also lead to mold that is not good for your health. Removing mold can be challenging. If you do not know how to remove it, I always recommend asking a professional for help. Examine your walls and ceilings regularly for moisture to help you discover problems soon enough.
How do you fix a water-damaged ceiling?
To fix a water damaged ceiling, you should follow a few steps:
● Step 1: Remove the stain
Water damage frequently causes indentation areas in plaster or paint. Particular at locations where water has stayed for long periods. These indentations are ugly and must be repaired before painting can begin.
The Best Way to remove stains from Plaster Surfaces
Use the following tips to clean plaster:
- Be careful with water: Do not use a lot of water to clean a plaster surface. Plaster is a porous material, and it can further damage if a lot of water is used.
- Soft, moist cloth: Use a moist, soft cloth. Soak a soft cloth in warm water and thoroughly squeeze.
- Use mild soap: To better remove stains, you can use some mild soap on your cloth.
- Circular motion: Always use work from top to bottom and in a circular motion.
- Bleach solvent for tough stains: You can use a homemade bleach solvent for tough stains. Mix three cups of water with one cup of bleach. This will fade more tough stains. It also has the added benefit of removing lingering mildew.
● Step 2: Apply a patching compound
Use a patching compound to conceal flaws in your ceiling’s corners and seams. Do not attempt to repair your ceiling without first laying a coat of primer. This will close any gaps or fissures that were opened during the repairing procedure. Allow the patching material to dry fully before you continue with the painting.
● Step 3: Paint the ceiling
You can start painting if all the fixes are done, and the ceiling is dry. Ensure that the ceiling is clean and spots with water damage are treated with a suitable primer. The primer will form a layer between the water stain and the new paint. Else the water stain may also be visible on the new paint.
Does water-damaged plaster need replacing?
If the water damage is local, small in size, and quickly found, you first try drying it. If the damage is more severe, you might need to replace it. Always ensure first that the source of the water has been found and fixed.
Always check that there is no mold. Mold can start quickly and can spread. Removing mold before further work is essential. If you do not know how to do this, I recommend asking a professional for help.
Do plaster walls hold moisture?
Plaster walls can hold moisture. Plaster is primarily made of gypsum and water, making it fragile and easy to get damaged. Additionally, mold can develop quickly on plaster walls, especially when the surfaces are moist. Moist and high humidity levels are perfect breeding grounds for mold.
Unfortunately, plaster walls cannot naturally prevent moisture from entering through cracks or holes. As a result, plaster walls are prone to moisture retention.
To manage trapped moisture on your plaster walls, open windows as often as possible to allow the moisture to escape. Besides, you can also use a fan to help remove excess moisture in situations where the moisture levels are too high.
You can use a dehumidifier, but I always recommend renting commercial dehumidifiers. They can remove a lot more water per hour than a residential dehumidifier.
A dehumidifier pulls in the moisture from the air and dries it out to release dry air back into the room. When used with a fan, this can be highly effective at drying out the drywall quickly.
Bubbling plaster walls
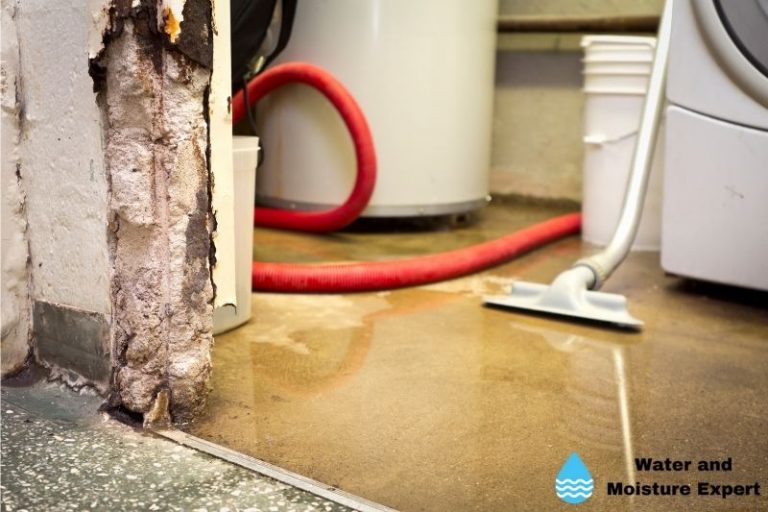
If you have a bubbling wall, you must act promptly before the situation worsens. For a concrete floor, you will need to repair the damp-proof course (DPC) around the perimeter of your property as well as the sub-floor ventilation. If this is not handled, it may lead to more serious problems.
To avoid bubbling plaster, install a suitable drainage system that allows all rainfall or snow meltwater to flow away from the home rather than through the walls. You should also check for cracks on the outside of your house that enable rainfall or snow meltwater to enter.
If you see damp spots on your ceilings and walls from your cellar, there is likely an issue with your house drainage system. If you do not have a drainage system, I recommend considering one. If you do have a drainage system, check that it is not clogged.
If you have a drainage system that uses a sump pump, it could malfunction. In those cases, it can be caused by a defective sump pump or a shoddily built DPC. If you think it is the latter, I recommend that you seek help from specialists who understand how to resolve this problem once and for all.
How to repair water damaged cement wall
If you follow the proper steps, fixing a water-damaged cement wall does not have to be complicated. There are several methods how to repair it affordably.
Use the following steps to repair damages to your cement wall:
● Step 1: Identify the source of the water damage and fix it
In most situations, a pipe or gutter has been damaged or removed from its location, allowing water to flow where it should not go. Determine the exact spot where the water is entering, and fix it. Remember that water leaks do not stop by themselves. In some situations, a drain or gutter that is blocked can be the culprit.
● Step 2: Repair leaks and holes on your wall using hydraulic cement
When you are sure the water source is fixed, you can continue repairing leaks and holes in your wall. If your wall has a drywall finish, remove it from the damaged parts. To fix leaks and holes, you need some sand and cement. This will be readily available at your local hardware store.
You can also use a premixed version, often available in smaller quantities. That way, you do not have to mix cement and sand. You can also use quick cement if available. If you purchase the sand and cement separately, mix them at a 1:3 ratio until they blend well.
Add water when you are ready to start the work. I recommend not to make it very fluid, which will make it more challenging to do the repair. If you added too much water, add more of the sand/cement mixture until you reach the required thickness.
● Step 3: Patch up cracks on your cement wall
When the holes are fixed, you can repair the cracks. For this, you can use products like as Quick-Crete. Patches should be as smooth as possible. Remove any excess material.
● Step 4: Apply a finish if needed
If you prefer to cover your cement wall with drywall, ensure the whole wall is dry. You can use a putty knife to apply drywall paste to your mended area and wait for it to cure before softly sanding it down with finer grits until it smoothens. For improved adherence over paint, put two coats of priming coat over your affected area.
The Impact of Water Damage on Plaster Walls
Water damage can impose significant harm on plaster walls. When this occurs, it typically weakens the structure, which can lead to further issues if it remains unaddressed.
• Identifying and Fixing the Cause
Before you can repair the plaster wall, it’s vital to ascertain and rectify the root cause of the water damage. Doing so ensures that damage will not recur once the wall is repaired.
• The Importance of Drying the Affected Area
Thorough drying forms a crucial step in addressing water damage. This process should be completed before carrying out any repairs or painting. For detailed guidance on drying processes, you can visit the EPA’s guide on Mold Remediation.
• The Need for Plaster Removal and Replacement
In cases where the water damage is extensive, removal and replacement of the damaged plaster may be necessary. This step requires professional input to guarantee safety and avoid further damage to your property.
• The Role of Primer-Sealer
With primer-sealer application, you can block any residual contamination and prevent water stains from seeping through the new paint. This product serves as a barrier, inhibiting the spread of underlying stains.
• Uncovering the Causes of Water Damage on Ceilings
Water damage inflicted on ceilings may originate from numerous factors. These include leaks from pipes or roofs and excessive humidity levels within the property.
• Signs of Water Damage on Ceilings
Indicators of water damage on your ceiling might encompass discoloration, bulging, peeling or mold growth. The appearance of any of these signs calls for immediate attention.
• The Process of Repairing Damaged Ceilings
When it comes to repairing and painting the ceiling, conducting thorough cleaning and drying of the affected area is fundamental to a successful restoration effort.
• Mold Growth on Water-Damaged Plaster Walls
Plaster walls impacted by water damage can retain moisture and subsequently become susceptible to mold growth. This not only causes unsightly discoloration and odors but can also affect indoor air quality and cause health issues.
• Controlling Moisture on Plaster Walls
One can manage the moisture on plaster walls through proper ventilation. Equipment like dehumidifiers can draw excess moisture from the air, or for larger areas, consider renting a commercial-grade dehumidifier.
• Bubbling Plaster Walls as a Sign of Water Damage
Bubbling on plaster walls often indicates water damage. Swift action must be taken to resolve this issue, as delays can lead to more severe problems down the line.
• Approaching Water-Damaged Cement Walls
Repairing cement walls afflicted by water damage is a two-step process: firstly, identifying and fixing the source of the water damage, followed by repairing the wall itself.
• Techniques to Restore Cement Walls
A practical method for patching holes and cracks in cement walls involves using hydraulic cement. This type of cement sets and hardens incredibly quickly, making it ideal for repairing leaks in walls.
• When Replacement of Plaster is Necessary
In cases where the water damage is severe or if the presence of mold is evident, the damaged plaster may need to be entirely replaced.
• The Moisture Retention of Plaster Walls
Plaster walls are highly susceptible to absorbing and retaining moisture. Ongoing moisture retention can cause additional damage to the plaster wall.
• Importance of Regular Maintenance
Regular maintenance and inspections help in identifying and addressing moisture issues on plaster walls early. This proactive approach can potentially save you significant time, money, and headaches in the long run.
• Understanding Plaster Walls
Plaster walls represent a classic construction method. They consist of a wooden lath layer covered in thin plaster, an approach known for its durability and aesthetics. However, professional attention would be required to maintain these walls.
• Key Signs of Water Damage on Plaster Walls
One common repercussion of water damage on plaster walls is the presence of dripping paint stains. These typically appear near wall breaks, such as around windows or near ceilings. If you notice such stains, you should become vigilant about potential water damage.
Furthermore, plaster walls that begin to experience water damage will showcase loose or flaking paint. This can be attributed to the plaster behind the paint getting wet and separating. Hence, look out for such signs to prevent further damage to your walls.
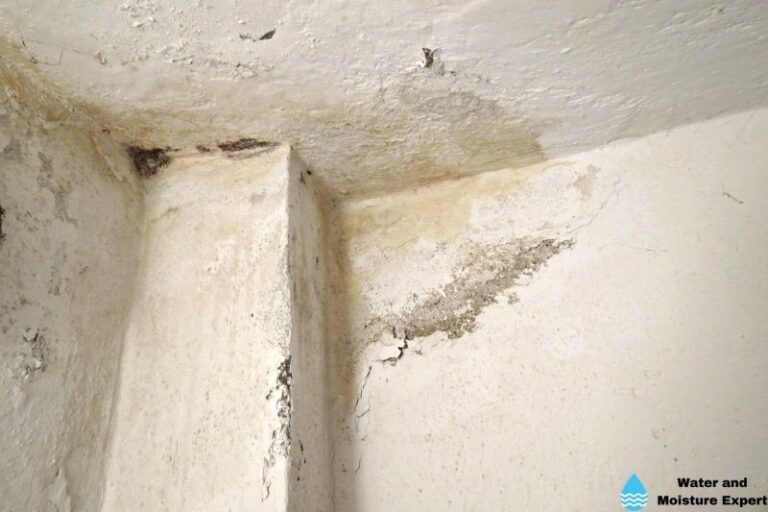
• Efflorescence as a Warning Sign
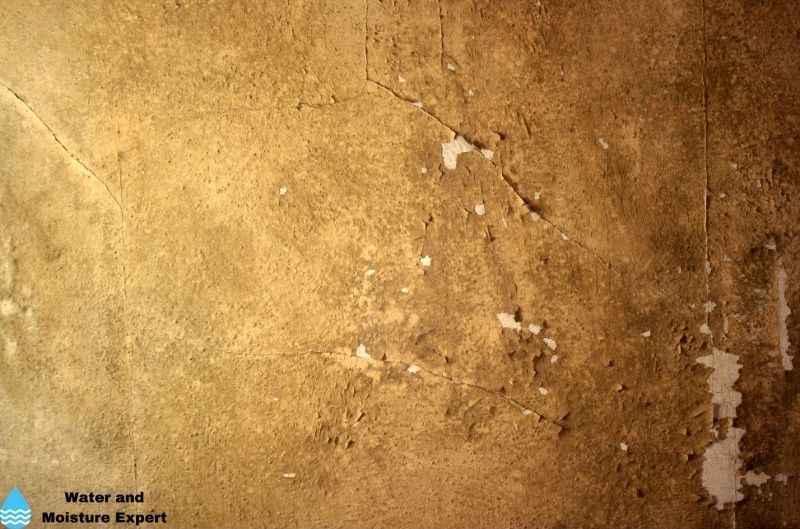
The formation of a white powdery material known as efflorescence could also be an indicator of excessive moisture in your plaster walls.
This occurs when the material inside the masonry dissolves into water. If you come across efflorescence, it would be wise to take necessary action before things get out of hand.
• Mold Infestation on Plaster Walls
Prolonged or repeated moisture in plaster walls could also result in mold infestation. Such molds are not only unsightly but also pose health risks. Should you find any mold, professional mold remediation might be necessary to restore your living or working environment?
• Professional Treatment for Damaged Plaster Walls
Before getting into any repair activities, it is critical to address the fundamental source of moisture. Failure to do so might cause frequent occurrences of the same problems. Professional services like Restore Pro offer water and mold damage remediation that could help restore your plaster walls.
• Responding to Damaged Plaster Walls
In the event you realize any of these symptoms in your plaster walls, it is highly recommended to take immediate action. Seeking the help of professionals such as contractors ensures that the problem gets tackled from the root cause.
Keeping track of and maintaining your walls’ condition helps in preserving the well-being of your habitation. Regularly check for the above signs, and in case of any, contact a professional to examine and treat the damage.
While plaster might require some regular upkeep, the raw appeal and sturdy nature it provides make every effort worthwhile.
For more advice on how to identify and handle water damage, you can refer to this guide from the U.S. Department of Energy’s Office of Energy Efficiency and Renewable Energy, a reliable .gov source.
• Assessing the Water Damage
Water damage is often more than what meets the eye. Therefore, the first step in water damage repair requires us to inspect the damaged location visually.
By doing so, we can determine how deep the damage has penetrated. Be meticulous and check if it has affected the underlying wood or metalwork. In many cases, water may seep into deeper layers, leading to issues like rot in wood structures or rust on metalwork.
• Removing Damaged Plaster
Once we know the extent of the damage, we can begin to address it. This process starts with gently removing any apparent defects. Use a putty knife to scrape away bubbling, flaking, or peeling plaster.
In case of serious damage, a more heavy-duty blade may be required to extract soft material. Remember to act delicately to prevent causing further damage.
• Preparing the Area
Next, work on the surrounding area by removing loose paint. This ensures better adherence to primer and paint layers you’ll apply later. A stiff brush is an ideal tool for cleaning off loose plaster particles.
Once done, it’s time to clean the entire area with a sponge soaked in clean water. Let the wall dry completely before proceeding. A blowing hairdryer can expedite the drying process.
• Priming the Area
Before proceeding with the main repair, it’s important to block any residual contamination. Applying an oil-based primer-sealer serves this purpose and prevents the bleeding of stains. After applying this layer, leave it to dry for approximately an hour.
• Repairing the Plaster
Now, it’s time to repair the plaster using a joint compound. Start by applying thin layers of this compound and skimming off any surplus.
The trick is to spread it evenly to ensure a smooth texture. Expect this compound to take a while to dry. Once dry, sand it down to create an even and level surface. Here’s a valuable resource provided by Washington State University detailing the right way to use a joint compound.
• Cleaning, Priming, and Painting
Once sanded, clean off the excess dust using a damp cloth before priming the patch again. This prepares the area for painting. Ensure that the primer is thoroughly dry before you begin the painting. Remember, the goal is to make the repair using paint that makes the repair invisible.
• Seeking Professional Assistance
While these tips can help handle minor to moderate areas of water damage, large-scale or severe damage might be too much to handle for a typical DIY enthusiast. In such situations, it is advisable to hire professionals.
Professionals specializing in repairing water-damaged plaster walls bring their expertise and knowledge to manage even extensive damage efficiently. Don’t hesitate to seek professional help whenever it seems more practical and feasible.
With these steps in mind, you can effectively deal with water-damaged plaster walls and restore them back to their original look and strength.
Regular maintenance and timely repairs can significantly enhance the lifespan of these walls. So act promptly and prudently whenever you notice signs of water damage.
– Health Implications of Water Damage on Plaster Surfaces
Water damage on plaster surfaces is more than just an aesthetic issue; it’s a health concern. These damaged surfaces often become breeding grounds for mold and micro-organisms.
When mold grows on plaster, it releases spores that circulate in the air. Breathing in these spores may cause respiratory problems, allergies, and other health issues.
According to the World Health Organization, indoor dampness (which can be caused by water damage) promotes the proliferation of molds and mites, potentially leading to respiratory diseases such as asthma and symptoms such as rhinitis and wheezing.
Correcting the water damage can thus help safeguard your health.
– Detecting Water Damage: The Unmistakable Signs
Efflorescence on masonry surfaces is one of the telltale signs of water damage. This phenomenon manifests as white or greenish crystalline salt deposits indicative of water intrusion. If you observe efflorescence, expert consultation is essential to determine the extent of the water damage.
Another symptom of water damage is peeling or flaking paint on plaster walls. Water-logged plaster can cause paint to lose adhesion, leading to bubbling or flaking.
It’s tempting to repaint or re-plaster these areas, but this only conceals the problem. Engaging professionals ensure the root cause of the water damage is addressed and adequate repair procedures are implemented.
– The Dangers of Mold and Micro-organism Proliferation on Plaster
The prolonged dampness resulting from unrepaired water damage leads to the proliferation of mold and microorganisms on the plaster.
These biological hazards are more than unsightly; they are harmful to our respiratory health, particularly in people with existing respiratory conditions or compromised immune systems.
Elimination of mold and micro-organisms on plaster isn’t a task for household cleaning agents. Especially for disturbing large quantities of mold, professional removal, and treatment are essential. Follow the guidelines from the Environmental Protection Agency (.gov) on mold remediation in homes.
– The Importance of Addressing the Underlying Cause of Water Damage
Before even considering repairing the plasterwork after water damage, it’s crucial to identify and treat the underlying cause.
For instance, if a leaky plumbing system or faulty roof drainage is causing water damage, these systems need to be repaired or replaced first. Only then subsequent restoration of plaster surfaces can be permanent and effective.
– Recommendation: John Canning & Co for Plaster Restoration and Repair
In the unfortunate event that you face water damage and subsequent plaster issues, John Canning & Co. comes highly recommended.
Their professional expertise helps ensure proper treatment and restoration of damaged surfaces, giving you the peace of mind of knowing that your home is once again safe and beautiful.
The Dangers of Water Damage to Plaster Boards
Water damage is one of the most common culprits that wreak havoc on plasterboards. Not attended to immediately, water damage can lead to the growth of harmful mold. This can be a serious risk to both your home’s structure and your health.
• How Does Water Damage Cause Harm?
The damage begins when water seeps into the plaster and is not properly dried. Water can leave behind moisture which promotes the growth of mold. More than just a nuisance, black mold exposure has been linked to numerous health issues like respiratory troubles and allergic reactions.
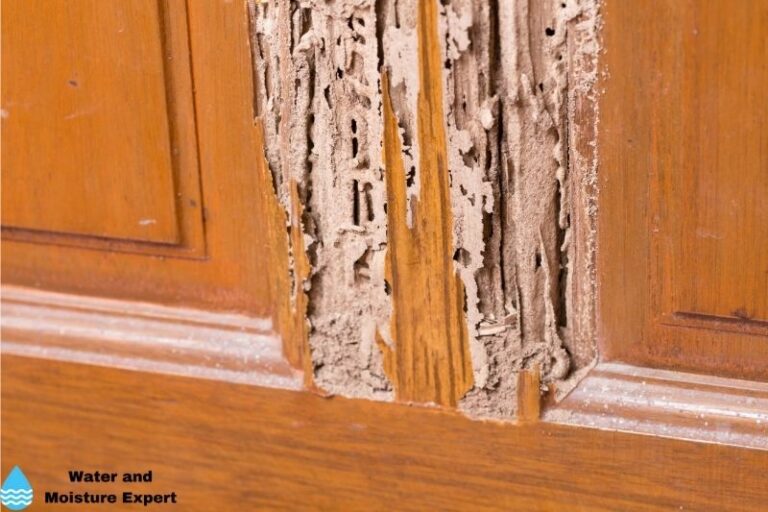
Not just health risks, but once water successfully invades the plasterboards, it can also cause structural problems. As mentioned, water can seep down to the wooden structure beneath the plaster, leading to additional problems. This can weaken the wood, leading to visible cracks in the plaster.
• How Do You Repair Plaster Damages?
Thankfully, plaster damages can be rectified and if acted upon immediately, further damage can be prevented. The repair process is multi-stage but reasonably straightforward:
- First, identify the source of the leak and solve it. This might vary depending on the specific circumstances of the water damage.
- Scrape off the affected plaster. Be careful in this process; you do not want to cause more damage.
- Apply a primer sealer to the damaged area. This provides a good base for the new plaster.
- Apply a new patch of plaster onto the damaged area.
- Lastly, smooth down the surface to match the rest of the wall.
Acting swiftly in repairing these damages is crucial. Find the source of the leak as soon as you spot a problem. Neglecting plaster repairs can cause extensive, costlier damage down the line.
• When is Plaster Board Replacement Necessary?
In severe cases, plaster repairs might not be enough. Water can cause irreversible damage, especially if left unattended for a long time. When this happens, plaster board replacement might be the only viable option.
• Should You Consider Professional Plaster Services?
Regardless of the size of the damage, getting professional help can significantly ease the process. Professional plastering services will save you time and effort.
They are equipped with the right tools and expertise to ensure the repair is done well and quickly. Plus, they offer plaster installations which come in handy if you choose full plaster board replacement.
• Additional Resources to Educate Yourself on Plaster Damage
Education is a crucial prevention tool. Understanding how water affects different materials in your home can help prevent potential damage. Here’s a helpful source from the Environmental Protection Agency that delivers important information on how to deal with mold and other water-related damages.
By understanding the potential risks of water damage to plasterboards, you can prevent mold growth and protect your health and home. Quick action and a touch of professional help can make all the difference.
Assessing Water Damage
Before you even think about starting the repair process, it’s critical to determine the extent of your water damage.
Prolonged exposure of water to your plastered walls can be deceptively destructive, capable of penetrating all layers of plaster and ultimately saturating the lath. Skipping this crucial first step can result in skipped areas of damage, resulting in potentially costly future repairs.
• The Role of Professionals
Given the intricacy of some damage assessments, it’s often necessary to take a step back and contact a professional, especially in the event of serious flooding.
Professionals can bring an expert eye to the situation, specifically assessing any potential harm to the underlying wood or metal structures that may not be immediately visible from the surface.
A great recommendation for those living in Texas is Dry Force, which offers water and flood damage restoration services in San Antonio and other areas, not to mention assistance with insurance claims and other restoration solutions such as roof leak maintenance and mold remediation.
• The Art of Cleanup
Once you’ve ascertained the extent of the water damage and removed the damaged plaster, cleanliness is next to effectiveness. Use a stiff brush to displace loose particles and dust from the exposed wall surfaces, then vacuum up the remnants. This detailed cleaning ensures a smoother, better prep surface for subsequent repair stages.
• Primer Preparation
Follow up your cleaning routine by washing the area with clean water and a sponge. This ensures a clean and dry surface, best preparing it for the application of an oil-based primer-sealer. This step is vital to block any residual contamination and to prevent future stains from re-emerging.
• Applying Joint Compound
Your next step will involve applying several coats of joint compound. It’s advised to undertake this step in gradual phases, with sanding and repetition, to achieve the best results.
The aim here is to carry out a painstaking, painstaking repair process that will stand the test of time and be virtually invisible once completed.
• The Final Dusting
Once your layers of joint compound have been applied, it’s time for a last dust-off. Wipe off any remaining dust with a damp cloth before you paint your repaired wall, ensuring the surface is as clean and smooth as possible. This will ensure that your fresh coat of paint adheres properly and stays put.
• Reacting to Minor Water Damage
The guideline above primarily caters to severe water damage. But what about smaller, more manageable patches of water damage? For instance, if a plaster wall has only been subjected to small amounts of water, you can wipe it off with a dry cloth.
It’s important to quickly address these small issues to prevent the softening and loosening of the plaster. This not only heads off larger water damage repairs but is a good preventive measure against mold growth.
• Replacing Plaster Walls with Drywall
Now, in some severe situations, it may be best to completely replace the plaster wall with modern drywall. This can seem like a daunting task, but it’s sometimes the most efficient solution for extensive water damage.
When removing old plaster, remember to wear a dust mask and ventilate the room well. Also, remember that old homes may have layers of lead paint, so take precautions.
• Information and Guidelines for Lead Safety
It is beneficial to review safety guidelines related to lead-based paints, common in homes built before 1978, from resources such as the United States Environmental Protection Agency website at EPA.gov.
Ultimately, the process of repairing water-damaged plaster walls is a gradual, meticulous one, but thoroughness and attention to detail at each stage will ensure the best possible results and the highest chance of a near-invisible repair.
Visual Inspection of Water Damage
When water damage impacts a plaster wall, start by conducting a thorough visual inspection of the area. This step is fundamental as it helps evaluate the size and severity of the damage.
The decision of whether to go for a DIY repair or engage professional services significantly depends on the extent of the water damage.
– Removing Damaged Plaster
Once the inspection has been completed, the next step is removing the damaged plaster. This might seem like a daunting task, but with the right tools and steps, it can be executed efficiently.
A putty knife can be utilized to extract the damaged plaster. This versatile tool ensures that all loose and flaking particles are detached from the surface, leaving behind a solid base for repair.
– Brushing off Loose Particles
Post the removal of damaged plaster; it is necessary to get rid of any leftover particles. A stiff brush is highly recommended for this task. Brushing ensures the complete removal of loose debris from the wall’s surface. To ensure the best outcome, vacuuming the area is certainly beneficial.
A vacuum cleaner helps to eliminate the tiniest particles left behind, making the wall entirely clean and ready for the next repair steps.
– Cleaning the Surrounding Area
Next, the wall area surrounding the water damage should be carefully washed with clean water. A sponge works perfectly for this task, enabling a thorough and gentle cleaning of the surface. Keep in mind that prior to the next step, the plaster wall must be left to dry thoroughly.
– Application of Primer-Sealer
The execution of a successful plaster wall repair requires an oil-based primer-sealer application. This product helps prevent residual contamination and the bleeding of stains.
Apply it to the drywall and wait for it to dry completely. An excellent choice for this task would be KILZ-Original Oil-based primer-sealer available from The Home Depot.
– Repairing the Area with Joint Compound
After the primer-sealer is wholly dry, it’s time to apply the joint compound. The key is to apply it in thin coats and ensure that any excess compound is removed. Achieving a perfectly blended wall requires repeating this step a few times until an even surface is obtained.
– Sanding for a Smooth Finish
For an utterly seamlessly repaired wall, the next step is sanding. Sanding the compound should be done only after it is completely dry. The objective is to create a smooth, flawless finish, blending the repaired area with the rest of the wall. Repeat the process as many times as needed.
– Priming and Painting the Wall
Before you can proceed with priming and painting, make sure to wipe away any dust resulting from sanding. A damp cloth will suffice for this task. After this step, you can proceed with the priming and painting, ensuring a beautiful and uniform finish.
– When to Contact Professionals
If, at any point, it seems that the damage extent is too severe or that the repair process becomes too complex, it is highly recommended to contact professionals. Moreover, if uncertainty arises on how to proceed with the repairs, getting professional help ensures the best result.
• Safety in Water Damage Repair
While carrying out these steps, always prioritize personal safety. Remember to wear appropriate gear, such as gloves and safety glasses, when conducting any repair. According to the U.S. Consumer Product Safety Commission, specific safety protocols need to be observed to avoid harm.
• Final Thoughts
The process of repairing water damage on a plaster wall can be a time-consuming task. Still, with the right approach, it is indeed achievable. The steps outlined above will guide you accurately on a successful repair. Bear in mind that seeking professional help when needed can save you from further complications down the line.
• Effective Drying Techniques For Water-Damaged Plaster Walls
Plaster walls are incredibly sturdy and reliable over time. However, they are not exempt from potential water damage. Here are a few expert strategies that you might consider.
– Use Appropriate Ventilation and Fans
Proper ventilation is an essential step in drying water-damaged plaster walls. It facilitates the immediate evaporation of water, thereby improving the drying pace significantly. Never underestimate the role of airflow in this context.
When dealing with water damage, always ensure to ventilate the room adequately. Open all windows and doors around the space to allow fresh air to flow freely. Besides, the use of fans can boost air circulation.
Industrial fans, in particular, can greatly expedite the drying process. Increase your fan power and orient them towards the water-damaged walls for optimal results.
– Rent a Professional Dehumidifier
While fans and ventilation play a central role in drying plaster walls, sometimes they may not suffice. Here a professional dehumidifier could prove instrumental. You can easily rent this equipment from hardware stores.
Dehumidifiers work by removing excess moisture from the air, achieving a drier environment conducive to faster plaster wall drying. It’s a potent force in complex water damage situations where natural ventilation merely falls short.
– Repair the Leak Source First
Before you embark on repairing the water-damaged plaster wall, pay attention to the cause of the leak. This would be the source of your problem. All your drying efforts would be in vain without addressing this root cause first.
This water incursion point could be a faulty plumbing line, a roof leak, or a window leakage. It might range from a minor crack to a significant structural fault. No matter the cause, ensure it gets fixed, and thoroughly so.
– Identifying Water Damage on Plaster Walls
Water damage on plaster walls often presents with a host of symptoms. Familiarize yourself with these telltale signs.
- Discoloration: Water stains may manifest as yellow, brown, or another dark color on your plaster wall.
- Drip or Streaking Stains: Water typically seeps down, leaving a trail of drip marks along your wall.
- Efflorescence: This is a whitish, powdery deposit of salts on the surface of your plaster wall resulting from water intrusion.
- Flaking Paint: The integrity of your wall paint gets compromised with water damage, leading to flaking.
- Mold Growth: Moisture provides a conducive breeding ground for mold, a sure sign of water infiltration.
A reference from the University of Missouri Extension confirms that these are indeed characteristic signals of water damage.
– Professional Mold and Micro-Organism Growth Treatment
Despite the urge to handle everything by yourself, mold removal should always be left to professionals.
Given the health risks associated with mold exposure, trying to remove mold on your own could be detrimental. Certified technicians possess the necessary know-how and safety gear to execute this task deftly.
– Addressing Underlying Causes
It’s crucial not to lose sight of the underlying cause of water damage as you repair your plaster walls. This approach ensures a long-lasting solution to the water damage problem. Without this crucial step, you’re at risk of reoccurrence, which is time-consuming and costly.
• A Reliable Plaster Restoration/Repair Contact
From my experience, John Canning & Co. comes highly recommended for plaster restoration and repair services. Their professionalism and dedication to high-quality work make them a go-to reference in the plaster restoration industry.
A Comprehensive Guide to Repairing Water-Damaged Plaster
• The Destructive Effects of Water on Plaster
Water is a formidable foe to your home’s plaster. When water damage strikes, plaster can easily loosen and soften.
This degradation is disturbing enough, but there’s an even more frightening prospect the potential for mold growth. Mold, a serious health hazard that impacts indoor air quality, can sprout from plaster left damp for too long.
• The Hidden Menace Beneath the Surface
You also need to consider what’s happening beneath the surface. If water sits on the walls for a prolonged period, it’s not just the plaster you need to worry about.
The expansion of the wooden structure beneath may lead to unsightly cracks in the plaster. This infiltration of water compromises the integrity of the wall’s entire structure.
• The Process of Repairing Water-Damaged Plaster
Repairing water-damaged plaster requires some comprehensive steps. First, it’s crucial to find the source of the leak and stop it. It’s futile to make repairs to a wall that is still exposed to water intrusion. The once-damaged areas will merely succumb to water damage once more, wasting your time and resources.
Once the leak is quelled, begin by identifying all damaged areas. Then, check for fungus growth using a knife-like tool to remove mold. Follow this action by sealing the water damage with a special primer-sealer, acting like a protective shield preventing further water ingress.
It is then time to patch the area with new plaster. Remember, it’s essential that the new plaster matches the existing color. This step helps maintain a homogenous look, ensuring your wall doesn’t have an unsightly patchwork appearance.
• When is the Complete Removal of the Damaged Wall Necessary?
In extreme cases where extensive damage and cracks prevail, complete removal of the damaged wall may be needed. Here, installing a new plasterboard is recommended.
Although this may seem drastic, it helps restore the structural integrity of your wall while preventing potential issues from loose plaster or hidden mold.
• The Importance of Addressing Water Leaks Early
Before any repair process commences, it’s essential to resolve any water leak concerns immediately. Addressing water leaks before conducting repairs is crucial to prevent recurring issues.
Unfortunately, acting when the damage is done may lead to the reoccurrence of the same problems, which means more effort and more costs.
• The Need for Timely and Professional Repair
Swift action is key when dealing with water damage. The more the plaster is exposed to water, the more severe the damage becomes.
It’s also of utmost importance that you seek professional plastering services. The International Union of Bricklayers and Allied Craftworkers could provide a comprehensive directory of professional plasterers in your locale.
Such professionals come with the needed expertise and experience to appropriately deal with water-damaged plaster and prevent further damage.
• Conclusion
In essence, water damage on plaster is a serious issue that should never be taken lightly.
From causing loose plaster and potential mold growth to causing cracks due to the expansion of the underlying wooden structure, water damage can wreak havoc on the structural integrity of your walls and your home in general.
Thus, early detection, prompt action, and professional intervention can go a long way in ensuring a proper and effective repair of water-damaged plaster.
The Importance of Identifying the Source of Water Damage
Before diving headfirst into repairing a water-damaged plaster wall, it is important to recognize the source of the damage first. This helps to ensure that the problem won’t simply recur after you’ve worked hard to fix the restorations.
• Recognizing Water Damage
There are key signs that give away a wall’s water damage condition. This includes efflorescence, a white powdery deposit that appears on the surface of a plaster wall. It gives away the presence of excessive moisture behind the wall.
It is crucial to understand that efflorescence should not be taken lightly but as a serious sign of structural issues.
• Warning Signs: Loose or Flaking Paint
Another common sign to look for in water-damaged walls is loose or flaking paint. The moisture drenches the plaster, causing the paint to separate, bubble, or flake off.
This indicates that the wall has been experiencing water damage for a prolonged period. Therefore, it is vital not to ignore this sign as it could lead to far more serious damage to your wall structure.
– Mold Infestation Is a Major Warning
The presence of mold on your plaster wall indicates a significant moisture problem. Mold infestation requires professional removal and treatment. Ignoring this could lead to health risks from mold spores, which can cause allergic reactions and respiratory issues.
For quality information on mold and its harmful effects, the Center for Disease Control and Prevention’s official website is an excellent resource.
• The Consequences of Water Damage
Water damage can have serious consequences on your plaster wall. Apart from the unsightly appearance, it can lead to critical issues like mold growth and structural instability in the plaster.
In these cases, addressing the issue promptly is crucial. It not only involves repairs to the plaster wall but also necessitates thorough mold remediation.
• Choosing a Water and Mold Damage Restoration Company
When facing water damage, it is recommended to hire professionals to handle the restoration process. An experienced company like Restore Pro, known for its specialization in water and mold damage restoration, can be invaluable in these situations.
With their expertise and effective tools, they are capable of restoring the safety and appearance of your home from severe water damage.
• An Effective Approach to Damage Restoration
Coping with water and mold damage is no small task. To ensure the safety of your family and the longevity of your home, it is highly suggested to detect water damage before it becomes a major issue. Take immediate action at the first sign of damage such as efflorescence and flaking paint.
Handling mold infestation requires professional help. So, when any sign of such infestation appears, don’t hesitate to call in the experts. Prevention and professional intervention, when needed, can keep your home safe and sound.
Addressing Existing Water Damage
The first step to managing any water damage is to address any leakage or plumbing issues causing the damage. If you notice any water leakage in your house, immediately attend to them.
Ignoring them might not seem problematic at the moment, but they could potentially cause a severe issue like water damage to your plaster walls.
I recommend fixing any water leaks or plumbing troubles as soon as you spot them. In my experience, any delay can lead to extensive damage, causing more complications in the future.
Moreover, before you start any kind of repair work, ensure that the area is thoroughly dry. If the affected plaster wall is not dried properly, the moisture can prevent the repair from adhering properly and may cause problems later on.
• Speeding Up the Drying Process
The drying process can be a bit slow, but you can speed it up. How? Use a dehumidifier and ensure proper ventilation in the room. This will not only speed up the drying process but also prevent any moisture from accumulating in the wall.
I have personally found that opening windows and using fans for better air circulation also aids in quicker drying. The University of Missouri Extension provides useful tips on how to improve ventilation and effectively use a dehumidifier.
• Handling Severe Water Damage
Not all water damage is easy to handle. There can be instances where the water damage is severe and has affected the underlying structure of the wall. This is a sensitive issue and needs immediate expert intervention.
I strongly advise contacting a professional in such situations. They can conduct a thorough assessment of the damage and suggest potential repairs.
• Regular Inspection For Early Detection
The best way to prevent severe water damage is to catch it at an early stage. I recommend regularly checking your ceilings and walls for any signs of moisture or water damage.
Early detection can prevent any problems from getting worse and help you avoid expensive repairs in the future.
• Mold Management
Mold on plaster walls is a nightmare no homeowner wants to face. If you notice mold on your walls, it is best to approach a professional for removal. Improper handling of mold can lead to severe health risks.
I suggest hiring a professional since they are equipped with proper tools and use methods compliant with health and safety standards.
• Installing a Drainage System
Installation of a proper drainage system can help prevent water damage to your plaster walls. Redirecting the water away from your home will lower the chances of water permeating your walls. Take my word. It’s worth the investment as it saves you repair costs in the future.
• Choosing the Right Sealer
If you’re dealing with water-damaged surfaces, I advise you to use a primer sealer specifically designed for such surfaces. These kinds of sealers ensure that the water stains do not bleed through the new paint. It is essential for maintaining a fresh and clean appearance.
• Seeking Professional Help
Finally, if you are unsure about how to go about repairing the water damage on your plaster walls, don’t think twice before seeking professional help. DIY may seem appealing and cost-effective, but a professional can prevent further damage or complications.
During my tenure as a home improvement professional, I have always maintained that amateurs attempting repairs can lead to more extensive damage in the long run. Trust me, availing professional help will be worth your while.
Remember, dealing with water damage may seem daunting, but it is manageable with the right measures. Don’t let a leak turn into a flood of trouble. Proactive prevention and timely interventions can save your plaster wall and your pocket.
Water Damage to Plaster Walls
Water damage to plaster walls is a serious concern that, if neglected, can lead to extensive structural damage.
It is essential to address plaster water damage promptly to protect the integrity of your building and prevent costly repairs from being necessary down the line.
• Addressing the Source of the Leak
Prior to making any attempt at repairing the damage, it’s crucial to locate and fix the source of the leak. Left unchecked, the continuous water intrusion could further ruin the plaster and even compromise the underlying structural elements.
Once the leak has been patched, ensure the affected surface is thoroughly cleaned and air dried, as moisture remaining can exacerbate the issue.
Recommendation: A moisture meter tool can help ensure the affected plaster is fully dry before proceeding to repairs.
• Repairing or Replacing Damaged Plaster
When dealing with smaller water-damaged areas, patching up using a plaster mixture could do the trick. However, for larger damages, it may be necessary to replace the entire layer of old plaster with new plaster.
Ensuring the plaster is completely clean and dry, apply the new plaster, ensuring to blend it with the surrounding area seamlessly.
• Priming and Sealing the Surface
After the repairs, it’s crucial to prime and seal the surface for a couple of reasons. Firstly, it helps to prevent bleeding stains that can occur due to water damage. Secondly, it assures a smooth painting process.
So, apply a coat of primer and allow it sufficient time to dry before moving ahead with any painting.
• Remedying Persistent Water Stains
In some cases, water stains may still persist even after replacing the damaged plaster. In such situations, removing the stained plaster and replacing it with a fresh layer is recommended.
• Importance of Drying Before Painting
Before you pick up that paintbrush, ensure the plaster wall is properly dried. Painting over a damp plaster wall can lead to unsightly streaks or even promote peeling. Patience is crucial here.
• Evaluating the extent of Water Damage
Sometimes, the water damage on the plaster wall could be too extensive. In such cases, it may be more cost-effective and overall better, in the long run, to completely replace the affected area rather than attempting repairs.
• The Effect of Humidity on Plaster Walls
Among the many things that can affect the longevity of plaster walls, humidity stands top of the list. Plaster walls can hold moisture and become susceptible to damage and mold growth when the humidity levels are high.
A dehumidifier can help maintain optimal humidity levels in your home (source).
• Indicators of a Larger Underlying Problem
For instance, if you have something like bubbling plaster walls, this could be an indicator of a larger problem, such as a compromised damp-proof course or poor drainage. Seeking professional assessment can help detect and fix these underlying issues.
• Repairing Water-Damaged Cement Walls
Water-damaged cement walls can be repaired pretty similarly to plaster walls. You’ll need to identify and fix the source of water damage, repair leaks and holes using a sand and cement mixture, and then patch up any remaining cracks.
• Applying a Finish
When done repairing water-damaged cement walls, it could be necessary to apply a finish like drywall. This aids in improving the appearance and enhancing the durability of your wall.
By sticking to the above steps, you’ll go a long way in addressing water damage to your plaster or cement walls, preserving the look and functionality of your walls, and, ultimately, your home’s long-term value.
Addressing the Cause of the Leak
Identifying and fixing the underlying cause of a leak is integral before starting any repair works on water-damaged plaster walls. It prevents further water intrusions that can lead to more damage. It also aids in ensuring that any repair efforts made are not in vain.
The common causes of water leaks include plumbing issues, roof leaks, and basement moisture problems. You may require professional assistance to identify and fix these issues accurately.
The Environmental Protection Agency offers helpful tips on dealing with leaks and water damage here.
• Importance of Ventilation
Drying out water-damaged plaster walls can be hastened by proper ventilation. It facilitates faster water evaporation, which helps in minimizing the extent of the damage.
Installing fans or dehumidifiers can support this process. Fast drying is crucial as it helps prevent the growth of mold, which can lead to health problems.
• Removing Cracked Plaster
Cracked plaster in walls soaked due to water damage may require complete removal. This aspect of the repair process involves eliminating the affected areas, and it is a delicate process that requires careful attention.
The damaged plaster may come off easily due to the water damage, but some areas may still be holding firm. These portions should be systematically removed for the replacement of a new plaster layer.
• Use of Primer
When repairing water-damaged plaster, using a primer is the best way to avoid the re-emergence of water stains. Primers are designed to cover up any residual contamination that may exist after cleaning the walls.
Applying it before the actual paint helps in blocking any trace elements of contamination, thus preventing stains from being noticeable afterward.
• Cleaning and Drying Prior to Applying Patching Compound
Thorough cleaning and drying of water-damaged plaster walls is crucial before applying a patching compound. This step ensures that the patching compound adheres well to the wall and doesn’t latch onto dirt or existing contamination.
Cleaning may involve light scrubbing and washing while drying should include both natural air drying and the use of fans or dehumidifiers.
• Addressing the Source of Water Damage
Before commencing repairs, it is crucial to ascertain and address the source of the water damage. This source could be a leaky pipe, cracks in the walls or roof, or seepage from groundwater.
The United States Geological Survey has an excellent source of information on this topic. Only by addressing this source can future water damage to the plaster be prevented.
• Additional Tips on Repairing Water-Damaged Plaster
When it comes to repairing water-damaged plasters, there are additional tips and instructions to consider as part of the process. First, it’s vital to protect your personal items during the process. Cover your furniture or other items around the area you’ll be working on.
Second, use the right materials. It’s recommended to use a mixture of plaster of Paris and lime combined with water for patching damaged areas. This mix provides high durability and a smooth finish.
Lastly, after patching, let the plaster dry naturally. Avoid rushing the drying process with excessive heat, as it may lead to cracking and de-bonding.
Remember, professional assistance might be required when dealing with extensive damage. When in doubt, always consult an expert.
– Essential Tools for Plasterboard Repair
To repair a broken area of plasterboard, a range of tools would be necessary. Let’s begin with a keyhole saw or a similar cutting tool, ideal for precise cuts and easily navigating around the damaged area.
A chisel and mallet shine when it comes to gentle removal of the damaged plasterboard, just enough to replace it with a fresh piece.
Wire cutters are often underrated, but they can be vital to cutting the wire loop, helping in removing the plasterboard piece more easily. After this, you’d need a wooden dowel and a wire loop to secure the piece of metal lath that replaces the removed plasterboard piece.
– Perfect Finishing For Plasterboard Repair
Repairing is not just about fixing; what follows is equally important. Use a joint compound along with fine-grit sandpaper to smooth out the surface. Once it’s smooth and dry, wipe off the dust using a sponge for a clean surface, ready for paint.
Understandably, the quality of paint plays a significant role. We recommend EasyCare Ultra Premium Interior Primer/Sealer to apply first. After letting the first coat dry, apply a layer of EasyCare Ultra Premium Interior Paint for a finish that would blend the repair almost invisibly.
– Replacing Drywall Section – An Alternative Approach
In a situation where you can’t reach the damaged part of the ceiling, consider replacing the entire drywall section. This can be a more effective, though a little more labor-intensive process, but it ensures a complete resolution of the problem.
– Check for Potential Mold Infestation
Before you begin any repair, always be certain the wall or ceiling has no mold. Plaster walls can trap moisture, potentially leading to mold growth that poses health risks. CDC mentions this as a serious cause of respiratory problems if not attended to.
– Moisture Management – The Essential Precaution
Proactively managing moisture is key to avoiding future plaster wall deterioration. Keep your windows open as often as possible to allow trapped moisture to escape. In closed spaces, a dehumidifier and a fan together help significantly in reducing moisture.
– Proper Drainage For Wet Walls Prevention
To shun bubbling plaster, an efficient drainage system is crucial. This system should facilitate the proper flow of rainwater or snowmelt away from your property. If there are any noticeable cracks facilitating water ingress, those have to be addressed promptly.
– Damaged House Drainage – A Potential Threat
Visible damp spots on your ceilings and walls, especially starting from your cellar, likely signal issues with your home’s drainage system. This calls for immediate action to amend your drain system and prevent water damage.
– Addressing Leaks in Walls Efficiently
After identifying leaks and holes in your wall, hydraulic cement is an effective tool for fixing them. Post this, a product like Quick-Crete is recommended to patch up cracks on your cement wall.
– Providing a Smooth Finish to Cement Wall
Once the cracks are taken care of, the last step is to apply a finishing coat of drywall paste. This helps in smoothing any repaired areas on your cement wall, thereby providing a clean slate for painting and completing the repair.
Remember, timely repair is key to maintaining the health and aesthetics of plaster walls or ceilings. The correct tools and techniques can make the process simpler and much more effective.
Identifying and repairing water damage on plaster walls
As a material, plaster has been used for thousands of years due to its durability and versatility in home construction and decoration. However, plaster can hold moisture, which leads to water damage and makes it susceptible to mold growth (point 56).
Regularly checking for signs of moisture on plaster walls can help homeowners detect and prevent the troubling event of water damage before it escalates into a major home maintenance issue (point 54).
• Spotting water damage on plaster walls
When it comes to spotting water damage on plaster walls, a number of signs can alert homeowners. Among them, bubbling walls can be an indication of underlying water problems (point 57).
If you find that your wall is bubbling or bulging, it would be wise to address the situation promptly to prevent further complications. Refer to the National Library of Medicine’s page on mold exposure for more information on the health hazards of letting water damage go unchecked.
• Before you start the repair
Before embarking on any repair work on a water-damaged plaster wall, it is critically important to identify and fix the source of the water damage first (point 51). If left unchecked, the source can continue to create more extensive damage even after repair efforts are made.
Equally, ensuring that the wall is completely dry before you initiate any repair work is absolutely necessary. By using accurate ventilation and drying methods, you can ensure that the wall is in a suitable state to undergo repair work (point 52).
• Repairing a water-damaged ceiling
When it comes to ceilings, it’s crucial to remove any stains or indentations before you start painting (point 55). The reason for this is that any imperfections on the surface will show through the paint, spoiling the finish.
Do take note that working overhead can be more challenging, so make sure to take frequent breaks.
• Preparation for repainting damaged plaster walls
Before you apply new paint, you’ll want to prep the wall. At this stage, applying a primer and a sealer to the water-damaged area can prevent bleeding stains. It also ensures a smooth surface that’s ready for painting (point 53). Remember, a good paint job is all in preparation.
• Repairing water damage on a cement wall
Different materials require slightly different approaches. If you’re dealing with water damage on a cement wall, here are some key steps to take: Identifying and fixing the source of the water damage is again your initial step (point 58).
Once established, patching holes with hydraulic cement is recommended. Following this, applying a final finish, if desired, can give your cement wall that added protective covering.
In all scenarios discussed, remember that acting promptly and in the correct order will save you unnecessary extra work down the line.
Whether you’re working with plaster or cement, proper identification of the source of water damage, thorough drying, and good surface preparation are all crucial steps toward a successful repair free of water damage.
Assessing Water Damage on Plaster Walls
When it comes to plaster walls, water damage can pose significant problems. A primary step entails assessing the extent of water damage. This assists in determining the appropriate method for repair.
Substantive water damage may require engaging a professional. If water has been present for prolonged periods, structural risks are amplified.
For instance, the underlying lath or surrounding structures can be severely impacted. The lath is a wooden strip structure that supports the plaster. If compromised, this might negatively affect the wall’s integrity.
Therefore, in instances where damage has been overdue, the Institute of Inspection Cleaning and Restoration Certification (IICRC) recommends professional assessment.
• Steps for Repairs
Removing the Damaged Plaster
Begin the repair process by removing damaged plaster. Use a putty knife to scrape off the decayed plaster until reaching the firm portion underneath. Ensure not to use complex tools or exert excess force, which can lead to unwanted damage.
Cleaning the Exposed Area
After the damaged plaster removal phase, a stiff brush should be utilized to clean off loose particles. Further cleaning will require a vacuum to remove excess dust that may have been left during the scraping process. The cleaning phase is vital to clear the path for repair procedures.
Washing and Drying the Wall
The next step involves washing the adjacent area with clean water and a sponge. This process helps to remove any residual debris and prepare the surface for subsequent steps. It’s crucial to allow the wall to dry fully before proceeding to the next stage.
Priming and Sealing with Oil-Based Primer-Sealer
The dried surface should then be primed and sealed. An oil-based primer-sealer is recommended to prevent stain formation and block residual contamination. Ensure a thin and even layer of the sealer to enhance wall smoothness.
Applying Joint Compound
Afterward, apply several thin coats of a joint compound. The compound should be spread evenly over the damaged plaster area and any excess scraped off. The application process should be done carefully for a flawless final appearance.
Sanding the Compound
After drying, the compound should be sanded evenly throughout. Sanding creates a level surface integral for long-lasting repair. This process may need to be repeated to achieve the desired flatness.
Cleaning and Painting the Repaired Area
Once the compound is dry and the surface is smooth, clean off any remaining dust using a damp cloth. Lastly, paint the patched area to match the rest of the wall. This completes the repair process, ensuring the wall returns to its original aesthetic condition.
• Understanding Risks Associated with Water Damage
Water damage tends to soften and loosen plaster over time, leading to serious wall issues such as mold growth. If the walls become saturated with water, the wooden lath behind the plaster is at risk of absorbing water. This eventually causes cracking and weakens the wall considerably.
• Considering Plaster Wall Replacements
Various risks come with water-damaged plaster walls. In severe cases, replacement might be the best option. Replacing old plaster walls with modern drywall can save more costs and reduce the risk associated with continuous repairs.
• Professional Services for Water Damage Restoration
Professional services, as rendered by Dry Force, can help address different types of water damage, such as roof leak maintenance, burst pipe cleanup, sewage backup restoration, mold remediation, and storm damage restoration.
These services are comprehensive, including cleanup, repairs, and facilitating insurance claims.
Water damage is a severe issue that demands immediate attention. With the right steps and precautions, repairing plaster walls can result in a secure and visually appealing wall. Utilize the recommended steps for restoration or consider professional services in advanced damage cases.
• Managing Water Damage in Plaster
Water damage is a common problem that most homeowners face. It might seem innocuous initially but can lead to serious health hazards if not addressed promptly. Specifically, when plaster becomes the victim of water damage, it can foster the growth of harmful microorganisms such as mold.
– The Threat of Mold and Microorganisms
The molds and microorganisms that find their habitat in damp spaces can cause various illnesses and allergic reactions.
Although one might consider removing the mold themselves, it is advisable to hire a professional service. Experts are trained to eliminate mold thoroughly, ensuring the safety of the occupants.
The Centers for Disease Control and Prevention (CDC) offers valuable information about the health risks of mold and how to control its growth.
– Indications of Water Damage: Efflorescence and Flaking Paint
You should also be alert to aesthetic cues. Any signs of efflorescence, which appear as white salt deposits on the plaster surface, could potentially point toward water damage. Since it requires a more detailed inspection, it is wise to consult an expert to gauge the actual level of damage.
Besides efflorescence, flaking paint on plaster walls is another visible sign of water damage. It’s crucial to assess the underlying plaster for dampness before jumping into repairs. Making an impulsive decision could lead to unnecessary expenditures.
– Addressing Water Damage Dilemma: Professional Support
When you spot the signs above, take immediate action. It is worth investing in a reliable, professional plaster restoration service. Not only does this save time, but it also ensures that the root cause is adequately addressed.
Moreover, once the root cause is tackled, the professionals work on preventing further damage, thus ensuring long-term stability. They use advanced tools and follow standardized procedures to carry out the repair work, so you can rest assured knowing your home is in good hands.
– Choosing the Right Plaster Restoration Service
Choosing a professional service requires certain considerations. Just as you would not entrust your health to an inexperienced doctor, do not trust your home to just any contractor. John Canning & Co is a recommended name for high-quality plaster restoration.
Their proven track record and excellent customer service make them stand out in the industry. They ensure complete, efficient treatment and repair of water-damaged plaster, catering to homeowners’ specific needs.
Ensuring your living environment is safe and healthy is paramount. So, promptly address any signs of water damage.
By calling on professional help like John Canning & Co, you can safeguard your home and loved ones from potential health risks posed by mold and other water-induced damages. Remember, prevention is always better than cure.
• Have a Solution to Water Leakage
This article is about plaster damage caused by water, but another crucial aspect of this issue is the source of water. To curb water damage, the most effective way is to deal with the source. Fix the leakage from pipes, roofs, or any other possible areas before you move on to repair damaged plaster.
To identify possible water leakage sources, use thermal sensors. They detect moisture and help locate leaks. Once the source is located, seek professional help to fix the problem effectively. For more information on how to detect water leaks in your home, the U.S. Environmental Protection Agency provides useful resources.
By following this two-pronged approach addressing the source of water and repairing existing damage, you can protect your home and ensure its longevity.
Assessing Water Damage on Plaster Walls
Successfully dealing with water damage on plaster walls requires a thorough assessment. It’s important to take the time to properly scrutinize the extent of the damage. Start by taking a close look at the wall, carefully identifying damaged areas. Remember, patience is vital at this stage.
• Removing Damaged Plaster
After inspection, start isolating the damaged parts on your plaster walls or ceiling. For this, you need a putty knife. This tool helps gently scrape off bubbling, peeling, or flaking materials without causing more harm to the wall.
In addition, it’s necessary to remove any loose paintwork from the wall. Again, use your putty knife. The aim of this step is to eliminate any extra matter that may hamper your repair work.
• Cleaning the Affected Area
Next, take a stiff brush to clear off loose plaster particles. A vacuum cleaner can also be useful in this step. This process not only removes loose particles but also preps the work area for subsequent steps.
Once you’ve gathered up all the loose particles, wash the wall with clean water and a sponge. This action further clears the area and readies it for repair. Remember to promptly dry the area after washing; dampness could escalate the initial damage.
• Accelerating the Drying Process
To ensure the plaster wall is thoroughly dry, you can use a hairdryer. This tool will speed up the drying process. It’s an optional step but a recommended one, as it guarantees a much drier and cleaner surface for repair.
For larger-scale damage, professional-grade blowers are a good choice. Visit the U.S. Department of Energy page on home repair for insights on using such drying tools.
• Preparing the Wall for Repairs
Once your wall is dry, apply an oil-based primer-sealer. This step is important as it blocks residual contamination and bleeding of stains. It also creates a receptive surface for the repair material to adhere to.
• Repairing Damaged Plaster
To repair the damage, use a joint compound. This material fills and smooths the affected areas. Be sure to apply the compound in thin coats. Also, ensure unnecessary material is removed immediately after application. Using thin coats makes the repair less conspicuous and more durable over time.
• Sanding and Drying
After applying your joint compound, allow it to dry completely. Next, sand the dried compound. This process ensures a level and even surface. Remember, the ultimate goal is to make the repair blend seamlessly with the rest of the wall.
• Repeating the Process for Lasting Repairs
Depending on the extent of the damage, you may need to repeat the entire process – from the application of the compound to the sanding phase. Multiple iterations will probably be necessary if the initial damage is extensive.
Don’t forget to wipe away excess dust with a damp cloth before priming. The area must be cleaned and allowed to dry completely before proceeding.
• Painting Repaired Plaster Walls
The final step is painting. Match the paint to the rest of your wall. This will make your repair blend in with the existing wall, making the repair almost invisible.
• When to Seek Professional Help
In cases of extensive water damage, it’s advisable to seek professional help. Professionals can deal with severe water damage more effectively, using special tools and methods you may not have access to.
Remember, however carefully you follow these steps; your repair can only be as effective as your initial assessment. Wisely deciding when to call a professional can save you time, effort and prevent further damage.
• Recognizing Water Damage in Plaster Walls
Spotting water damage in plaster walls can sometimes be a tricky task. One key sign is often drip painting near breaks or openings in the wall, including windows or ceilings.
It’s as if the wall is crying, giving you a loud, visual clue of the damage that lies beneath. If you see paint that looks as if it’s weeping or seems to have had liquid dripping down, you might just have a problem on your hands – a potential water damage issue.
• The Alarm Bell: Efflorescence
Efflorescence might sound like a fancy term, but it simply refers to a white powdery substance that can accumulate on the surface of your plaster walls.
Often mistaken for dust or discoloration, efflorescence is a clear indicator of excessive moisture lurking behind your plaster wall. Don’t ignore this subtle sign. It warns of bigger challenges lying ahead.
• Loose or Flaking Paint: Another Indicator
We all admire a fresh coat of paint. But what happens when that lovely paint begins to peel or flake? When water damage sets in, the paint on your plaster wall is one of the first casualties.
As the plaster wall absorbs moisture, it causes the paint to lose its adhesive bond, resulting in peeling, flaking, or cracking. If the area underneath also feels moist to the touch, you can be almost certain you’re dealing with water damage.
• Mold Infestation: A Serious Concern
No, those green, black, or yellow patches on your wall are not some weird form of modern art. They’re molds – and their presence suggests prolonged moisture presence.
Mold thrives in damp environments, turning your moist plaster wall into a breeding ground. Mold infestation is a serious concern and should be addressed immediately, preferably by a professional a mold remediation expert to be exact.
• Facing The Consequences of Water Damage
If left unchecked, water damage can lead to dire consequences. Apart from an unappealing look, it can lead to mold growth, which poses health hazards to the home inhabitants.
Furthermore, water damage might undermine the structural stability of the plaster, causing crumbling, sagging, or even collapse. We surely don’t want that nightmare, do we?
• Diagnosing the Cause Before Repairing Damaged Plaster
Before swinging into action to fix the damaged plaster, it’s crucial to first investigate the underlying source of moisture.
This can be a result of faulty plumbing systems, roof leaks, or cracks in your house’s foundation. Ignoring this step is like mopping the floor while the faucet above is leaking; you’ll just be spinning your wheels.
• Hiring Professional Services for Water Damage Restoration
The damage caused by water can be overwhelming. It’s not unusual to feel out of your depth and unsure about where to begin.
When faced with this dilemma, I’ve found it’s best to turn to the professionals. Companies like Restore Pro specialize in water and mold damage remediation, restoring safety and aesthetic appeal to your home.
Restore Pro can be easily contacted through their website or Facebook page, and their expertise goes a long way in resolving any water damage-related issues. From assessing the extent of the damage to undertaking necessary repairs, they’ve got you covered.
For more information about water damage and plaster walls, here is a fantastic resource from the Environmental Protection Agency (.gov). It is an invaluable guide filled with sound advice and recommendations on dealing with mold and moisture in your home.
• Impact of Storm Season on Plaster Board
During storm season, water leaks through the roof can pose a potential risk to your home, causing significant damage to plasterboards. These seemingly minor leaks can escalate into more extensive damage if not promptly addressed.
• How Water Damages Plaster Board
The impact of water on plasterboard can have a destructive effect. As water penetrates the plaster, it softens and loosens it, leading to noticeable dampness on the walls. This damp environment encourages the growth of mold, further exacerbating the problem.
• Damage to the Wooden Structure
What you may not see but is just as significant is the effect of water on the wooden structure behind the plasterboard. Prolonged exposure to water causes the wood to expand, pushing against the plasterboard and resulting in noticeable cracks.
• Plaster Repairs: The Beginning
The first step in repairing a water-damaged plaster, based on my years of experience, is locating and rectifying the source of the water leak to prevent future issues.
• Removal of Damaged Plaster Board
Once the leak has been addressed, it’s time to deal with the damaged plasterboard. Damaged areas are scrapped off carefully using a sharp instrument resembling a knife.
This aids in removing the compromised plaster without causing unnecessary damage to the surrounding area. The EPA provides guidelines on how to handle mold-infested materials properly, which can be highly beneficial.
• Priming and Sealing
Up next in the process – is the use of a special primer-sealer. This is a crucial step in effectively sealing off the water damage and preparing the surface for a new coating of plaster.
• Applying a New Coating of Plaster
After priming, a new coating of plaster is applied to the affected areas. This acts as a healing balm, refreshing the previously damaged wall.
• Importance of Color Matching
It is essential to color-match the new plaster with the existing one to maintain the aesthetic look of the walls. This requires an experienced eye and a skilled hand to achieve.
• Smoothing Down the Surface
Once the color has been matched, the plaster is then smoothly polished and blended with the rest of the wall. This process ensures a seamless finish, making it difficult for anyone to spot the repairs.
• Handling Severe Plaster Damage
In cases where the damage is severe, resulting in multiple cracks, simply repairing might not be the solution. It may require installing a new plasterboard altogether. The affected wall is removed and a new plasterboard is installed after having addressed any water leaks.
• Importance of Prompt Action
Addressing water-damaged plaster promptly is imperative. The longer the delay, the higher the probability of extensive damage and incurred costs. This is why being vigilant and taking immediate action can prove to be a lifesaver.
• Professional Services for Plaster Repairs
Professional plastering services offer both repairs and installations for water-damaged plaster. Assessment of the damage severity and subsequent repair or installation is handled efficiently and expertly.
• Professional Help for Proper Property Restoration
As a homeowner, it is highly recommended to seek assistance from professionals when faced with water-damaged plaster. This ensures that your property is restored to its prior state or even better!
This step-by-step guide encapsulates the necessary processes to manage water-damaged plaster and highlights the importance of timely and professional intervention.