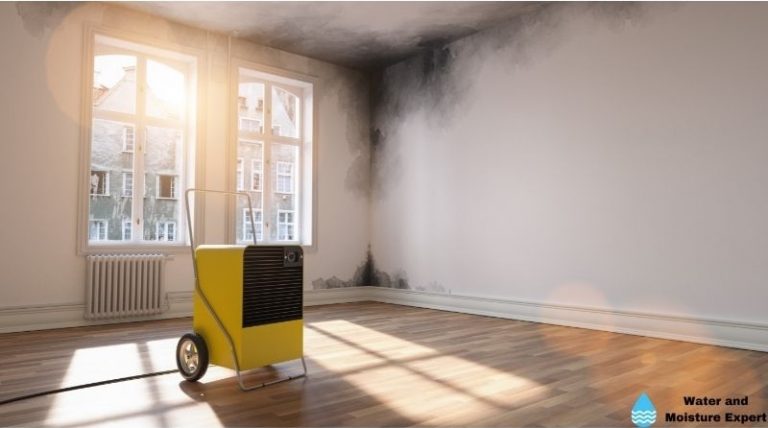
How to Spot Water Damage. Tips from Professionals
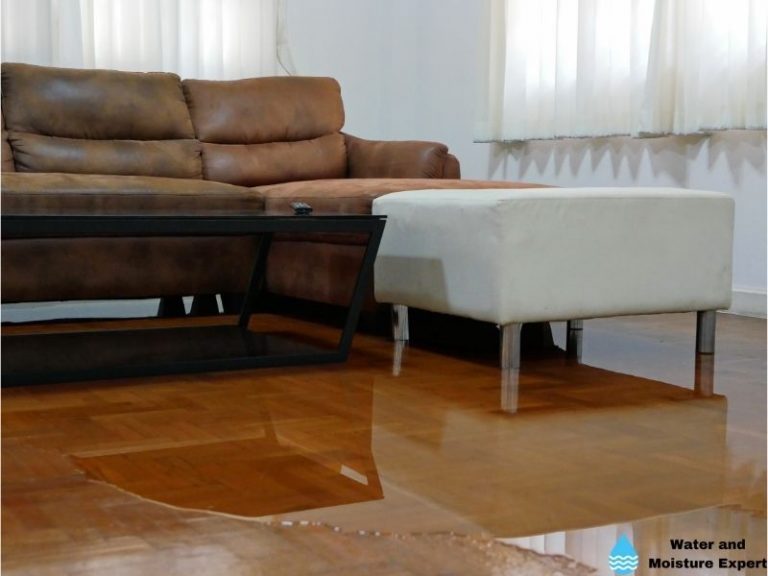
The most obvious sign of water damage is a wet carpet with standing water, but not all water damages are as easy to see. If you can’t find any standing water, but your house feels clammy, or there’s an odd musty smell, it can mean a water problem.
How to Spot Water Damage:
In some cases, water damage is easy to spot when water is dripping from your ceiling. But in many other cases, it can be challenging. But there are several signs that you can see that indicate potential water damage. They include condensation on windows and walls, bubbling paint, a bad smell, mold, and peeling wallpaper.
In this blog post, I will explain how you can detect water damage. What are the signs of water damage in your ceiling? How can you spot water damage under your floor or in your wall?
Contents
- 1 Does Water Damage Show Immediately?
- 2 Can You Detect Water Damage?
- 3 Early Signs of Water Damage on the Ceiling
- 4 Signs of Water Damage under the floor
- 4.1 ● Water damage under the floor: Buckling
- 4.2 ● Water damage under the floor: Crowning
- 4.3 ● Water damage under the floor: Cupping
- 4.4 ● Water damage under the floor: Discoloration
- 4.5 ● Water damage under the floor: Warping
- 4.6 ● Water damage under the floor: Odors:
- 4.7 You think you have a problem but can not find a cause
- 5 How to detect water damage in walls
- 6 What Do You Spray on Walls After Flood?
- 7 How Do You Know if Your Motherboard Has Water Damage?
- 8 Identification of Water Damage: the Telltale Signs
- 9 Identifying Paint Bubbles on Walls
- 9.1 • The Role of Primer in Preventing Paint Bubbles
- 9.2 • The Importance of a Clean Surface
- 9.3 • Water Bubbles: A Sign of Deeper Trouble
- 9.4 • Excessive Heat: A Hidden Culprit
- 9.5 • The Proper Bubble Repair Process
- 9.6 • Remember: Bubbles Often Don’t Disappear on Their Own
- 9.7 • When to Seek Professional Help
- 9.8 • The Role of Homeowners
- 9.9 • Calling in Professionals for Large-Scale Issues
- 10 Recognizing Water Damage in Walls
- 11 Impact of Excessive Heat and Moisture on Paint Bubbling
- 12 Understanding Blistering Paint: Causes and Solutions
Does Water Damage Show Immediately?
Unfortunately, water damage doesn’t always happen in an instant. It is a problem that may take a while to notice. The duration for identifying this problem in your home depends on the amount of water leaking. Large water leaks will be noticed almost immediately. Tiny leaks may take much longer before you spot them. Some can take weeks or more.
The size of the leak, the location, the type of leak, and the materials involved mainly determine how long before you notice the damage. More significant leaks allow more water to enter your home, which takes a shorter time to see. A minor leak inside a wall will take more time to show. And a material like drywall will show water damage much clearer than bare concrete.
Also, the type of leak can play a significant factor. A small crack in your roof that leaks during rain and a specific wind direction will be much harder to spot. Particularly when these specific circumstances only happen once in a while.
Can You Detect Water Damage?
When you see water dripping from your ceiling, it is clear you have a problem. But in some other instances, it will be much harder to know you have a problem. The faster you fix the leak, the less damage it can do. Knowing how to detect and see the signs of water damage can be a great help.
Some of the signs you should look out for when assessing for water damage include:
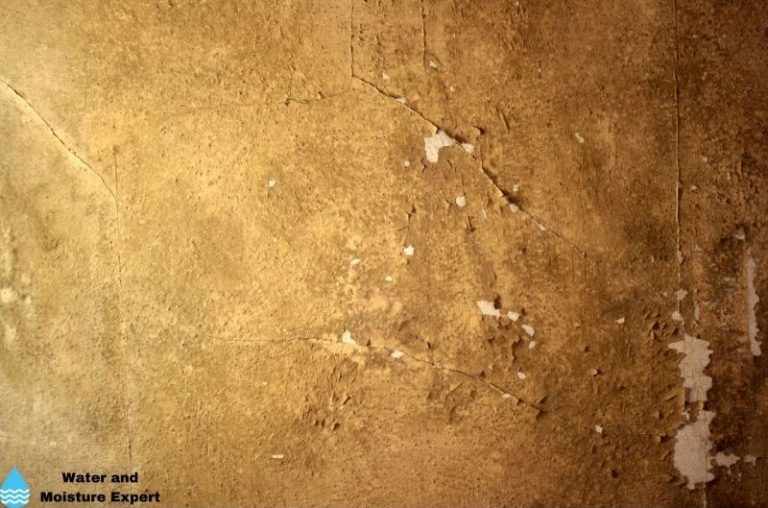
● Water Stains
One of the most apparent signs of water damage in your home is water stains. The size of these stains indicates the size of water leaks – bigger stains indicate bigger water leaks. These stains mostly show on the walls and ceilings. When assessing your home for water leaks and damage, ensure you pay adequate attention to the corners where the floors, walls, and ceilings meet. In case of any water stains or discoloration, take time to locate the source of the leaks and address them effectively.
Always use a suitable primer when you have found and fixed the water leak and want to repair the paint damage. The primer will form a layer between the new paint’s water-damaged paint. Without the primer, the water stain will be visible again.
● Dampness and Humidity
Unexplained dampness or humidity in your home is another telltale sign for an unidentified water leak. You should check for moist surfaces such as walls and counters that shouldn’t be accumulating any water. The culprit is a nearby leak that should be found and fixed.
Always know that water can travel quite some distance and travels downwards. I have seen cases where the leak was in the roof but only showed near the floor. The water found its way through the wall and did not cause visible damage until it reached the floor.
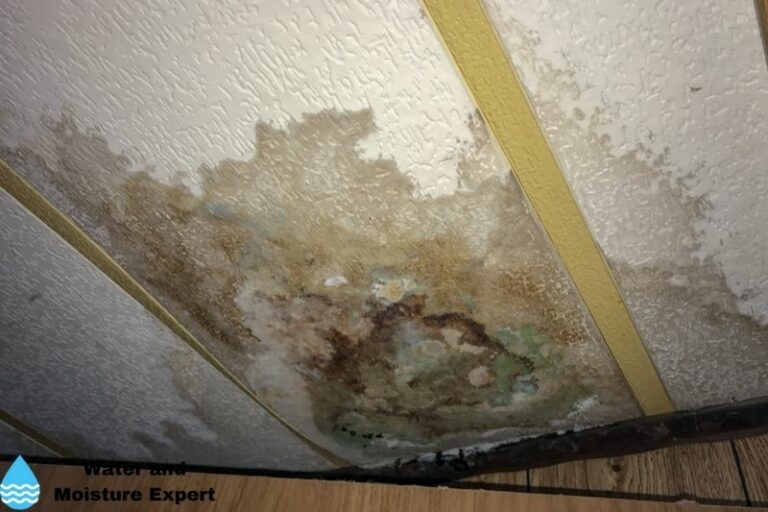
● Mold
Mold is another symptom of water damage in your home. It thrives in damp and moist places, which explains why it likes water leaks. Mold is linked to many health issues, including allergic reactions and respiratory and skin conditions.
Visible mold can indicate water leaks in your home but can also result from humidity issues. Either way, it should be addressed immediately to mitigate its effects. After fixing the source, you still have to remove the mold. When mold is also inside your wall or ceiling, particularly with porous materials, I recommend asking a professional for help. Do not underestimate mold.
● Dripping/ Strange Noises
Every homeowner is familiar with the sound of dripping water. However, leaking water sounds can be deceptive, which necessitates why you should be cautious about every water sound you hear.
The ideal time to listen to assess water sounds in your home is at night – when it is quietest. Besides, you can also identify these leaks by rushing or scratching noises.
● Paint Damage/ Soft Spots
Paint and wood are highly vulnerable to water damage. Therefore, it is vital to focus on them when assessing your home for water damage. Some of the features to look out for include peeling paint and warped floorboards, mainly resulting from water damage.
These effects can also affect walls and ceilings, especially the wooden and painted ones.
● Health Issues
Mold is linked with many health issues. If you have health issues with unknown causes, do a mold check. It does not mean mold is the cause, but it better be safe than sorry. Assess the property for water leaks when home occupants suddenly start having symptoms that could be related to mold.
Delays in assessing and fixing the water leak source often result in more extensive damages. Addressing these damages as early as possible is the key to saving money and safeguarding your home occupants from potentially severe health concerns.
Early Signs of Water Damage on the Ceiling
The ceiling is one of the most affected areas from water leaks, particularly the ceiling under the roof. It is among the primary places you should consider when assessing your home for water damage. Understand that the leak itself does not need to be right above the visible damage. Particularly with a sloped roof, water will find its way down.
Some of the signs to look out for when assessing the ceiling include:
- Discoloration – yellow, brown, or copper stains
- Sagging
- Mold or mildew
- Newly formed cracks
- Peeling paint
Ceiling water damage may result from roof leaks. Act as you identify one or more of the above signs on your ceiling. If you do not know how to do it yourself, ask a professional for help. They have a lot of experience and often can find the culprit quickly.
Signs of Water Damage under the floor
Water damage under the floor can be challenging to spot. After a natural disaster like a flood, most homeowners will understand that there can be a problem under their floor. If you have a crawl space under your floor, it is the best place to check for issues. Standing water is, of course, something that should be handled immediately. In case of severe moisture, try to locate the source.
But if the cause is not that obvious, and you do not have a crawl space, you can look at other signs:
● Water damage under the floor: Buckling
Buckling occurs when your flooring detaches from the subflooring underneath. Your floor can either peel upwards or separate at the seams.
● Water damage under the floor: Crowning
Crowning occurs when the flooring shrinks due to a loss of moisture. It shows on the floor as rounded planks with the mid-part high and the edges low.
● Water damage under the floor: Cupping
Cupping is the opposite of crowning. Your flooring absorbs moisture, resulting in the plank edges curling upwards and the middle section slightly depressed.
● Water damage under the floor: Discoloration
Color changes are a sign of mold or mildew, no matter how small. Always inspect your flooring for new stains and discolored dark spots for mold growth.
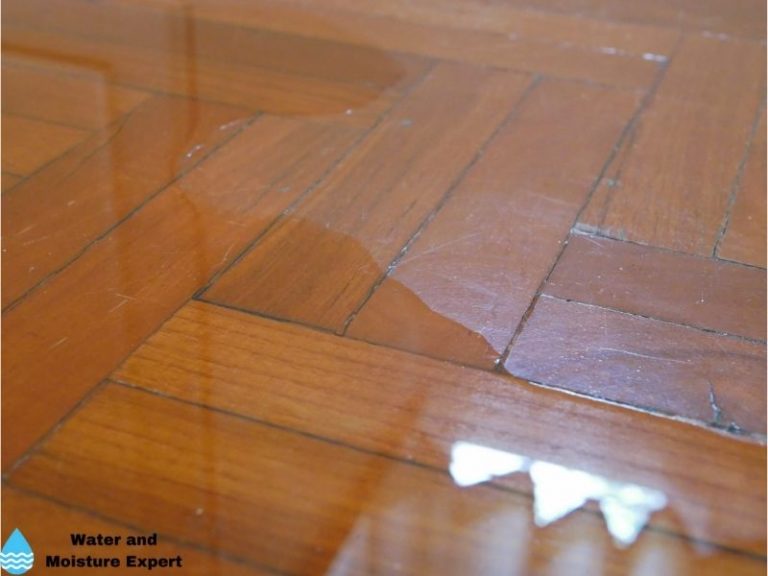
● Water damage under the floor: Warping
Any strange incidents of peeling, cracking, or bubbling in your flooring are a sign of water damage.
● Water damage under the floor: Odors:
Mold and mildew are characterized by unusual odors in your flooring or subflooring. When you notice strange smells, always try to find the cause. It will be a false alarm in many cases, but it is essential to fix this when the odor is caused by mold.
You think you have a problem but can not find a cause
There are situations where you just have a feeling something is not ok. But somehow you can not find the reason. In that case, I recommend asking a professional for help. The sooner you find the reason, the cheaper it will be in the end. In many cases, water damage will only get worse and can even cause floor collapses or other nasty things.
And in case there is no problem, knowing this can feel like a big relief.
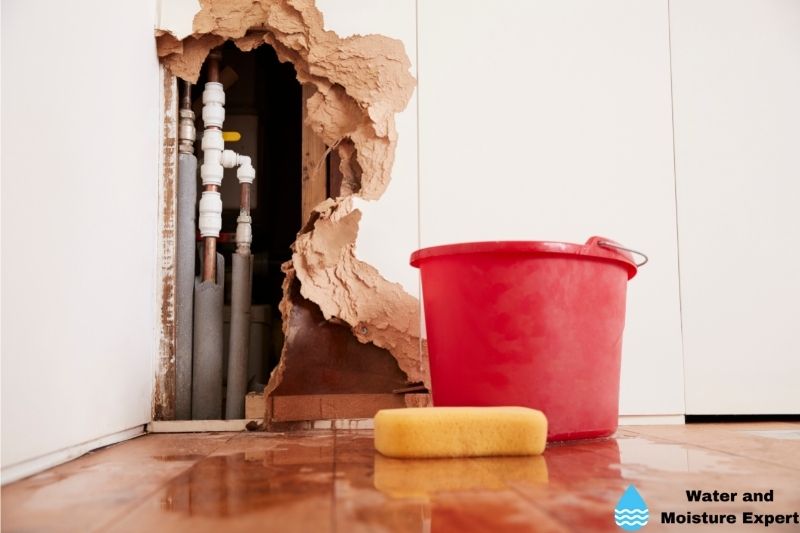
How to detect water damage in walls
Water damage in walls can be hard to detect. If water is dripping from your wall or your paint shows watermarks, it is clear you have a problem. But if that is not the case, there are various signs that will show you have a problem.
Here are a few things to look out for when checking your home for water damage in your walls:
- Musty odors: These odors occur due to excessive water absorption into drywalls, among other related materials.
- Mold growth: The occurrence of mold on your walls without any known plumbing repairs is a sign of an underlying water leak. Locate the leak and fix it immediately to prevent further damage.
- Visible signs: It is possible to identify a water leak in your walls through visible signs such as peeling wall paint or wallpaper, warped walls, and water stains.
Know that most water damages don’t happen overnight. Often it starts really small and gets bigger over time. Until it is big enough that the signs are visible. With this type of water damage, always do a thorough check for mold.
Mold can be difficult to detect and can be present inside your wall. If you are unclear how to do this, I recommend asking a professional for help. And always fix the leak first. When the water damage signs suddenly go away, it probably means they will return as sudden another time. Leaks don’t fix themselves (normally).
What Do You Spray on Walls After Flood?
Floods are among the most severe causes of water damage and mold. It is advisable to take adequate protective measures to prevent mold after floodwater damage, especially on walls and floors. Spraying household chlorine on the wall studs is one of the effective measures.
Despite being readily available and an affordable disinfectant, household chlorine can kill a range of bacteria and mold. As a result, this protects your home from the adverse effects of mold and mildew after water damage.
But before starting, ensure the walls and floor are really dry. Open doors and windows, use a fan. You can use a dehumidifier to shorten the drying speed further. To fight against mold, proper ventilation is key. And I recommend thoroughly cleaning the surface before spraying the concentration. Use appropriate eye and hand protection when working with chlorine.
How Do You Know if Your Motherboard Has Water Damage?
The motherboard is your computer’s brain. It connects the vital components in your machine allows them to work together for effective performance. However, water is the biggest enemy of electronics, and your motherboard is no exception.
In the event of water damage to your computer and motherboard, you should look out for the following signs:
- Corrosion: Corrosion near the solder joints. This is a clear sign something has happened.
- Moisture outside: Moisture outside the computer or laptop. Particularly near the location where the air is blown out of the computer or laptop.
- Moisture inside: Moisture inside the computer case.
- Bubbles: Bubbles under the computer screen
- Discoloration: Discoloration near the motherboard
- Sticky keyboard: In the case of a sticky keyboard, you know something has happened. If you have a separate keyboard, check the computer if it has a problem. If you have a laptop, you can be pretty sure that the electronics under the keyboard have a problem.
If your computer or laptop suddenly stops working, it is clear there is a problem. If you expect water damage do the following:
● Step 1. Powering down:
Power down the computer immediately. I recommend doing this quickly by just pressing and keeping the power button pressed. This will turn off the computer immediately.
● Step 2. Disconnect the power:
Disconnect the mains from the computer. In the case of the desktop, remove the cable at the back of the computer. In the case of a laptop, disconnect the power supply and the battery if possible.
● Step 3. Wipe clean:
Wipe off any excess liquid with a dry cloth or towel
● Step 4. Let it dry:
When all excess liquid has been removed, let the computer dry. If you open the case, this will go faster. But take your time. Try to avoid powering on too quickly. You want to ensure all moisture is gone. And this can take several days.
● Step 5. Turn on:
If you have ensured that the water and moisture have gone, you can try to turn on the computer. If the amount of water was small and you acted quickly, it often will still work. If it does not work, I recommend bringing it to a computer repair shop for a professional analysis and assessment.
● Remark:
Even when your computer works fine after the incident, it does not mean that the water did not do any damage. Corrosion is something that can start and result in problems after some time. If you know what you are doing, you can clean the electronics. Or ask a professional for help.
Identification of Water Damage: the Telltale Signs
It’s crucial to identify water damage in your home before it escalates from an easily manageable issue to a full-blown catastrophe. A common sign of water damage is discoloration on walls. This can often indicate the growth of mold and mildew, which are caused by an abundance of moisture.
Typically, the discoloration manifests as patches of varying colors (usually brown, yellow, or green). The longer they’re left untreated, the larger these patches can grow. And this isn’t just a visual blight.
Prolonged exposure to mold and mildew can range from mild irritation to potential health risks such as breathing difficulties or skin reactions.
• Peeling Paint: More Than Meets The Eye
Have you ever noticed paint that’s blistering or bubbling up on your walls? It might not just be an old, underperforming coat of paint. Such anomalies frequently occur when moisture becomes trapped beneath the layers of paint.
When trapped moisture has nowhere to escape, it causes the paint to lose its grip on the wall, forming unsightly bubbles. This doesn’t just mean a fresh coat of paint is needed. It’s a strong indicator of underlying moisture issues that could be causing significant, stealthy damage to your property.
• The Invisible Enemy: High Humidity
We don’t always associate water damage with an invisible aspect like humidity. However, high levels of humidity in your home can lead to condensation on cold surfaces like windows. This scenario provides the ideal breeding ground for mold, leading to further damage.
In addition, this humidity-induced condensation can negatively affect the adhesion of paint to your walls. Over time, you may notice parts of your wall showing signs of peeling or blistering paint – once again indicating those underlying moisture problems.
• Proactive Approach: Tackling Water Damage Early
The importance of addressing water damage issues cannot be stressed enough. It can prevent more severe damage and potentially save homeowners hefty repair expenses.
The timely intervention also curbs the development of other problems like mold growth. Ideally, homeowners should not delay once they’ve noticed any signs of water damage. My recommendation, based on years of experience, is to react promptly at the first signs of trouble.
• Calling In The Experts
Sometimes, water damage issues require more than a DIY fix. It may be necessary to seek professional assistance to ensure the problems are resolved safely and efficiently.
Professional water damage restoration services possess the expertise to identify, assess, and remedy both visible and hidden water damage. They own specialized equipment to aid in dehumidification, drying, mold remediation, and other repair processes.
It’s worth noting that some water damage can be covered by homeowners’ insurance policies. Therefore, a professional assessment can also aid in accurately documenting the extent of damage for claims purposes.
For more information on water damage and mold-related issues, you might find The U.S. Environmental Protection Agency a useful resource.
• Final thoughts
In summary, monitoring your home for signs of water damage, such as discoloration on walls, blistering paint, and the effects of high humidity, can make a substantial difference. Moreover, it is always beneficial to address water damage issues promptly and even seek professional help if necessary.
By paying attention to these telltale signs, homeowners can maintain the safety and well-being of their properties while curbing unnecessary expenses. Remember, prevention and timely action are the best defenses against water damage.
Identifying Paint Bubbles on Walls
Paint bubbles on your walls are more than a slight inconvenience. Often, these bubbles indicate underlying water damage or the presence of mold. It’s critical to understand what these bubbles mean, treat their root cause, and prevent their reoccurrence in the future.
• The Role of Primer in Preventing Paint Bubbles
Pre-paint preparation is key. To prevent paint bubbles, applying a primer before the paint is highly recommended. A primer ensures that your paint adheres smoothly to the surface, reducing the chances of developing bubbles later on.
It acts as a shield between the surface and the paint, providing the perfect condition for long-lasting smooth paint.
• The Importance of a Clean Surface
Even the highest-quality paint will not adhere properly to a dirty surface. This can lead to the formation of paint bubbles. To avoid this issue, thorough cleaning of the walls is required before any painting task.
This process will ensure that the paint sticks to the wall properly and reduces the chances of bubble development.
• Water Bubbles: A Sign of Deeper Trouble
Water bubbles under the paint are a clear sign of a water leak or excess moisture in your wall. This issue should be addressed immediately.
Not just because it causes annoying bubbles but, more importantly, because it can lead to other significant problems like fungus and mold, find the source of the leak or moisture and rectify it before you embark on a repainting project.
• Excessive Heat: A Hidden Culprit
Excessive heat can be another sneaky cause behind paint bubbles. Heat can cause the paint to expand and form bubbles, especially if the paint was applied in less-than-ideal conditions. If this is the issue, try to find a solution to the heat issue before resorting to repainting.
• The Proper Bubble Repair Process
If you encounter paint bubbles on your walls, don’t be tempted just to pop them and ignore the issue. The appropriate response is to first clean the affected area, sand it down, repair it with joint compound and then repaint the surface.
You can follow the EPA’s guidelines for repainting surfaces for a safe and smooth job.
• Remember: Bubbles Often Don’t Disappear on Their Own
Many homeowners might hope that paint bubbles will go away on their own over time. Unfortunately, this is usually not the case. Most bubbles need to be repaired to restore the smooth finish of your walls.
• When to Seek Professional Help
If, during your paint bubble repair process, you discover a larger issue, such as severe water damage or mold, don’t hesitate to seek professional help. Large-scale water damage and mold remediation are complex issues that require the work of professionals to ensure they are properly managed.
• The Role of Homeowners
Homeowners play an important part in maintaining the condition of their walls. It’s their responsibility to identify the cause of paint bubbles, ensure the necessary repairs are carried out, and oversee the process of fixing the bubbles.
• Calling in Professionals for Large-Scale Issues
While DIY can solve minor issues, larger ones like water damage and mold remediation may require professional help. Professionals have the right equipment and experience to treat these large-scale issues efficiently and effectively.
Recognizing Water Damage in Walls
• Spotting Softened Drywall
An important sign of water damage to be watchful of is softened drywall. If you start to notice that your walls yield easily under slight pressure, it’s likely that water damage is present. Drywall typically becomes soft and loose when subjected to moisture over time.
Additionally, signs like buckling or depression are clear indicators of water damage causing the structural integrity of your wall to dwindle.
• Attending to Bubbling or Cracked Paint
Another symptom of water damage in walls that you should look out for is bubbling or cracked paint. If you see that your wall paint is starting to form bubbles or cracks, more often than not, it’s a sign of lurking water damage.
However, larger bubbles shouldn’t be disturbed as they could potentially lead to further damage. Here, it would be best to call in professionals who are equipped to handle such situations tactically.
• Identifying Discolored Drywall
The most common sign of water damage in walls is discoloration in your drywall. Moisture exposure over time can give your walls an unsightly appearance with streaks marred by stains and discoloration.
If these lines of discoloration run down your wall from the ceiling, it may imply that the water damage has become quite extensive.
• The Need for Professional Assistance
It is strongly recommended to contact a professional to assess the aftermath of water damage to your walls. By hiring a professional, you can ensure a thorough inspection for potential issues like mold, rotting, and electrical problems associated with water damage.
There is a highly credible professional based in the Atlanta, Georgia, area who provides free assessments for such water damage emergencies.
• Using Dehumidifiers for Drying Walls
Post the unfortunate incident of water damage, using a dehumidifier can be a saving grace to dry out your walls. Furthermore, carefully blotting your walls will help absorb the excess moisture, further aiding the drying process.
However, remember that while this may address the surface-level moisture, it may not work for deeper, hidden water damage.
• Addressing Water Damage Promptly
One should never delay the treatment of water damage in walls. Timely attention prevents hidden damages that could pose potential threats like fires and mold growth.
Water basically acts as a catalyst to hasten the deterioration process, making the structure weak and more susceptible to larger risks like breakage or even collapsing in extreme cases.
It is a must to address the water damage immediately as it not only affects the aesthetics of your house but also increases the potential for dangerous problems such as mold, which can impact your health. The Center for Disease Control affirms mold proliferation due to moisture can lead to many known health risks.
In view of all the above information, it is evident that being aware of these signs and acting promptly is crucial in managing and alleviating the impact of water damage on walls. An early response can save you from extensive repairs and ensure your home remains a safe and happy space.
Impact of Excessive Heat and Moisture on Paint Bubbling
Based on my experience, paint on your walls can be surprisingly sensitive. This is particularly true when considering the influence of temperature changes. Excessive heat is one of the main problems. It can lead to a problem known as “paint bubbling”.
This refers to areas where the paint lifts from the underlying surface, resulting in an unsightly and cracked finish. This usually occurs when paint loses its adhesion due to heat or moisture. Notably, these effects aren’t limited to only indoor settings but also occur in outdoor environments.
• Bathroom: A Vulnerable Space
This issue of paint bubbling becomes noticeably problematic in spaces that are constantly exposed to dampness, such as the bathroom. With repeated exposure to moisture due to the excessive use of warm water combined with poor ventilation, your walls are more prone to paint bubbling.
In severe cases where the wall and floor damage is substantial due to persistent exposure to heat and moisture, a bathroom renovation may be required.
This comprehensive solution helps address not only the aesthetic concern but also focuses on fixing the root cause of the issue. This triggers the need for a thorough inspection to ensure it doesn’t recur.
• Shower Leaks and Paint Bubbling
A hidden issue that needs your attention is water leakage from your shower into the wall cavity. Over time, this continuous leaking can lead to paint bubbling behind the shower even if the rest of your bathroom settings seem unaffected.
It is a subtle yet alarming sign of water leakage that must be addressed promptly to avoid significant repair costs.
• Faulty Plumbing and Paint Bubbling
Paint bubbling isn’t restricted by boundaries. Cracked pipes, failed seals, or loose connections inside wall cavities can cause paint bubbles in areas of the house other than the bathroom.
It’s important to routinely inspect these hidden areas, either by yourself or with professional help. Early detection can save you from more extensive damage and high repair costs in the future.
• Overcoming The Temptation of Quick Fixes
In my professional opinion, sanding back the wall and repainting it is often misconstrued as a solution. This appears to fix the problem for a while, but it’s merely a superficial and temporary solution. According to an expert opinion from Nu-Trend, this common approach is not advisable.
• Importance of Addressing the Root Cause
While it may seem like additional work, the effort to repair the cause of paint bubbling is vital to prevent such incidents from recurring.
You need to ensure the root cause is eliminated, whether it is cracked pipes, a leaky shower, or excessive moisture build-up due to poor ventilation. Only then can you achieve a long-lasting and satisfactory result.
• Availing Professional Help
A good example of professional assistance in this area comes from Nu-Trend, which offers free site assessments and repair quotations. Expert consulting with pros like them can help diagnose the underlying issues and suggest the most efficient solutions for your paint-bubbling problem.
For those looking for additional resources on property maintenance, consider visiting home maintenance tips by the U.S. Department of Housing and Urban Development, a reliable .gov source.
The website (URL) provides a wealth of information and advice, particularly in tackling home-related issues such as paint bubbling.
In conclusion, regardless of the reason, paint bubbling is a largely preventable issue. By paying attention to your walls’ condition and seeking professional help when required, you can maintain the aesthetics while increasing your home’s longevity. As they say, prevention is better than cure.
Understanding Blistering Paint: Causes and Solutions
Blistering paint is a common wall defect that often mystifies homeowners. It’s caused by the top coat of paint failing to adhere properly to the surface beneath, such as plaster or primer.
While visually unappealing, blistering paint is typically a surface-level issue that doesn’t indicate any underlying structural problems.
• What Causes Paint to Blister?
Several factors contribute to blistering paint. One common cause is the use of mismatched types of paint. If you apply a water-based paint over an oil-based one, for instance, the top coat may not adhere well, leading to blistering. This problem also arises when a wall is painted without a primer coat first.
Incorrect painting practices can also cause blistering. Painting over a greasy surface, in humid conditions, or in direct sunlight can lead to this defect. It’s also crucial to avoid using the wrong roller or stirring the paint too quickly, as these can interfere with paint adhesion.
• Internal Wall Bubbling vs. Blistering Paint
While blistering paint may seem like a mere cosmetic issue, beware of internal wall bubbling. This problem, common in historic homes made of brick, indicates water penetration and demands quick attention. Unlike blistering, bubbling plaster is typically caused by damp conditions.
Upon detecting bubbles on your wall, it’s essential to rule out structural issues. Bubbling plaster can bear a striking resemblance to blistering paint, so careful analysis is needed.
Internal wall bubbling can spring from various sources, including leaks from the roof or around windows and door frames, moisture-wicking from the ground, poor attic ventilation, plumbing leaks, improper insulation between the lath and exterior brick, and deteriorating exterior brick and mortar.
• Repairing Internal Wall Bubbling
Before initiating repairs, you must address the underlying moisture source. Otherwise, the bubbles will keep reappearing. If external factors contribute to moisture penetration, appropriate outdoor repairs are essential to prevent future occurrences.
Fixing bubbling plaster isn’t easy. It requires delicate repair techniques, starting from the center of the damaged patch and removing the affected material layer by layer. This process continues until you reach plaster with intact integrity.
Proper cleaning of the sub-surfaces and surrounding area afterward ensures an even surface for refurbishing. Then, seal the water-damaged section. The repair process culminates in a fresh plaster application, which is then sanded smooth and sealed with a primer sealer.
However, be cautious, as removing plaster can damage the underlying structure, especially if it’s attached to the lath or directly on the brick.
• Addressing Exterior Brick and Mortar Damage
Brick or mortar damage is a more severe issue. It necessitates specific tools and skills for successful repair. Depending on your home’s heritage, you may opt to leave the exposed brick as a feature, enhancing the building’s historic charm.
Nevertheless, it’s important to follow professional guidance when dealing with these intricate issues. Tuckpointing experts are ideal for such repairs, and they can help retain the aesthetics while keeping your home structurally sound.
For those residing within the Washington DC area, one highly recommended company is Renaissance Development, which specializes in historic masonry. They can assist with the correction of exterior brick facade issues and home restoration endeavors.
Further understanding of wall bubbling or blistering issues can be found in this resource provided by the National Park Service (a .gov website), which explains how to address paint problems in historic buildings.
The key to dealing with both blistering paint and wall bubbling is understanding their causes and using professional techniques and help when needed. Swift action prevents small issues from escalating into serious structural problems that threaten the safety and charm of your beloved home.